You know how it goes. I’d get the kids up and ready for school, run the stress gauntlet of breakfast, get them moving, get my mum up and breakfasted, then myself ready for the day. By 9am, all I wanted to do some days, was put my head back down and sleep for hours. I ate as little as I could, given that I had terrible cravings, but still gained weight.
It did my head in.
Then…
When I got checked up recently for diabetes, other blood tests were done at the same time. What that meant, is that I’ve found out my thyroid was blown, and probably has been for quite a while.
I’m not hugely under at the moment, but it’s low enough that it’s been causing me problems. I just didn’t know what to look for at the time.
I should have known better as my mother has been underactive for many years, but hers was knocked out as a result of treatment for an overactive thyroid.
Underactive thyroid, or hypothyroidism is easy to miss in the early stages. I had no idea. At all. I knew I was tired, and finding end of the day difficult, although I couldn’t fall asleep, but I put that down to caring for three kids, one with special needs, and two elders with dementia.
The symptoms can be mistaken for other things, so it’s worth knowing what to look out for. Since I’ve been put on Thyroxine, the pain I had 24/7 in my thumbs seems to have taken a walk off a cliff, leaving me pain-free, but that could also be due to having the diabetes more under control now. I’m keeping my fingers crossed that it stays like that.
Symptoms Can Include
- Weight gain.
- Extreme tiredness.
- Sensitive to cold.
- Depression.
- Slowing down of movement and thought patterns.
- Muscle aches.
- Cramps.
- Dry skin.
- Brittle nails and hair.
- Pain and numbness in hand and fingers.
What Does The Thyroid Do?
Our thyroid regulates our metabolism. The butterfly shaped gland in our necks is responsible for almost everything our bodies. In other words, the hormones produced by the thyroid are dumped into the blood stream and are necessary for all the cells in our bodies to work properly.
An unbalanced thyroid will interfere with the way your body uses fats, and can make our body cells work slower than normal in hypothyroidism.. I’ve often been given sideways glances when I said that I put weight on around 1200 calories a day, and couldn’t understand why. No-one ever believes you. They really do think you’re trying to make excuses for putting on weight, or think you’re just lazy. Now I know I wasn’t going mad…..
When the cells slow down, so does the heart rate, and can increase the risk of heart disease, increase the levels of cholesterol in the blood and cause fatty deposits to build up in arteries. For that reason, it’s important to get diagnosed if your thyroid is out of sync.
Diagnosis
Diagnosis is quite a simple blood test, that shows the levels of T3 and T4 hormone in our blood. The doctor can tell immediately if you have it, by your results.
The Future
As hypothyroidism is often a result of our own immune system malfunction, treatment is usually needed for life. The drug of choice seems to be Levothyroxine, and I can feel it helping already, despite only having taken it for a fortnight so far. The disease could also simply be a result of having virus that puts our hormones out of whack, or Hashimoto’s disease, which is often hereditary.
How Can I Stop Underactive Thyroid Developing?
The simple answer is, that you can’t. Having an underactive thyroid is quite common, more so in women, with around 15 in every thousand women developing it.
Find Out More
Find out more about thyroid conditions at Thyroid UK.


 If you’re lucky enough to win the giveaway, you could buy a gorgeous Country Junior Bed, or a selection of clothes, or actually, any one of a multitude of baby and parent goodies they have to offer on their website, and in-store.
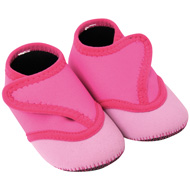
 There is a good maternity range, and some fabulously cute and stylish outfits for both boys and girls. These Baby Beach and Swim Booties are adorable in either blue or pink, for only £8, and they’re machine washable, anti-slip soles.


Quick, creamy, and packed with zing this is my kind of lunch Thanks for the easy, nourishing recipe, Scottish Mum.
I just googled this saying and this thread came up I'm neither Scottish or a mum, I'm a Geordie and…
As an 88 year old American, after reading the article(s) and all of the comments, I say "nothing is now…