Posted on 2 Comments

Breakfast Muffins / Fridge Clearance

Breakfast Muffins

Prep Time 10 minutes
Course Appetiser, Breakfast, Lunch, Snack
Cuisine Breakfast
Servings 12 Muffins

Equipment

  • Muffin Trays or cases. I used 2 red trays with 6 slots each.

Ingredients
  

  • 4 Eggs
  • 6 Slices Bread
  • 1 tsp Chicken Seasoning
  • 12 half tsp Sliced Meat / Vegetables / Fridge Leftovers
  • 12 half tsp Soft Cheese Low Fat
  • Grated Cheese To Taste

Instructions
 

  • Rip up the bread, squash it and line the bottom of the muffin trays.
  • Take half teaspoon of soft cheese and put it on top of the bread. Don't try to spread it at this point, or it will lift the bread from the muffin cases / trays.
  • Tale a half teaspoon of the meat/vegetables/leftovers of your choice, and put it on top of the soft cheese.
  • Crack your four eggs into a cup and whisk. Add in seasoning of choice. I used chicken seasoning. Add a 25g grated cheese. Use a fork and mix well.
  • Take the egg mix and divide between the 12 dishes. Then take a fork and slightly mash down the mixture until it is evenly spread.
  • Sprinkle some grated cheese on the top.
  • I cooked mine at 180 degrees C for 15 minutes. Check the oven after 10 minutes & adjust where necessary. Ensure your food is fully cooked before removing from the oven.
Posted on Leave a comment

Brie & Fig Parcels Recipe

Brie and Fig Parcels by James Strawbridge

Celebrity chef James Strawbridge has created the following recipe for the UK’s fairest food delivery service 44 Foods.

Brie and Fig Parcels by James Strawbridge

Brie & Fig Parcels by James Strawbridge

Ethical, sustainable, and selling high quality British produce only, 44 Foods boasts a range of more than 20 cheeses from across the UK – which are delicious either on their own, in recipes, or paired with their stunning new range of British wines.
Course Appetiser

Ingredients
  

  • 140 g Organic Cotswold Brie cheese, Simon Weaver
  • 400 g Filo Pastry
  • 50 g 50g Butter Melted
  • 4 Melted Figs Quartered
  • 6 Sprigs Thyme
  • 1 Tbsp Black Bee Honey
  • 1 Pinch Smoked Sea Salt Flakes

Instructions
 

  • Preheat the oven to 200˚C. Cut the filo into 10cm squares and use them to line a greased muffin case. Overlap the square sheets by rotating every 45˚ to form a flower shaped parcel. Brush melted butter between each layer and repeat.
  • Once the filo pastry has all been used, fill the tart cases with a slice of ripe fig and a few pieces of diced brie sprinkled with chopped thyme. Bake for 10-12 minutes until the cheese melts and the filo is golden brown. 
  • Remove from the oven and whilst still warm drizzle with honey and sprinkle each parcel with a pinch of smoked sea salt.
  • Serve warm with a chilled glass of Sharpham rosé to accompany.

Notes

Serving suggestion: Sharpham Pinot Noir Rose
Keyword brie and fig parcels
Posted on 1 Comment

Babybel Nuggets Recipe

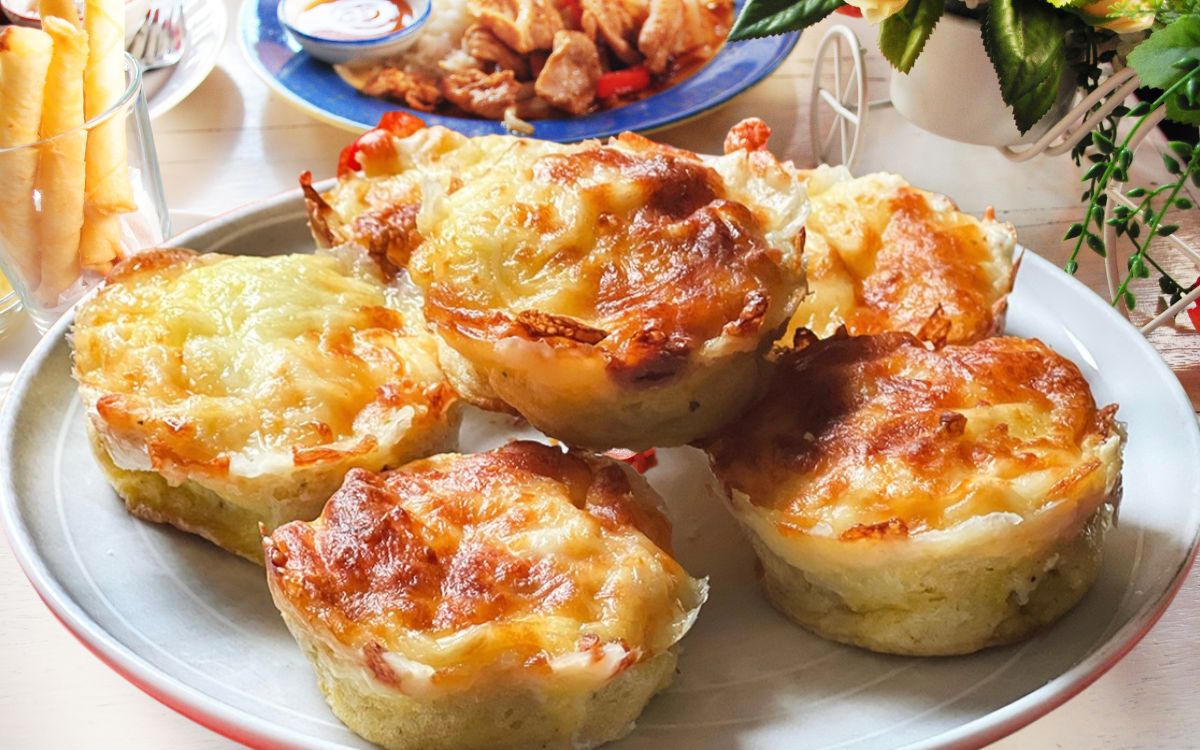
A little lockdown favourite that my son makes.  Cheese is such a versatile ingredient to use in cooking of all kinds, and Babybel adapts well as a replacement for meat in this type of fast food dish.

He loves cheese, and he loves fried food.  He had a go at these, just because he could.  I took some pictures along the way, as it seemed to be a nice simple dish.

He makes them in the same way as for other nuggets, but simply using small Babybel cheese rounds instead of chicken or fish.

‘Best nuggets ever,’ he says.  He would say that, since he made them…….

Babybel Nuggets 

Ingredients:

He didn’t measure these, so just use as much as needed, and use 1 egg at a time, giving it a quick whisk in the bowl with a fork.

  • Babybel Cheese
  • Egg
  • Flour
  • Ruskoline
  • Cooking Oil

Method – Pictures Below:

Step 1

Peel the Babybel Cheese.

Step 2

Prepare three small bowls.  One with flour, one with beaten egg and the last one with ruskoline.

Dip the individual Babybel Cheese rounds into the flour first to dry it, then into the beaten egg, rolling it around until fully covered, then into the ruskoline to coat the cheese.  He used gloves as it’s a messy business making nuggets.

Step 3

He used a small egg pan with about half to three quarters of an inch of cooking oil, pre heated, and fried three or four at a time for a few minutes each side, on a medium heat.

Posted on 5 Comments

How to make mushy peas at home.

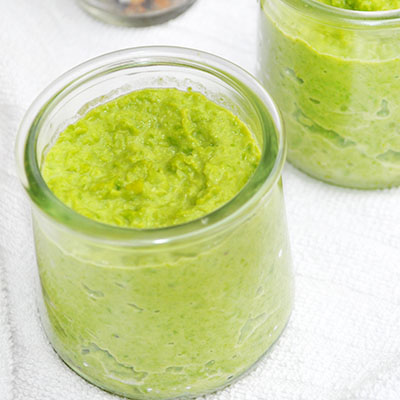
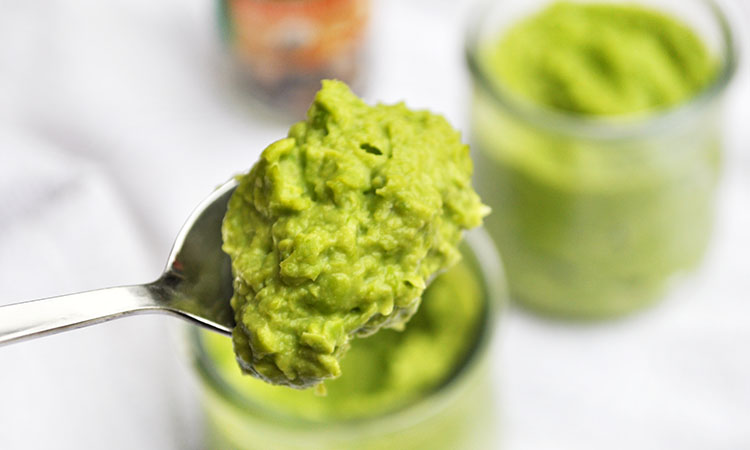
I used to buy mushy peas.  Tins of them, then one day I had none and the teens were moaning, I decided to have a go at making my own.  Marrowfat peas make the closest thing to the tins you buy in the shops, but marrowfat peas are not something I tend to have on hand.  I do, always, however, have bags of frozen peas or petit pois.  The taste is slightly different with the younger garden variety peas, rather then the more mature marrowfat ones, but to be honest, the taste with the younger peas is actually amazing and doesn’t take long to do.

I think it comes with the advent of kids needing fed quickly, and no time to go shopping, which is always my issue these days with mum requiring more soft meals and the teenagers always bringing friends home for food.  They don’t always eat what I make, but hey, at least they’ve been offered decent food.  Cook the peas in a microwave or use a hob on the pan.

This version is made so that my mum can eat them, so they are very well blended and are just made using petit pois.   These are also great for making mushy pea and ham soup.

Mushy Peas Recipe

Lesley Smith
5 from 2 votes
Prep Time 2 minutes
Cook Time 10 minutes
Total Time 12 minutes
Course Accompaniment, Vegetables
Servings 2 -4

Ingredients
  

  • 300 g Frozen Peas any kind Use marrowfat peas to get a similar effect to tinned mushy peas
  • 30 g Butter
  • Tablespoon Double Cream Optional
  • Water
  • Half Level Teaspoon Salt
  • Pinch Cracked & Ground Black Pepper

Instructions
 

  • Put your peas into a microwaveable bowl, sprinkle the salt and pepper and cover the peas with water. Cook on full power for between 6-10 minutes. Depending on the type of pea you have, it might take longer. I usually put mine on for 5 minutes, then check them to see if they've softened up. If they haven't, I just microwave them for a slightly longer.

  • When peas are softened, drain the water from the peas and add the butter and optional cream. Depending on your taste, you may want to add a little extra salt. .

  • To keep a tinned style effect, use a potato masher to mash down the peas, or for a more pureed version, like the image here, just pop them into a blender for a few seconds. This can also be blitzed for longer, as a pure puree version for those who need it.


Posted on 1 Comment

Cauliflower and Cheese Sauce

Cauliflower and Cheese Sauce

This is another recipe that was practiced at home for my son’s home economics homework.  He had intended to make for just two people, but as the recipe he downloaded wasn’t terribly good, I got him to make a version that would be easier to cope with.  If you’re comfortable with white sauce, make it your own way.

Cauliflower and Cheese Sauce

Lesley Smith
Prep Time 15 minutes
Cook Time 40 minutes
Total Time 55 minutes
Servings 6

Ingredients
  

  • 3 Small - Medium Cauliflowers
  • 100 g Butter
  • 100 g Plain Flour
  • 1 Litre Milk
  • 150 g Cheddar Cheese
  • Salt & Pepper
  • Cherry Tomatoes

Instructions
 

  • Set the oven to heat at around 180-190C.

  • Wash and cut the cauliflower into clumps. Not too large, or it will take longer to cook. Put it into a large saucepan with a pinch of salt, and cook the cauliflower for ten minutes, or until it softens. Then put it into a sieve and drain. Set aside while you make the cheese sauce.

  • Over a medium heat, using a thick bottomed pan, add butter, milk and flour. Melt the butter slowly into the mix, then bring to a bubble while it thickens. You will need to stir the sauce as it cooks, as white sauce is easily burned.

  • When the sauce has thickened, add salt and pepper to taste, then remove from the heat and add in the cheese, a handful at a time, folding it in until it has all melted.

  • Put the cauliflower into an oven dish, and pour your cauliflower in, then pour the sauce over the top.

  • Bake for 20 minutes, or until the top of your cauliflower cheese begins to turn a golden brown shade.

  • Serve with parsley and chopped cherry tomatoes.


Posted on 1 Comment

Actifry Recipe: Summer Garden Veg with Garlic

Actifry Vegetables 2

Simple and easy, and very tasty veg.  You can do these in a frying plan or a wok, but the Actifry does make it simple.

Actifry Recipe: Summer Garden Veg

Lesley Smith
I made this instead of boiling potatoes.
Prep Time 10 minutes
Cook Time 10 minutes
Total Time 20 minutes
Course Vegetables
Cuisine Low Carb
Servings 4 - 6

Ingredients
  

  • 2 Courgettes Medium
  • 4 Medium Sized Onions
  • 15 - 18 Cherry Sized Tomatoes
  • Handful of Sliced Peppers
  • 1 - 2 Garlic Cloves
  • 1 Tablespoon Olive Oil
  • Salt and Pepper to taste

Instructions
 

  • I don't think we can get much more simple than this. Simply slice the courgettes and onions and add them to the Actifry.

  • Add the tomatoes whole, and also the peppers.

  • Crush or chop the garlic into tiny pieces and add, or you could use garlic powder, pieces etc.

  • Pour oil over the vegetables in the fryer. Then add a little salt and pepper.

  • This can take up to about 10 minutes, sometimes a little more in my Actifry, as I like my courgettes nice and soft.


Posted on 1 Comment

Actifry Recipe: Fried Garlic Mushrooms

This is so simple in an Actifry that it’s shameful, well fast and easy anyway with no burning from this end either.

Actifry Recipe - Garlic Mushrooms

Actifry Recipe: Garlic Mushrooms

Lesley Smith
Prep Time 5 minutes
Cook Time 10 minutes
Total Time 15 minutes
Course Actifry Recipe
Cuisine Accompaniments
Servings 6

Ingredients
  

  • 400 g Mushrooms Washed, Chopped and Dried
  • 2 Teaspoons Rapeseed Oil
  • 1 Clove of Garlic Chopped

Instructions
 

  • Pop your washed, chopped and dried mushrooms and garlic into the fryer.
  • Add your Rapeseed oil.
  • Select 10 Minutes.
  • Enjoy.


Posted on 7 Comments

Garlic and Cheese Stuffed Mushrooms

Three of the six of us who live here eat mushrooms regularly.  To make a change, I thought some stuffed mushrooms would go down well when we had family round and not much time to prepare anything nutritious, filling, and enough for us all to eat.

Cue, the stuffed mushrooms, stuffed just with what I had in my fridge.

They were delicious.

Enjoy.

Stuffed Mushrooms: Garlic and Cheese

Lesley S Smith
Prep Time 15 minutes
Cook Time 15 minutes
Total Time 30 minutes
Course Appetizer
Servings 8

Ingredients
  

  • 8 Large Flat Mushrooms
  • 150 g Mozarella Cheese Grated
  • 250 g Cheddar Grated
  • 150 g Philadelphia Cheese
  • 45 g Garlic Butter
  • Sprinkling OXO Shake & Flavour Italian Seasoning

Instructions
 

  • Take the mushrooms, wash them thoroughly and cut off any stalks, before placing them on a baking tray covered with a tin foil sheet. You could also take out the inside of the mushroom to make it a bigger hollow if you wish.
  • Grate the cheese into a bowl, or break it into small pieces. Mix with the garlic and herbs and philidelphia.
  • Put the mixture into the microwave for a minute or two if the butter and cheese is not mixing properly.
  • Roll dollops of the cheese mixture together and place them on top of the washed mushrooms. Pat down the mixture gently so that it flattens into the mushroom. Sprinkle the OXO Italian Shake & Flavour over the top of the mushrooms.
  • Pop in pre-heated oven at 200C for around 15 - 20 minutes.


Posted on 3 Comments

Honey Glazed Mushroom and Onion Topping

Honey glazed mushroom and onion topping is perfect for on top of soups, toast, potatoes or steaks.  We’re big fans of as many vegetables we can get into the kids.  A teaspoon or two of honey among 4 – 6 people isn’t going to do any harm at all in a sensible food intake.

Honey Glazed Mushroom & Onion Topping

Lesley S Smith
Prep Time 10 minutes
Cook Time 10 minutes
Total Time 20 minutes
Course Sides / Toppings
Servings 4 - 6

Ingredients
  

  • 2 Onions
  • 500 g Chopped Mushrooms
  • 2 tablespoons Honey
  • 1 heaped teaspoon Coconut Oil
  • 1 teaspoon Ground Peppercorns

Instructions
 

  • Put the coconut oil in a frying pan and let it melt. Coconut oil melts very quickly so it will not take long.
  • Add the chopped onions and mushrooms and fry lightly until cooked. You are aiming at keeping the onions as light as possible for this dish so don't let them burn.
  • At the end of cooking, add in the honey and give it a good mix with the mushrooms and the onions.
  • Serve as a topping for soup, toast, baked potatoes, salads, steaks, or anything savoury that you can think of.
  • Sprinkle with a little ground peppercorns for decoration.


Posted on 3 Comments

Simple Home Made Roast Potatoes Recipe

I like lots of recipes to be quite simple and for my roast potatoes, I usually use this basic method to make mine and sometimes just throw some extra spices or citrussy flavours into it.  Everyone has their own roast potatoes recipes so this is just a guide to making the basic potatoes without any fanfare or fancy cooking.

Anyone can make roast potatoes without a deep fat fryer and I prefer mine done in the oven to how my mum used to make them.  I made roasties for new years day and to be honest, if I’d known when I was younger, how easy they were to make, I’d probably never have bought pre-made ones back then.

Simple Home Made Roast Potatoes Recipe

Lesley S Smith
Prep Time 10 minutes
Cook Time 50 minutes
Total Time 1 hour
Course Side Dish
Servings 8

Ingredients
  

  • 5 kg Potatoes For Roasting Peeled and Chopped into Quarters
  • 100 g Goose Fat
  • Salt

Instructions
 

  • Par boil potatoes for 5 - 10 minutes with a little salt in boiling water.
  • Line a tray with foil and put the goosefat into the oven to melt.
  • When the potatoes are ready, pop them into the tray of melted goosefat and pop them in the oven at around 200 - 220C for 10 minutes. Don't turn them over at this point or they may smush up.
  • Take them out of the oven, turn the potatoes over to coat the goosefat over all the potatoes and put them back in the oven for a further 30 minutes.
  • Take them out again, give them a shake and then return them to the oven for another 10 minutes. If you like them as crispy as we do, then just keep them in for a little longer.


Posted on 12 Comments

Mashed Turnips Recipe – The Scottish Way (Neeps / Swedes)

This is how my grandmother made her turnips.  I know the supermarkets call them swedes, and in England they may be just that, but up here they’re more widely known as neeps or turnips.

We grew our own this year in the plot and have been pleasantly surprised at how well they turned out.  I like them simmered for up to 2 hours which makes the flavour more intense and darkens the vegetables.  I didn’t have long enough for this recipe, so they’ve only been simmered for about 40 minutes and are quite light in colour.

Mashed Turnips 2

I was surprised at how easy it was to peel and chop our own fresh turnip straight from the ground in comparison to the bought ones from the shops.  The taste is also much sweeter and more attractive to the kids.  I know the picture doesn’t show them as how nice they look, but you get the idea of how they work.  They’re fabulous  alongside the vegetables for roast dinners, haggis and chicken meals.   One of my boys just likes potatoes with his.

Our neeps from the plot are fairly big.  I only needed one for 6 of us.  I usually have to use 2 or 3 from the supermarkets for us all.

Mashed Turnips (Neeps / Swedes)

Lesley Smith
4.50 from 4 votes
Cook Time 1 hour 30 minutes
Total Time 1 hour 30 minutes
Course Sides

Ingredients
  

  • 1 - 2 Turnips
  • Butter
  • Salt
  • Pepper

Instructions
 

  • As simple as it can be. Peel and chop the turnips (or swedes if that's what you call them) and put them in a big pan with boiling water. Add salt and pepper and simmer for up to 2 hours. Remember to replace the water as often as you need to. The neeps will be ready anytime after around 20 - 40 minutes, depending on your cooker and the size of chunks you cut your vegetables into, as well as your preference. We like long boiled darker mashed neeps here..
  • When cooked, the neeps will be easy to put a knife into and simply mash them with a little butter until the lumps are all out. Some people add a little milk, but I prefer mine without.
  • If you want to keep them hot while you are making a full meal ready, just put a knob of butter on the top, cover with tin foil and put in the oven on a low heat.

Posted on 3 Comments

Stir Fry Garlic Rainbow Vegetables Recipe

We use a lot of vegetables in cooking.  To see me you wouldn’t think so, but we do go through lots of fruit and veg.  Garlic rainbow vegetables are popular as they really just involve tossing in anything that’s in the fridge with a bit of colour.

We had spring onions and runner beans from the plot to use up and some carrots, baby sweetcorn and tomatoes in the fridge so this was a perfect meal accompaniment for us.

Stir Fry Garlic Rainbow Vegetables

Lesley Smith
Prep Time 10 minutes
Cook Time 10 minutes
Total Time 20 minutes

Ingredients
  

  • Baby Sweetcorn Halved
  • Runner Beans
  • Grated Carrot
  • Sugar Snap Peas
  • Cherry Tomatoes Halved
  • Spring Onions Sliced
  • Rapeseed Oil
  • Garlic Clove - Crushed
  • Salt
  • Pepper

Instructions
 

  • Adding a little rapeseed oil to your wok or frying pan, make sure the oil is hot before adding the vegetables, but keep the heat on moderate or you could burn them easily.
  • Add all the vegetables, garlic and some salt & pepper to the pan. Use a flipper or wooden spoon to turn them over every 15 - 30 seconds until they are ready.

Notes

Again, I don't put quantities for this as it's more dependent on what you have in your fridge to use up.