Posted on 1 Comment

Crepe Style Pancakes

This came about due to the lack of baking powder and plain flour in the Scottish Mum Household.  The boys wanted pancakes, but I knew I wouldn’t be able to make them rise like fluffy pancakes, so I bit the bullet and went for self raising flour ones.  They are more of a consistency like crepe style pancakes than the traditional ones that we are used to up here in Scotland, but they kept the boys bellies full.

Crepe Style Pancakes

Lesley Smith
5 from 1 vote
Prep Time 10 minutes
Cook Time 10 minutes
Total Time 20 minutes
Course Baking
Servings 15 Medium Pancakes

Ingredients
  

  • 2 Medium Eggs
  • 30 g Butter or Margarine
  • 300 ml Milk
  • 250 g Self Raising Flour
  • 30 g Sugar

Instructions
 

  • Fold the ingredients until the flour is incorporated. Then whisk the ingredients briskly until it forms a smooth batter consistency.

  • Heat a thick bottomed pan on the hob. I don't use oil to cook my pancakes, but some do. I keep the temperature low, and cook slowly.

  • When the top of the pancake mix begins to show bubbles, it's time to flip it over and cook the other side. As I don't use oil, the pancakes don't have that smooth single colour, but they do have significantly less calories than an oil cooked pancake.

  • We get around 15 medium sized pancakes from this recipe. It will depend on how large you make yours.


Posted on Leave a comment

Cherry and Strawberry Sauce – Great with Cake

Cherry and Strawberry Sauce – Great with Cake

Lesley Smith
Course Sauces – Sweet

Ingredients
  

  • 250 g Pitted Cherries
  • 250 g Strawberries
  • 100 g Caster Sugar
  • 100 g Water
  • 1 teaspoon Cornflour
  • 1 teaspoon Lemon or Lime Juice

Instructions
 

  • Put the strawberries, cherries, sugar and water on to boil on a moderate heat and keep stirring. You don’t want this to stick to the bottom of the pan.

  • Take your choice of lemon or lime juice and mix it with the cornflour until it is smooth. Take the cherry mix off the boil and stir it in quickly until it smoothes out.

  • Put the mix back on the heat, stirring all the time while it bubbles to stop it burning. The idea is to bubble off the liquid until it reaches a thick consistency.

  • Leave the sauce to cool, then simply serve.
Posted on Leave a comment

Easy Peasy Jelly Squeezies

Looking for a way to get more water into kids or adults with dementia who have an aversion to drinking from a cup?

Sneaking fluid in through food is a great way to do things.  These are so easy, and can be calorific or zero calorie, depending on the type of jelly you use.

These are not like adding glycerine to make the firm jellies which are like the harder Haribo type sweets, and they’re simply a way to change up the diet and make jelly more appetising.

Using the usual concentration, jelly is too wobbly to set in moulds.

These are made in ice cube trays and are made in minutes.  They are about to become a staple part of mums diet in the sugar free form.  I may even splash out on a few nice moulds too.

For these, I have used two different strengths.

Green
Simply a regular lime jelly at half the consistency, ie 1/4 pint of hot water to dissolve the jelly, then top up with 1/4 pint of cold water before pouring into the moulds.  These are still squeezable although slightly tacky to the touch.

Red
Made using the sugar free jelly option in powder form at half the above consistency.  I used 2 sachets here with 1/4 pint hot water, dissolved and added 1/4 pint cold before pouring into the moulds.

The red ones are far more firm than the green, and although both are squeezy, the red have a far firmer effect.

Water Content

250ml / Half Pint water per 18 jellies

Use

Leave these colourful ‘treats,’ out for someone who struggles to drink fluid, to sneak just that little extra in a day.   It’s far more attractive to eat something that looks like a sweetie than it is to eat a bowl of jelly.

Posted on Leave a comment

Recipe: Dulcey de Leche Chocolate Cupcakes

National Cupcake Week 2018

Bakers at the ready! National Cupcake Week returns to the UK from 18-24 September 2018. To celebrate the occasion, Royal Lancaster London will be serving up an exclusive cupcake-creation from Head Pastry Chef Steve Penny: Dark Chocolate and Dulcey de Leche Cupcakes.

The indulgent treat will be served in the hotel’s Hyde Lobby Bar throughout the week and is priced at £3 per cupcake. Steve Penny shares his recipe for a twist on a classic that’s sure to be the icing on top of a sweet week.

Dark Chocolate and Dulcey de Leche Cupcake by Steve Penny

Ingredients (10-12 cupcakes):

250g   Softened butter

150g   Caster sugar

100g   Light brown sugar

250g   Eggs

20ml   Milk

250g   Self-raising flour

30g     Cocoa powder

20g     Cocoa nibs

2 cans Condensed milk

100g   Dulcey de leche

Valrhona Dulcey pearls

Chocolate Butter Cream:

50g Dark chocolate (minimum 70% cocoa solids)

100g Unsalted butter, softened

200g Icing sugar

1 tsp Vanilla extract

Splash of Milk (to loosen)

Method

To make the Dulcey de Leche:

Step 1: Take two cans of condensed milk and place them unopened in a bain-marie in the oven. Set the oven temperature to 120 degrees for around 2-3 hours. Be careful when opening the cans as they will remain hot for a long time!

To make Chocolate Butter Cream:

Step 1: Melt the chocolate in a bowl set over a pan of simmering water. Allow to cool until the chocolate no longer feels hot to the touch.

Step 2: Beat the butter in a second bowl until soft then gradually add the icing sugar. Add the vanilla extract and beat again.

Step 3: Add the melted chocolate to the butter mixture until completely mixed, you can add a few drops of milk if the mixture is a little stiff.

To make the Cupcakes:

Step 1: In a bowl mix together the flour, cocoa and cocoa nibs.

Step 2: Cream the butter and sugars together until light and fluffy.

Step 3: Slowly add the milk, eggs and lastly the dried ingredients (flour, cocoa and cocoa nibs). Fold in the Dulcey de Leche into the mix.

Step 4: Fill 10-12 muffin tins. Don’t fill to the top, only ¾ of the cases should be full!

Step 5: Bake at 180 degrees for approximately 15-20 minutes (or until a knife inserted into one of the cakes comes out clean) and allow to cool.

Step 6: Once cool, carefully make a hole in the top of the cakes using a teaspoon and pipe in the dulcey de leche. Top with a spread of the milk chocolate butter cream to give a smooth velvety finish.

Step 7: Sprinkle Valrhona Dulcey pearls and drizzle more chocolate on top just for luck!

Royal Lancaster London, Lancaster Terrace, London W2 2TY
Reservations on 020 7551 6000 or visit wwww.royallancaster.com


Posted on 2 Comments

Raw Strawberry and Banana Ice Cream Recipe

Note:  This post contains an affiliate link.  These are marked by an asterisk next to them.  If you buy anything from using these links, I will receive an ambassador commission, which lets me keep this blog running.  The price is not altered for you in any way.  

As a Froothie Ambassador, I used my new Optimum VAC2 Air Vacuum Blender * to make this ice cream.  It does need a very efficient blender to be able to pound frozen fruit together well, in a way that leaves us with creamy ice cream.  Read my review, or find out how to get one for yourself here. 

I’ve tried making ice cream like this several times, and once had a wee gadget that did the job, but broke very quickly.  It just was not powerful enough to pulverise the frozen fruit on a regular basis.  I’ve found that adding banana to any fruit, gives it the taste of ice cream, and sometimes a little avocado thrown in can help as well.

Raw Strawberry and Banana Ice Cream Recipe 

Ingredients

  • 350g Frozen Strawberries (optional – remove the green stems before freezing)
  • 250g Frozen Banana (peel the banana, and slice before freezing)
  • Optional – 4 drops of Madagascan Vanilla Essence

Method

I use the Optimum VAC2 Air Vacuum Blender.  This is a very simple recipe that needs very little preparation at all.

Step 1

Mix the strawberries and bananas and add the optional vanilla essence if desired.

Step 2

Add the fruit to the blender jug.

Step 3

Do not choose a vacuum setting for this, as you will need to use the tamper tool to push the fruit down the jug while blending.  Use the pulse function for 30 second increments, until you achieve the consistency you desire.

Step 4

Add the ice cream to a bowl, or a tub for putting in the freezer.  To use from the freezer, leave out for 10 – 30 minutes, then stir well to achieve the ice-cream texture.

Step 5

Serve with chopped nuts, flaked almonds or chopped dates.

Find out more about the Optimum VAC2 Air Vacuum Blender on the Froothie website *

Posted on 2 Comments

Sugar Free Chocolate Mint Avocado Mousse

Guest post with recipe developed by Nicky Corbishley, the founder of Kitchen Sanctuary blog.http://kitchensanctuary.com/

Nicky is also brand ambassador for NEFF, after winning the Cookaholic competition last year, and is currently helping gathering true and passionate cookaholics around the country to enter this year’s competition.

Neff is currently looking for new entrants to this years competition at: http://www.nextcookaholic.co.uk/

One of his fantastic recipes is included in this post.  Enjoy..

Refined sugar-free chocolate mint avocado mousse with shortbread bites

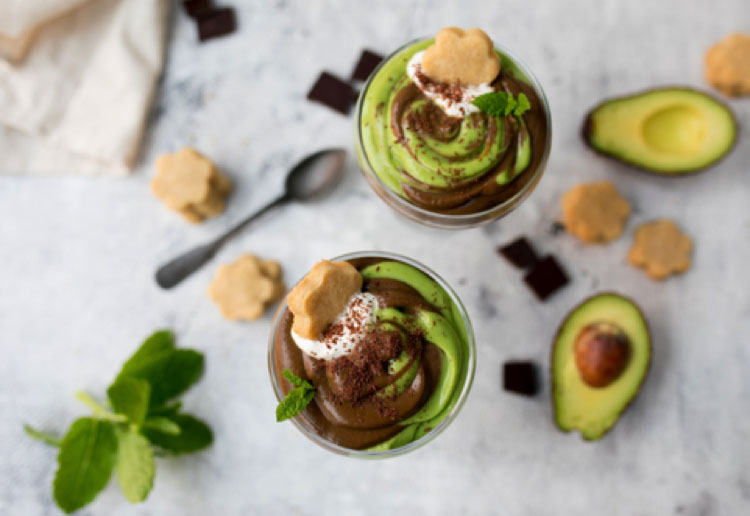
  Makes 4 servings of mousse and 28-30 shortbread bites

Chocolate Mint Mousse:

  • 4 ripe avocados, peeled and de-stoned
  • 2 very ripe bananas, peeled
  • 160ml unsweetened almond milk
  • 1 1/2 tsp vanilla bean paste
  • 1/8 tsp green food colouring gel (optional)
  • 3 tbsp honey
  • ½ tsp peppermint extract
  • 3 tbsp raw cacao powder
  • 2 tbsp Greek yogurt
  • 1 small square good quality, sugar-free dark chocolate, grated
  • Mint leaves to garnish

Shortbread Bites:

  • 100g unsalted butter, softened
  • 3 tbsp real maple syrup
  • 100g plain flour
  • 50g rice flour
  • pinch of salt

Instructions:

  1. Start with the shortbread. Using a stand mixer, or by hand, mix the butter and maple syrup until well incorporated. Add the two flours and the salt, and mix again until just incorporated (don’t over-mix as your cookies will be tough).
  2. Scoop out the dough and squash it together into a big ball. Place it onto a lightly floured surface and roll out to approx. 6mm thick. The dough is quite delicate and will try to crumble in places. Just push it back together if it crumbles.
  3. Using a small (approx. 3-4 cm) cookie cutter, cut out the cookie shapes – squashing and re-rolling the dough as needed. Dip your cookie cutter in flour before each cut, to prevent it sticking to the dough. Place the cookie shapes on a tray or chopping board, cover with clingfilm and refrigerate for 30 minutes (this will help the cookies to maintain a sharper shape once in the oven).
  4. When you’re ready to bake, preheat the oven to 170c CircoTherm. Take the biscuits out of the fridge and take off the clingfilm. Place baking parchment or a silicone mat onto a large baking tray and place the cookies on the tray. They shouldn’t spread, but leave at least 1.5cm space between each cookie. Place the tray in the oven and bake for 8-10 minutes, until the edges start to turn slightly golden. Remove from the oven and allow to cool on the tray.
  5. Now make the mousse. Place the avocados, banana, almond milk, vanilla bean paste, food colouring gel (if using) and honey into a food processer. Blend until smooth and creamy. Spoon half of the mixture out into a bowl and stir in the peppermint extract.
  6. Add the cacao powder to the remaining mixture in the food processer and pulse until well combined.
  7. Spoon the two mixtures into two separate piping bags with a large circular or semi-circular tip (alternatively use disposable piping bags with the tips cut off – no nozzle needed). Holding both bags at the same time, with the tips next to each other, pipe the mousse into serving glasses in a swirled pattern.
  8. Top each mousse with ½ tbsp Greek yogurt and a small sprinkling of grated dark chocolate. Push a shortbread biscuit into the blob of Greek yogurt and garnish with a few small mint leaves.
  9. Serve the mousse immediately, with extra shortbread bites for dipping.


Posted on 1 Comment

Simple Fruit Pasty Recipe

Have you ever wondered what to do with those leftover bits from tins of fruit?

How about this…

[fbvideo link=”https://www.facebook.com/ScottishMumBlog/videos/1279362062129739/” width=”500″ height=”400″ onlyvideo=”1″]

Fruit Pasty

Lesley Smith
5 from 1 vote
Prep Time 10 minutes
Cook Time 20 minutes
Total Time 30 minutes
Servings 4 Large

Ingredients
  

  • Half Tin Apples or 200g
  • 1-2 Pear Halves
  • 2 Peach Halves
  • 320 g Puff Pastry or 1 Puff Pastry Sheet
  • 1 Egg
  • 8 g Almond Butter
  • 2 Tablespoons Coconut Sugar

Instructions
 

  • Chop your fruit into smaller pieces, after draining as much fluid from them as possible. Sprinkle a tablespoon of coconut sugar on the top, spreading all over the fruit.

  • Roll your sheet out on a chopping board. I used a sheet. Slice into 4 portions.

  • Take each piece and roll it until it is a square.

  • Break an egg into a cup, add a tablespoon of coconut sugar and beat.

  • Mix the fruit and coconut sugar, which is likely to have broken down by now, until all mixed in, then add the almond butter and mix in.

  • Split your fruit into four sections. Put a quarter in the middle of each square, and then fold over, pressing at the edges to seal with your fingers.

  • Take a knife and slice some breathing holes into the top of each pasty.

  • Bake at 220C Oven, 220C Fan, Gas Mark 7, until brown on the top. Our ovens all vary, and for mine, it took around 20 minutes.


Posted on Leave a comment

Christmas Sticky Pudding with Chocolate, Coconut, Apple & Cinnamon

This isn’t the version I’ll be using for Christmas Day, as I’ll be using the regular old full fat, toffee sauce version, but I wanted to try something different and see how it turned out, although on Christmas Day, we will have the apple and cinnamon added to the recipe here.

This came about, as I wanted to use something different from butter, and yes, I cheated in some bits for it…….  You’ll see where below.  Even cooled this is going to be very squidgy and lush, and also very coconutty.  Substitute with butter for a more traditional taste.  It could do with that squidgyness for the lack of soaking overnight in toffee sauce.  If you want a toffee sauce, go to my oaty sticky toffee pudding post.  I’ve said serves 6 – 12, as it all depends on your portion sizes. 🙂

Like all sticky puddings, this is much better on the day after it is made, or after it’s fully cooled, when you can re-heat.

[fbvideo link=”https://www.facebook.com/ScottishMumBlog/videos/1251809644884981/” width=”500″ height=”400″ onlyvideo=”1″]

Christmas Sticky Pudding with Chocolate, Coconut, Apple and Cinnamon

Lesley Smith
Prep Time 15 minutes
Cook Time 25 minutes
Total Time 40 minutes
Course Dessert, Puddings
Cuisine Christmas
Servings 6 - 12

Ingredients
  

  • 120 g Chopped Apple
  • 50 g Self Raising Flour
  • 50 g Coconut Sugar
  • 2 tsp Bicarbonate of Soda
  • 100 g Medjool Dates
  • 100 g Coconut Oil
  • 50 g Oatmeal
  • 1 Egg
  • 1 tbsp Black Treacle
  • 50 g Cream
  • 50 g Chopped Nuts
  • 1 tsp Cinnamon Powder
  • 1 Tin Chocolate Middle and Covering
  • Red Food Colouring

Instructions
 

  • Chop the dates into small pieces. Put them into a bowl and pour over a little boiling water and set them aside. Leave them to soak in until everything else is done or whizz them in a processor.

  • Put your oven on, to around 170C/160C (Fan).

  • In a mixing bowl, add your flour, oatmeal, bicarbonate of soda, apple, cinnamon, nuts and sugar, and stir it around. Melt your coconut oil, so that it’s easy to mix in, and add it, along with your beaten egg, and black treacle. Mix by hand, or use a low setting on a mixer, to ensure the mix isn’t handled too roughly. When the pudding mix looks slightly curdled, add in the cream and black treacle, and fold it in by hand. Don’t worry about the texture. At this point, it might resemble batter more than pudding mix. Just remember, that it isn’t a cake mix and doesn’t need lots of air added. Using a spatula to scrape the sides and bottom of your bowl is a good idea.

  • Add your whizzed dates, or mash the dates into the water, then pour it all into the bowl. Fold fold in by hand.

  • Grease your baking tins and pour the mixture in. I used two moulds initially, but transferred them into one for the oven.

  • Bake for 25-30 minutes, or until the pudding is cooked, and a skewer comes out clean.

  • I cheated by putting mine into a basin of cold water to cool mine quickly as the hordes were desperate to eat it, so mine came out mashed up a bit. Leave yours to cool fully, and it will co-operate much more nicely.

  • Add toppings and serve. I didn't make toffee sauce for this version, but cheated with a tin of chocolate Nestle, which I heated up before pouring on.

With the red food colouring added, it became a very very dark coloured pudding.

Drizzled with cream and raspberry sauce.  [fb_button]


Posted on Leave a comment

High Protein Sweet Stuff

This came about from sheer desperation to get lots of protein in, with only 450 ish calories left for the day.  64g Protein for 487 Calories.  Eat it at once, or split into two, for two high protein desserts.  Lush.

high-protein-sweet-stuff

[fbvideo link=”https://www.facebook.com/ScottishMumBlog/videos/1218274918238454/” width=”500″ height=”400″ onlyvideo=”1″]

High Protein Sweet Stuff

Lesley Smith
Prep Time 2 minutes
Total Time 2 minutes
Course High Protein
Servings 1 -2
Calories 487 kcal

Ingredients
  

  • 200 g Skyr plain.
  • 200 g Skyr strawberry.
  • 25 g Vanilla protein whey.
  • 5 g Chopped nuts.
  • Pinch Flaxseed.

Instructions
 

  • Add the skyr, and whey to a bowl, and mix well. You'll need to mix to almost a whip for a while, to smooth out all those whey lumps for this to work.

  • Transfer to a pretty dish, slice the banana on top, sprinkle on the chopped nuts, and a pinch of flaxseed.


Posted on Leave a comment

High Protein, High Energy Balls

Making things ourselves, especially when it comes to protein bars is a no brainer.  Otherwise, they cost a fortune in the shops and your hard earned cash can disappear pretty fast.   Make these higher protein, by reducing the coconut flour and increasing the protein powder, or adding a little peanut butter.

I prefer the stronger coconut taste, and often take one of these, or some dried mango on a run with me, for energy over the 10k mark.

high-protein-high-energy-balls

[fbvideo link=”https://www.facebook.com/ScottishMumBlog/videos/1217978701601409/” width=”500″ height=”400″ onlyvideo=”1″]


No Cook, High Protein, High Energy Balls

Lesley Smith
Prep Time 10 minutes
Total Time 10 minutes
Course High Protein, Snacks
Servings 15
Calories 160 kcal

Ingredients
  

  • 150 g Coconut Flour.
  • 150 g Myprotein Chocolate Protein Powder.
  • 100 g Chopped Nuts.
  • Approx 250ml Milk.
  • 6, or 120g Medjool Dates stoned and crown removed.
  • Extra Coconut Flour for dusting.

Instructions
 

  • Put 150g coconut flour, and 150g protein powder into a bowl. Add the chopped nuts.

  • Stir the ingredients until well combined.

  • Put 100ml milk into a bowl, and shred the Medjool dates into the milk. Mash down with a fork until well mixed. You might need to add a little more milk.

  • Add the mushed date/milk mix to your dry ingredients and mix well. Add more milk, a tablespoon at a time, and get your hands into the bowl to pull it all together, a bit like scone batter. Add enough milk to have all the mix formed into a large ball.

  • Dust your surface with coconut flour and form small balls with the large one. Roll each one in the coconut flour to give a lovely white surface.

  • Pop in the freezer for an hour, then keep in the fridge until ready to eat.


Posted on 6 Comments

Quick and Easy Millionaire Shortbread Recipe

This came about due to a child who opened a tin of caramel, just to put a couple of spoons on his ice-cream.  He then added some to a piece of cake, heated it in the microwave, and proceeded to sip it with a spoon.  In order to ensure he didn’t finish the entire tin and end up on a sugar high, I quickly grabbed what was left of the tin, around half, and scooped it into a little bowl while I smushed up some Digestives.

Would I use this kind of caramel again – you betcha – although the finished result is far more runny in the caramel stakes than caramel you actually cook up on the stove.  This was much faster and with the caramel cold, the chocolate can go almost immediately on the top.

millionaire-shortbread-2

Quick and Easy Millionaire Shortbread Recipe

Lesley Smith
5 from 1 vote
Prep Time 10 minutes
Cook Time 10 minutes
Total Time 20 minutes
Course Baking
Servings 8

Ingredients
  

  • Half Tin Caramel.
  • 8 Digestive Biscuits. I used Tesco.
  • 60 g Butter.
  • 200 g Chocolate. I used Tesco value milk chocolate as that's what I had. I could have got away with less chocolate.

Instructions
 

  • All I did here was smush the digestives in a small pan, with a steak tenderiser. It was fast, and much preferable to putting the biscuits into a bag and smushing them that way. Less mess and no chance of the bag bursting.

  • Add the butter to the biscuits. I did think about microwaving, but as the digestives were in a pan, I just put in the butter, and heated it up. I used soft butter, otherwise, having the biscuit in at the same time as the butter could have ended up with toasted digestives.

  • Once the butter is melted and mixed in with the biscuits, take off the hob and put it into a small cake tin. I had some paper cases, so used one of those. It was about 6 inches in diameter. Spread the biscuit base and pat it down with the back of a spoon.

  • The caramel is cold, so I didn't wait for the base to cool. I simply spread the caramel over the top, and gently made sure the whole base was covered.

  • No need to wait for your other ingredients to cool, as with the cold caramel, it was straight onto the chocolate. I melted it in the microwave, 30 seconds at a time, then stirring madly, until all the chocolate was nice and gooey. Spread over the top, pop into the fridge, and take it out before completely cool, to score the top of the chocolate. Pop it back into the fridge for a while, and the base will be easy to cut and break up.

millionaire-shortbread-7


Posted on Leave a comment

Quick and Easy Apple Turnovers

Ever wondered what to do with that spare apple or two that nobody wants, or the odd ones that fall from the tree?  My youngest came home from school, all fired up to show us what he’d made so quickly with an apple at school.

Apple Turnovers 3

Who am I to say no to that…..

No measurements, no being picky, this is just a pinch here and there and off you go.

I’d a block of 425g Puff Pastry, and we used about a third to a half for this.

Yield: 4-4.5 Apple Turnovers.

Ingredients

  • Puff Pastry – around 200g.
  • Sugar.
  • Milk.
  • 2 Small Apples or 1 Large.

Method

  1. Roll out the pastry, to an approximate large square.

    Apple Turnovers Prep 4

  2. Cut the pastry into smaller squares, so that you have four. Tidy the edges if you feel you need to. Littlest had made a couple of his more of a rectangle, so we had to fiddle around with it a bit at the stuffing stage.

    Apple Turnovers Prep 3

  3. Peel, core and chop the apple, then divide it up into your pastry pieces, in the centre.

    Apple Turnovers Prep 2

  4. Fold the squares over, point to point, then press down on the edges with a fork.

    Apple Turnovers Prep 1

  5. Brush the tops with milk, then sprinkle on sugar before piercing the turnovers.  Then, simply bake in pre-heated over at 220 Degrees, or following your own pastry pack advice, for around 15 minutes.

Apple Turnovers 2