Posted on Leave a comment

Recipe: Oaty Sticky Toffee Pudding using Hamlyn’s Scottish Oatmeal

Oaty Sticky Toffee Pudding 1300

Halmyns LeafletAlong with a few fellow bloggers, I had the opportunity to appear in a leaflet for the Scottish Royal Highland Show this year.

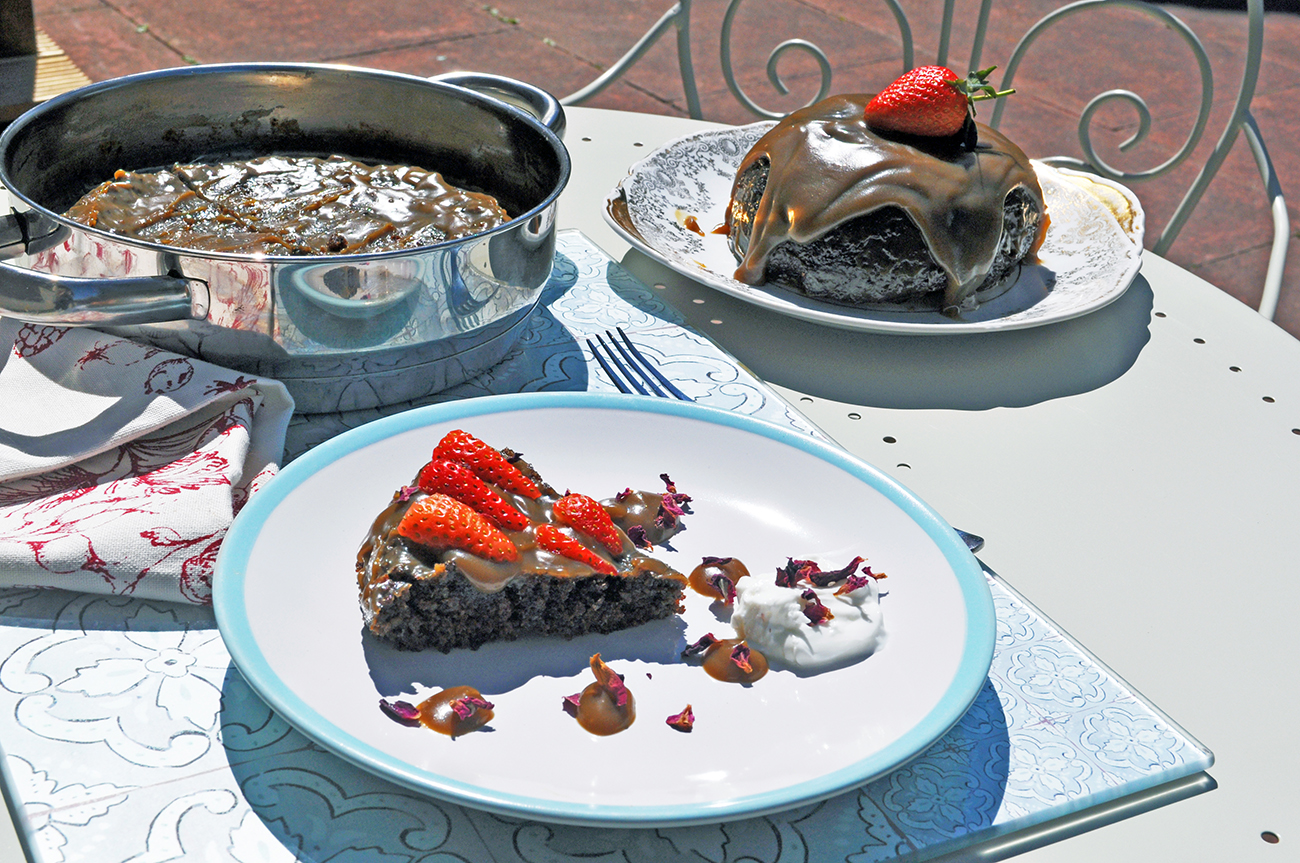
Hamlyns of Scotland, who commissioned the leaflet, kindly gave me permission to post my recipe on my blog too.  Here it is, the front cover of the leaflet, which apparently went down very well, and the recipe and images from making sticky toffee pudding with some oaty goodness in it.

I think I might even try replacing all the flour with oatmeal at my next attempt with this.  The consistency might be different, but as I love the nutty taste of oatmeal, I suspect it would go down very well here.

Oaty Sticky Toffee Pudding Recipe

Oaty Sticky Toffee Pudding 8 650

Ingredients

For the pudding.

  • 200g Medjool Dates, stones removed.
  • 100g Self Raising Flour.
  • 100g Hamlyns Scottish Oatmeal.Oaty Sticky Toffee Pudding - Hamlyns Oatmeal 650
  • 150ml Boiling Water.
  • 2 Teaspoons Bicarbonate of Soda.
  • 2 Eggs.
  • 100g Butter.
  • 2 Tablespoons Black Treacle.
  • 150g Demerara Sugar.
  • 100ml Double Cream.

For the toffee sauce.

  • 350g Golden Caster Sugar.
  • 100g Butter, cubed.
  • 500ml Double Cream.
  • 1 Tablespoon Black Treacle.

Method

For the pudding.

  1. Chop the dates into small pieces. Put them into a bowl and pour over the boiling water and set them aside.  Leave them to soak in until everything else is done.Oaty Sticky Toffee Pudding - Add Dates Mashed Into Water 650
  2. Put your oven on, to around 170C/160C (Fan).
  3. In a mixing bowl, add your flour, oatmeal, bicarbonate of soda and sugar, and stir it around. Melt your butter so that it’s easy to mix in, and add it, along with your eggs and black treacle.  Mix by hand, or use a low setting on a mixer, to ensure the mix isn’t handled too roughly.  When the pudding mix looks slightly curdled, add in the double cream and fold it in by hand.  Don’t worry about the texture.  At this point, it might resemble batter more than pudding mix.  Just remember, that it isn’t a cake mix and doesn’t need lots of air added.  Using a spatula to scrape the sides and bottom of your bowl is a good idea.Oaty Sticky Toffee Pudding - Mix Ingredients 650
  4. Mash the dates into the water, then pour it all into the bowl with the rest of your ingredients. Again, fold in by hand.  The mix may look curdled, but it’s fine.
  5. Grease your baking tins and pour the mixture in. I used two moulds.  One traditional round pudding mould and a flat one for the family to tuck into as soon as our toffee pudding was ready.
  6. Bake for 25-30 minutes, until the pudding is cooked.

For the toffee sauce.

  1. In a thick bottomed pan, add the sugar and butter with around three quarters of the cream, then slowly bring to the boil, stirring all the time.
  2. When the sugar is dissolved, add the black treacle and bring the mix to the boil, letting it bubble for a minute or two at the most.
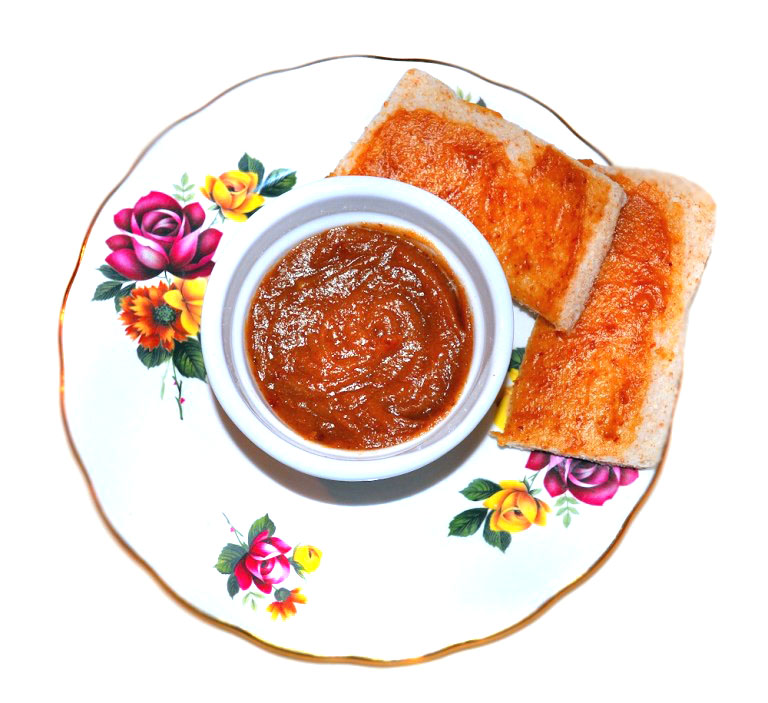
  3. Take the sauce off the heat and beat in the remaining cream. Your mix will be a gorgeous toffee colour, and look lovely and glossy.Oaty Sticky Toffee Pudding - Toffee Sauce 650

Combining the pudding and sauce.

Oaty Sticky Toffee Pudding - Pour Toffee Sauce over and Leave to Soak 2 650

  1. Slide a knife or spatula around the edges of your cakes, and slide them out of the tins if possible. If a little of the cake sticks to the bottom, its fine.  Just use your spatula to scrape it out and pop it on top, then use a knife to smooth it out.  The pudding is gooey and it will repair easily and can even be slightly moulded if needed.  Toffee sauce is going on the top, and it will hide any slight imperfection.  If in doubt, wait until your pudding is cooler before attempting to remove it from the mould.
  2. Pour a little toffee sauce into the bottom of your moulds. Replace your pudding, letting it sit in the toffee sauce, then pour some more on top.  Keep aside around one third of the toffee sauce for serving.
  3. If you’ve left the pudding overnight to soak up the toffee sauce, it will be more sticky and gooey than if eaten immediately. If you want to heat the pudding up before serving, that’s fine too.
  4. Enjoy on its own, or with a little yoghurt and strawberries.

Oaty Sticky Toffee Pudding 1 650

Posted on Leave a comment

Happy Pancake Day 2016: Strawberry Pancakes

It’s that time again, the Shrove Tuesday, that every year, brings out the pancake maker in all of us.

This time round, I’ve opted for a fruity version, with some lovely strawberry pancakes, that get a little bit of goodness in our kids, while they enjoy some deliciousness at the same time.  Pancakes are easy to make, but somehow, I always manage to burn the first couple, until I get into my stride.  I rarely have that perfect circular shaped pancake.  I just throw mine in and hope for the best.  I’ll keep my pancake shape envy under wraps….as they taste awesome anyway.

This recipe can make up to 12 fairly largish traditional and quite fluffy pancakes, but you could get more if you make them smaller.  I think I make ours too big.

Strawberry Pancakes

Strawberry Pancakes Recipe

Lesley Smith
Prep Time 10 minutes
Cook Time 15 minutes
Total Time 25 minutes
Course Baking
Cuisine Sweet Treats
Servings 8 -12

Ingredients
  

  • 35 g Baking Powder
  • 2 Large Eggs
  • 40 g Soft Butter
  • 35 g Caster Sugar
  • 300 ml Semi Skimmed Milk
  • 250 g Plain Flour
  • 150 g Sliced and Chopped Strawberries

Instructions
 

  • Start by simply putting all your ingredients into your mixer, or bowl. Mix for around three minutes. The mix is thick in this version of pancake batter, so don't let it scare you.

  • Heat a thick bottomed frying pan (or any pan) on the hob. I prefer not to use oil to cook my pancakes, but it means I do have to keep a close eye on them. I leave the heat almost at the lowest that it can go and cook them very slowly.

  • When you see the top of the dollop of pancake mix beginning to bubble up, then it is time to turn over your pancake to cook the other side, which won't take long at all. Don't leave pancakes alone on the hob as they will burn very quickly.

  • Spread with a little butter or strawberry jam to complement the added fruit, or a drizzle of maple syrup.

If you’re feeling more adventurous, why not try:

Maltesers Pancakes

Malteser Pancakes 1

American Fluffy Pancakes

American Pancakes Featured

Low Carb and Gluten Free Cream Cheese Pancakes

Cream Cheese Pancakes 3


Posted on 1 Comment

Luxurious Date Butter / Date Caramel

As well as eating a ton of dates these days, I’m using them in cooking now, as a way to get the sweet portion of my sweet tooth satisfied.  I make a sort of ice-cream with whipped quark and crème fraîche, but needed something sweet to go with it, instead of simply adding sweeteners.  My grandmother used to make this, and although I’ve made mine in the way she did (but much simpler with a Nutribullet) I suspect there are other ways to get it done.  At first, it wasn’t as straight forward as I thought, but I’ve got it sorted now.  I’m even putting it on my mothers toast instead of butter and jam for her evening snack.  Much better than the added sugar and fat late in the evening for her.

This is fabulous spread on toast, ice-cream, waffles, or anything you want to put in place of butter and margarine spreads.  It’s sweet and sticky and delish, and good for us, as it’s simply a one ingredient butter / spread / caramel, that just has a little water added to it.

You’d need sticky Medjool dates to get this to work properly, as I suspect drier dates wouldn’t pulverise so easily, or might need much more in the way of soaking.

date-butter-date-caramel-square2


Luxurious Date Butter / Date Caramel Sauce

Lesley Smith
5 from 1 vote
Prep Time 2 minutes
Total Time 2 minutes
Course Spreads
Cuisine Dessert

Ingredients
  

  • 12 Medjool Dates
  • Water

Instructions
 

  • Destone the Medjool dates and chop them up into reasonably small segments.
  • Add them to your blending jug, with a little water, and leave them to soak for up to half an hour.
  • Pour the water into a separate cup and add back two or three teaspoons of water to the dates.
  • Blend. When the blender stops turning, add a spoon more of water, and mix with your dates, until it is slightly thinner again. Reblend.
  • Repeat the last step until you have the consistency you want. Runnier or thicker, it's all up to you.


Posted on 4 Comments

Raw Food Canapé – Sweet and Exotic for New Year

Have you ever wanted something sinfully sweet, but don’t want to eat sugar, chocolate, cake or ice cream?  Then dates might just be for you….

This gorgeous and very simple recipe for a New Year canapé is so simple, and guests will never believe it’s all made from good for you food.  If you don’t tell them what it is, some of them will think it’s some juicy delicacy they’ve never heard of.  For me, it’s a raw food canapé and these look awesome on a tray, far better than my image.

Raw Food Canapé

Medjool Dates Exotic Fruit Canape2

Raw Food Canapé - Sweet Exotic Fruit

Lesley Smith
Prep Time 2 minutes
Total Time 2 minutes
Course Canapé
Cuisine Starter

Ingredients
  

  • Medjool Dates - 1 Per Canapé
  • Soft Cheese or Whipped Cream, or Whipped Quark, or even Creme Fraiché.
  • Dried Mango - Unsweetened
  • Dessicated Coconut or Fresh Grated Coconut

Instructions
 

  • Simple slice along the top of the dates, and remove the stone pit. If there's a slight hard crust at the end, slice that off, and open the date out.

  • Simply pop in a tiny spoon of soft cheese, and sprinkle a few strands of dessicated coconut on top.

  • Slice your dried mango in little strips and place on top for decoration.

About Medjool Dates – The Caramelly Tasting Fruit

Dates, like Figs, are a relatively new fruit to me.   I once saw a neighbour eating them, and I physically felt a little queasy.  For my whole life, I’ve imagined dates as tasting like prunes, and I really cannot stand prunes….  Not in the slightest….  Uh uh, never….  Am I clear about that??????

I know we tend to think of them as just a Christmassy thing, but going forward, they’re going to be a big part of my diet, to fulfill days when I have a sweet tooth.

I’ve only really tried the Medjool variety so far, and although I would try other versions, I’ve learned through experience, to stick to what I actually like.

Medjool dates are nice and plump, with an outer skin and rich softer flesh inside.  I think they are said to be more juicy than other drier versions of dates.  I suspect that’s one reason that I’ve been put off trying other varieties.

When they ripen, they turn from a reddish yellow, to a deep brown, with a gorgeous caramel taste.  A bit like nature’s natural sweets.  If you’re never tried them, you might just find yourself a new healthy sweet.

Here’s the lowdown:

Goodness For Our Bodies

Packed with fibre and potassium as a healthy treat, there’s also some calcium, magnesium and copper in there.  So as well as being tasty, they’re also good for our bones.  We sure can’t say that for sugary sweets.

Blood Sugar

As a diabetic, finding sweet treats that aren’t high in sugar or carbs is quite difficult if I’m to keep away from polyols as much as possible, and dates fills one of those voids.   Yes, it’s sweet, so contains natural sugar, but they are also filled with fibre, so help keep us from feeling those carb cravings too quickly afterwards.

It’s One Of Our 5 A Day

Yes, it is.  It’s fruit.  I don’t think I can say any more about that, as we all know we need to get our fruit and veg in somehow.  Around 3 dates will count as one of our five a day.  And at around 90-95 calories for three dates, they’re also quite filling.

How To Eat Dates

The easiest way is to just eat them like a sweet, but remember to remove the stone inside as you bite into it.   The pit is easy to remove and is hard to miss, as they’re usually quite big.   Some people cut off the top, remove the pit and put other things inside, like nuts, chocolate, soft cheese and more etc.

Cooking With Dates

I think I’ll be making some desserts with dates as a base.  I have made cheesecake base with dates, but strangely, I never actually attributed the sweet taste to the dates that I mixed with crushed nuts.  I wish I’d discovered this little treat years ago.   A caramel sauce will be one of my first attempts, hopefully to go with some treat ice cream for the kids, and not let on that it isn’t sugary caramel.  I can dream….

Growing Dates

I think I’ve mentioned plenty of times on the blog, that we have a plot where the man grows quite a lot of our own during the fairer months.  I very much doubt dates will grow in the UK, but hey, anything is worth a try, and if I can get him to make me a space in the polytunnel, I’ll give it a go next year.  From what I’ve read, cutting the tapered bit from a few cola bottles and planting a pit just under the compost at the top is the best option, but if it does indeed take about 20 years to grow a tree, I might be better off to just try it at home, or buy a plant from a local nursery, but I don’t hold out much hope of it surviving for long in winter.  It might be a bit of a pointless experiment….

Medjool Dates Nutritional Content

Each date – pitted (high in potassium)

  • Calories: 66kcal
  • Carbohydrates: 18g
  • Fiber: 1.6g
  • Saturated Fat: 0g
  • Unsaturated Fat: 0g
  • Protein: 0.4g
  • Sodium: 0.2mg


Posted on 4 Comments

Imperfect, but tasty and quick scones.

I’ve never been one for great and fancy dishes, unless there’s a good reason, so most of what I make, is quickly thrown together, and my scones are no different.

My mother has taken a liking to scones this week, and she fancied one today.  The local cafe was shut, so it was out with the KMix and on with the flour and butter.  These literally take five minutes or so, to get from the ingredients to the baking stage, so they’re also perfect for if you get visitors, and you’re caught on the hop.

I get nine imperfect but tasty scones from this mix.  How many can you get?  I think I’ll be making this recipe more and more as time goes on.  It’s actually much tastier than bread and can be used instead of bread, almost everywhere.

DSC_0658

I do sometimes wonder what a scone would taste like in the place of a dumpling when I make a stew.  One day, I must find out.  I don’t think scones should be reserved for jam and cream.  Serving one with soup would be fabulous too.

I’ve often fancied trying ones with self raising flour, rather than the traditional plain flour I’ve been used to, and I used less flour than I would use normally, with the hope that the scones would turn out light and fluffy.

A basic reminder that scones need to be handled very little, as the more mixing and turning there is, the heavier they tend to turn out.

These were more popular than my usual plain flour scones, so I might just stick to this in future, and try some different variations around it.   Ok, the tops weren’t perfect, but the scones did look good in their own sweet way.

Imperfect, but tasty and quick scones.

Lesley Smith
2 from 1 vote
Prep Time 10 minutes
Cook Time 10 minutes
Total Time 20 minutes
Servings 9

Ingredients
  

  • 350 g Self Raising Flour
  • 60 g Caster Sugar
  • 85 g Butter Cubed
  • 180 g Milk
  • 1 Teaspoon Vanilla Essence
  • 1 Egg
  • Cream and Jam to serve.
  • 1 tsp Baking Powder

Instructions
 

  • Put your oven on, at around 200 Degrees for a Fan Assisted oven, or 220 with no fan.

  • Throw your flour, caster sugar, baking powder & cubed butter into a mixer and set it on very low or fold, until it resembles breadcrumbs. If you don't have a mixer, just use your fingers to break the butter up and mix it with the dry ingredients.

  • Add the milk & vanilla essence, straight to the dry ingredients, then fold it in. The mix will seem sticky, but don't worry about it.

  • Put some self raising flour onto a board, chopping board, or table, and take the dough out of the mixer, form a loose ball, and gently roll it around on the flour, until the dough is no longer sticky.

  • All I did next, was to separate the mix into nine evenish pieces and form a ball shape, then slightly flatten it, before placing it onto a baking tray that I lined with baking paper and sprinkled with some more flour.

  • Use a fork to beat the egg, then use your fingers or a brush to coat the tops of the scones. Then, simply bake in the oven for 10 minutes.
Posted on 2 Comments

White Chocolate and Peanut Crispy Tiffin Recipe

Peanut Tiffin
This really is a heart attack in a sticky, gooey, sweet treat, but oh boy, is it ever so tasty.

My eldest had to make treats for selling at school, and as we didn’t have all the traditional ingredients, we had to change a more traditional tiffin style recipe to suit what we did have.  We finely grated a little chocolate over the top for added decoration.

Peanut Tiffin 1

White Chocolate and Peanut Crispy Triffin Recipe

Lesley Smith
Prep Time 10 minutes
Cook Time 20 minutes
Total Time 30 minutes
Course Sweet
Cuisine Sweets
Servings 20

Ingredients
  

  • <span class="mceItemHidden" data-mce-bogus="1"><span></span>300g Honey</span>
  • 1 Tablespoon Treacle
  • <span class="mceItemHidden" data-mce-bogus="1"><span></span>280g Peanut Butter</span>
  • <span class="mceItemHidden" data-mce-bogus="1"><span></span>200g White Chocolate</span>
  • 26 Large Marshmallows
  • <span></span>100g Rice Krispies
  • <span class="mceItemHidden" data-mce-bogus="1"><span></span>150g Salted Peanuts</span>

Instructions
 

  • Grease or line a 24 - 26cm baking tray.

  • In a largish pan, over a low to medium heat, add the treacle, honey and peanut butter. Stir continuously while the mixture comes to a slow boil.

  • Take the mixture off the heat, and add in around 10 marshmallows. Stir in well until they are fully melted in.

  • <span class="mceItemHidden" data-mce-bogus="1"><span></span>Mix the krispies and the cereal into the mixture well.

    </span>
  • Use the back of a spoon to press your mixture down into your tray. Mark the top of your tiffin into sections, pop a marshmallow on the top of each section, and leave to cool until serving.


Posted on 5 Comments

Strawberry Flapjacks Recipe

We’ve had loads of lovely strawberries from the plot this year, and more than we could simply eat as strawberries on their own.

I’ve made two batches of strawberry jam, and this flapjacks recipe was to keep the kids happy with some sweet munchies, and also save a few pennies from shopping for a few days, as I had all the ingredients already.

It’s very indulgent and uber tasty, and oh so easy to eat lots of it.

Enjoy.

Strawberry Flapjack

Strawberry Flapjack Recipe

Lesley Smith
This is an enormous recipe, that I used for kids friends coming over. Most people will only need around half these quantities for Flapjack making.
Prep Time 15 minutes
Cook Time 40 minutes
Total Time 55 minutes
Course Dessert / Snack
Cuisine Dessert
Servings 20 - 40 pieces

Ingredients
  

  • 750 g Porridge Oats or Large Oats
  • 400 g Butter
  • 300 g Strawberries washed, dried and finely sliced.
  • 200 g Golden sugar.
  • 4 Tablespoons Honey

Instructions
 

  • Switch on the oven, to around 120/140C.

  • Melt the butter in a pan, or in the microwave, until fluid.

  • In a bowl, mix the oats, golden sugar and honey together with the strawberries. Tip in the melted butter and give it a good mix, until the oats resemble a sticky mix, as per the image above.

  • Line a baking tray with baking paper and tip the mixture out.

  • Use the back of a spoon to press the mix down firmly. If you don't do this, your flapjack will fall apart when you try to cut it.

  • Bake for around 40 minutes. If the top begins to brown, your oven is up too high, so turn it down.

Strawberry Flapjack 3


Posted on Leave a comment

Quick and Easy Cake

Ok, this doesn’t look the prettiest or the nicest and it would certainly be a bit of an embarrassment for proper foodie enthusiasts who spend hours and hours moulding and modelling their cakes.  I really don’t have time for that kind of cooking so mine is always pretty quick and easy.

Cake 2

This came from the kids wanting something sweet when the cupboards were empty of any treaty stuff altogether.

I have to admit to using a basic sponge cake recipe and simply adding a teaspoon of vanilla to spice up the flavour.  I had to use plain flour as I was out of self-raising and also dumped in a teaspoon of baking powder to make it rise.

The topping is simply a spray can of cupcake icing.  I know, I hear some of you groan with the complete frivolity of it, but it was in the cupboard, just staring at me.  The red balls are just regular old sugar balls and the filling is 400ml of long life double cream that was in the cupboard as a standby and whipped.

Cake 4

Cake

The basic sponge cake is below, but make it minus the buttercream icing and jam for this version.  See what you can make if you don’t have much in the cupboard.

Instead of buttercream and icing, this recipe uses.

  • 1 Teaspoon Vanilla
  • 400ml Double Cream
  • Frosting/Icing
  • Sprinkles

Basic Sponge Cake

Lesley Smith
Course Baking

Ingredients
  

  • 250 g Caster Sugar
  • 250 g Butter
  • 250 g Self-Raising Flour
  • 4 Eggs
  • Icing Sugar For Butter Icing
  • Butter For Butter Icing

Instructions
 

  • Mix sugar and butter together in a mixer or a bowl until smooth.
  • Add in the eggs and again mix until smooth.
  • The final step is simply to fold in the flour until fully mixed through and you've added air with the folding.
  • Cook in a moderate oven around 160 - 170. You can split the mixture into two tins which should cook in around 35 minutes, but it will take longer if you use one tin and slice the cake as I do. My last cake took nearly 50 minutes to be fully ready and I reduced the heat a little. I use a skewer to pierce the cake and if it comes out clean, I know it's ready. I use cake release spray on my tins, but a good old spread of butter will also help to turn out your sponge once it's cooked.
  • I slice my cake into two portions, allow them to cool and then fill with butter icing.
  • I judge butter icing by eye. I put approximately half a block of soft butter into a bowl and then just add icing sugar in small amounts until it reaches the thickness and consistency that I am after. Spreading the icing sugar on finishes the simple cake and then just sprinkle a dusting of icing sugar over the top.
  • Serve with fruit coulis or sauce.
Posted on 1 Comment

Madeira Wine Cake Recipe

I used to think that Madeira Cake was made with Madeira wine, the same way that liqueurs are often substituted in recipes.  It took a long time for me to realise that the Madeira Wine came in as the perfect accompaniment to a crumbly sponge cake.  I’d be tempted to use almost any sponge cake recipe for use as a Madeira cake, with the addition of some lemon for that citrusy taste to give the cake a tangy flavour.

Here, I’ve used a basic sponge cake recipe.

The accompaniment for sponge cake, to counteract crumbly dry texture, is always a sweet white wine.

Madeira wine from the Madeira Islands is particularly good for this, but choose a sweet variety to accompany cake for afternoon tea.

Unusually, Madeira wine is fortified (made by adding the Madeira spirit) and the flavour is created by heating the wine up to high temperatures and keeping those constant for a good period of time, which also helps to keep the wine for a long time when it’s opened.

Here is my Madeira Cake Recipe Using a Basic Sponge 

Madeira Sponge Cake Slices

Ingredients

  • 250g Caster Sugar
  • 250g Butter
  • 250g Self-Raising Flour
  • 4 Eggs
  • Grated Rind of 1 Lemon

Method

  1. Set the oven to a moderate temperature.  Around 160-170 C.
  2. Mix (cream) the sugar and butter together in a mixer or bowl until smooth.
  3. Add in the eggs and mix until smooth.
  4. Fold in the sifted flour until you have a cake mix texture without lumps and bumps, then fold in the grated lemon rind.
  5. Put the mixture into a loaf tin or two depending on the size.
  6. Bake for up to 35 minutes.  To find out if your cake is fully cooked, use a barbeque skewer to pierce the cake, and if it comes out clean, it’s fully cooked.  Adding a spray or two of cake release to the tins helps with removing your cake once it’s cooked.
  7. When your cake is cool, and I mean cool, slice it in the same way you would a loaf of bread.  If you slice it hot, the cake may crumble into tiny pieces.
  8. Serve and enjoy with a glass of Madeira Wine.  Tesco have a great selection of sweet white wines.

Written for Tesco.

Posted on 5 Comments

Creme Egg Brownies – With A Surprise Middle

Cadbury is my favourite chocolate, but making a cadburys cake hadn’t come into my kitchen until now.  For an Easter recipe, it seems a good idea to use one of the things that we only get for a few months each year, the renowned Cadburys Creme Egg.

The kids wanted a tray bake to take to a friend’s house, but I had so little that would actually fit into any one recipe and sponge didn’t seem to be the answer.  I had too few eggs, so it had to be brownies.

My eldest pottered round to the local co-0p and came back with a variety of cream eggs, with different fillings.  It wasn’t quite what I’d asked for, but hey ho, they were all Cadburys chocolate of some sort.

We ended up with some full sized Cadbury Creme Eggs, and some Cadbury Caramel Mini Eggs.  I was at a bit of a loss, so brownies seemed to be the answer for this conundrum.  I’m just glad these are going out of the house, as they are delicious and far too calorie laden to be more than an odd treat.

Serves16
Prep time15 minutes
Cook time40 minutes
Total time55 minutes
By authorLesley S Smith

INGREDIENTS

  • 250g Unsalted Butter (Softened)
  • 375g Caster Sugar
  • 200 Grams Plain Flour
  • 3 Eggs
  • 50g Cocoa Powder
  • 5 – 6 Cadbury Creme Eggs
  • 16 Cadbury Mini Eggs
  • 1 teaspoon Coffee Powder (Optional)

METHOD

Step 1
Preheat your oven before you start and set it to 180ºC, or reduce it to 160ºC for a fan oven.

Step 2
Grease a medium to large baking try or roasting tin.

Step 3
fAdd all the ingredients to the mixer, or bowl, and mix/fold until smooth. Many people will beat the sugar and eggs together first, but I don’t bother for brownies. I just throw it all in.

Step 4
Pour into your choice of baking tray and smooth it all into the edges.

Step 5
fPut into the oven for 20 minutes, lightly score the top of the mixture in the cake tin into portions and push half or a whole mini egg into each portion.

Step 6
fPut the brownies back into the oven for a further 20 – 25 minutes, or until the mixture stops wobbling when you shake the pan.

Step 7
fLet your Cadburys Brownies cool down before putting smushed pieces of Cadbury’s Creme Egg on the top and serving. The kids wanted a bit of colour, so we added a little icing writing to the plate, which pleased them very much.

Posted on 42 Comments

Breadmaker Softies Recipe – or Bread Rolls, Baps, Burger Buns, Morning Rolls – Whatever you call them.

I think there are very few people who don’t like fresh bread at any time.

I think it’s why the French bread sticks are so popular in shops, as they seem to be baked fresh for your visit.   I kept meaning to add these to the website, but just never got round to photographing ours as they tend to be eaten as soon as they come out of the oven.

I know some of you will be wondering how you make softies or buns in a breadmaker, but it’s easy enough as the breadmaker does almost all the work.

All you have to do is shift the dough from breadmaker to baking tray and then finally the oven.

Breadmaker Softies Recipe – or Bread Rolls, Baps, Burger Buns, Morning Rolls – Whatever you call them.

5 from 14 votes
Prep Time 3 hours
Cook Time 15 minutes
Total Time 3 hours 15 minutes
Course Bread
Servings 6 - 12

Ingredients
  

  • 320 ml Water
  • 2 teaspoons Caster Sugar
  • 2 teaspoons Salt
  • 25 g Fat - Rapeseed or Olive Oil
  • 550 g Strong Bread Flour
  • 1.75 teaspoons Breadmaker Yeast

Instructions
 

  • Using a breadmaker, you are going to choose the dough setting which normally takes a couple of hours. If you use a pizza dough setting, you will have to do two proves, not the one used for this recipe.
  • Add the water in first to the bowl. Then add the oil and layer the flour on the top, so that it covers all the water completely.
  • I add the salt and sugar to one side of the bowl so that it is kept dry on top of the flour.
  • Add the yeast, again, making sure to keep it dry at this stage by adding it to the top of the flour, but away from the sugar and salt.
  • Leave your dough until it has finished its setting and simply shape into balls on a greased tin. I'm never precise with this, so my softies come out all shapes and sizes which is fine for us. I use a little flour to coat my hands as the dough is often very sticky otherwise. Leave your dough to prove on the greased tin, until it has at least doubled in size. I tend to either use cake release spray or the one cal oil sprays to grease my baking trays.
  • Simply bake in an oven around 200C for approximately 15 minutes. Keep a check on your softies and if you think they are cooked earlier, simply insert a skewer into the side of one to see if it comes out clean.
  • Ours never seem to go cold before they are used. This size of batch makes about 6 - 8 large softies, or up to 12 small ones.


Posted on 44 Comments

Breadmaker Recipe: Basic White Loaf

Using a breadmaker is like coming home to warm slippers.  Yes, really.  It’s so handy to have if we run out of shop bread and means I don’t have to run out for extra supplies late at night for the next days packed lunches.

I have a Panasonic which is fairly aged now but it still churns out the bread beautifully.  It also means I can put some in the freezer too.

Breadmaker Bread: Basic Large Size White Loaf

4.32 from 19 votes
Prep Time 5 minutes
Total Time 5 minutes
Course Bread
Servings 11

Ingredients
  

  • 320 ml Water
  • 25 g Olive Oil
  • 1.5 teaspoons Sugar
  • 1.5 teaspoons Salt
  • 1.5 teaspoons Breadmaker Yeast I use Allinsons or Dove’s Farm
  • 500 g Strong White Bread Flour

Instructions
 

  • Breadmaker recipes tend to differ on how they explain using ingredients for bread. I tend to add in the water first as I really have not got the hang of putting in the dry ingredients first.
  • Add the water and olive oil.
  • Put the flour on top of the water until it completely coats the surface. If you’re not confident, make a little well in the middle of the flour for the yeast.
  • I put the salt and sugar on top of the flour into one side and then add the yeast in last, making sure that it is not in contact with the water or sugar at all.
  • Select a four hour or basic bread setting. You can also use this recipe for a thicker French crust effect by using a longer setting to get a thicker crust. I find this is the best recipe for making sandwich bread for school packed lunches.
  • Leaving your bread to cool fully means it will cut more easily, but if you’re like my boys and like some warm bread to use immediately it comes out of the breadmaker, then it tends to be more of a tear and share effort here. I can get up to 11 slices from this, but when I first started to cut a loaf, I was lucky if I got five or six. It does take practice.