Posted on 5 Comments

Sticky BBQ Chicken, Cherry Tomatoes & Cucumber

Sticky BBQ Chicken 570

Much easier than it looked, I think I’m now hooked on cooking in the bag. This time round, I bought Maggi So Juicy to try it, but after seeing it is a Nestle product and knowing the boycott around them for the advertising campaigns at mothers in third world countries to get them to buy baby formula, I doubt I’ll buy it again. My next attempt will just be a roasting bag with herbs and spices in it.

I didn’t see anything to worry me on the ingredients list, although I’d have preferred to do without the Maltodextrin if it was at all possible.

All there is to it, is to open the top, take out the bag and pop your chicken into it. Then shake the seasoning into the bag, tie the end with the clip provided and turn the bag over and over until all the seasoning coats the chicken.

I used chicken breasts from my favourite online butcher. I forgot to pierce the 4 small holes in the top of the bag, but it didn’t seem to do any damage. I added 5 whole chicken breasts to the pack and there was plenty of room for them to cook despite being huge.

The bag expands a fair bit so make sure you put it in the lower to middle of your oven, otherwise, you could end up like me with the top of the bag sticking to the upper rack and having to peel it off.

Thankfully the bag stood up to a fair bit of punishment all in all, and I did spend longer cooking it than was recommended on the pack. I cooked for an hour, whereas the recipe said 30 – 40 minutes for drumsticks. I reasoned that the big chicken breasts would take longer to cook and they came out just perfectly.

I served with Potato fritters, cherry tomatoes and cucumber.

My next job is to try it without the ready made herbs and spices.

Sticky BBQ Chicken 2

Posted on 16 Comments

Kangaroo and Buffalo Burgers

Buffalo Burger Cooked 570

My favourite online butcher, Andrew Gordon Butchery and Fine Foods has taken in some wonderfully unusual meat for burger making.

He now frequently has Kangaroo, Waygu, Buffalo and Zebra burgers, as well as a few Springbok ones in stock.   I was in past and came away with some Kangaroo and Buffalo burgers.

Buffalo Burger 570

The man seemed initially skeptical of the contents or taste of the burgers, but once cooked, he was highly delighted and ate two whole massive 200g Buffalo Burgers to himself.

A quick shallow fry in a frying pan in some rapeseed oil, popped in a bun with a cheese slice, lettuce, tomatoes and radish.

Buffalo and Kangaroo Burgers Cooked

Fabulous.


Posted on 2 Comments

Roasted Stuffed Peppers with ONION, MUSHROOM AND CHEDDAR CHEESE, SERVED WITH QUAILS EGGS AND SALAD

Filling peppers is a very cheap and tasty way to fill bellies.  There is no limit to the amount of combinations that can be filled and roasted.  Add some lovely side salad and eggs, and the plate looks lovely.

Roasted Stuffed Peppers – Onion, Mushroom and Cheddar Cheese, Served with Quails Eggs and Salad

Lesley Smith
4 from 1 vote
Prep Time 15 minutes
Cook Time 20 minutes
Total Time 35 minutes
Course Mains, Starter
Servings 6

Ingredients
  

  • 6 Whole Peppers Red, Green or Yellow (can be mixed)
  • 500 g Mushrooms Chopped
  • 2 Large Onions Chopped
  • 250 g Cheese Grated
  • 12 Quails Eggs
  • Salad
  • Salt & Pepper
  • 3 tablespoons Olive Oil

Instructions
 

  • Put your oven on to pre-heat at approximately 180 C.
  • Slice the top of your peppers and put it to one side. I had to take slivers off the bottom of mine to make them stand up, otherwise they just toppled over. If you buy your peppers loose, you can look for the perfect peppers to do this with. Hollow out the peppers and remove the seeds.
  • Fill the peppers with grated cheese, pop the lids back on and place them on a baking tray. Sprinkle salt and pepper over the top, and drizzle olive oil over the top of the peppers.

  • Bake in the oven for approximately 20 minutes, or until the peppers are soft.
  • Lightly fry the mushrooms and onions in a frying pan and put the Quails eggs on to boil. 4 minutes in boiling water only.
  • When the peppers are cooked, place them on a bed of lettuce or salad leaves. Take off the top and fill with the onions and mushrooms, add sliced quails eggs and serve.

How to cook quail eggs.

Stuffed Peppers2

Posted on 2 Comments

Spinning Chicken – Ekeing out Quality Meat to avoid buying Mechanically Processed Meat – Part 2

From the mango chicken I made in my first post about ekeing out quality meat, the second half of the batch went straight into being a Chicken and Mango Tikka Masala.

I think the very real after effect of the horsemeat scandal is that we really don’t know what’s in processed food, even if it tells us the ingredients on the wrapper.

This was the second half of my intention to feed a family of 6 twice with each half of the batch.  One portion for eating, and one for freezing for another day.

Step two. Chicken and Mango Tikka Masala.  Again, accessories spun out the meat, with a filling pasta and nan bread accompaniment.

Chicken and Mango Tikka Masala Pasta

Servings 6 -12

Ingredients
  

  • HalfMango Chicken Batch http://scottishmum.com/mango-chicken-wrap/
  • 1 Clove Garlic
  • 0.5 Jar Pataks Tikka Masala Paste
  • 1 Teaspoon Sugar
  • 500 g Pasta Tubes
  • 250 g Tub Mascapone or fresh cream (You will need 250g more when you defrost the portion destined for the freezer.)
  • 500 g Carton or Jar of Tomato Passata
  • 100 ml Water
  • 1 Teaspoon of Mixed Herbs
  • 2 Onions

Instructions
 

  • Lightly fry your two chopped onions in the oil, add the garlic and don't allow the onions to brown. You want them to be a lovely soft texture.
  • Mix the Mango Chicken with the cooked onions and garlic.
  • Add half a jar of the Tikka Masala Paste, the tub of passata and sugar and mixed herbs. Bring to a very low simmer for 5 minutes. Your chicken is already cooked, so it is just a case of combining the ingredients and flavours until they are mixed in. Add water slowly until it becomes a texture similar to a very thick pasta sauce.
  • Split your batch into half. Put the half for freezing to one side to cool. With the batch you will be eating, add the cream or mascapone and finish the meal. If you freeze the portion for another day with the cream or cheese in, it may separate on defrosting. Leave adding the dairy to that portion until you are ready to eat it.
  • Cook between 500g and 1kg of pasta, depending on whether you plan to freeze cooked pasta with your Chicken and Mango Tikka Masala. If you do plan to freeze some pasta, I would be tempted to combine the pasta and Mango Chicken Tikka Masala. I prefer defrosting cooked pasta that has been combined with a sauce, but it would be just as simple to use rice, or cous cous when you eat your frozen batch.
  • Add your cream or mascapone to your Tikka Masala. If you want your sauce thinner, simply add a little more water until it reaches the right consistency.


Posted on 3 Comments

Spinning Chicken – Ekeing out Quality Meat to avoid buying Mechanically Processed Meat – Part 1

My challenge for a lot of this year is to find ways to make quality meat affordable and a good purchase for everyone.

Bearing in mind that my family would wolf down a big pack of chicken nuggets in one go, it would work out about a fiver a meal just for those, which is likely to have e-numbers, additives, sugar, added salt and much more depending on the manufacturers.

I think the very real after effect of the horsemeat scandal is that we really don’t know what’s in processed food, even if it tells us the ingredients on the wrapper.

I get chicken from the Andrew Gordon Butchery in Aberdeen.  It costs on average £25 for 10 very large chicken breasts.

To buy the same in a supermarket, I’d probably have to get 15 – 20 breasts weight wise, and at todays prices, that seems to work out quite high to me.   I live happier knowing that the meat I eat has had a good life before it hit my plate.

I used all 10 chicken breasts to make mango chicken for wraps, with the intention of splitting the batch down the middle as soon as it was cooked.  To spin it out even further, a cook could add vegetables, lentils, noodles or much more to the cooking process.

The intention was to feed a family of 6 twice with each half of the batch.  One portion for eating, and one for freezing for another day.

That would give me the equivalent of a full belly x 24 for the £25 worth of good meat by adding cheap and healthy ingredients to bulk it out.

I cooked the second half of the batch on the same day, with one portion in the fridge for the next night, and another one in the freezer for another day.

Come back tomorrow to see what I turned the Mango Chicken into.

First step, the Mango Chicken.  I added salad vegetables, wraps and sauces to make the meat spin out.

[gmc_recipe 10534]

Posted on 4 Comments

How to make a simple chicken pie with help from the slow cooker.

Chicken pie recipes are as many and varied as there are hot dinners in the year.  I wanted to have something no fuss, with full flavour, and easy to make.  Puff pastry is the one pastry that I cheat with.  It is such a faff to work with, that I always have some on standby in the freezer to make emergency pies or puff pizzas.  A little puff on the top of a dish can complete something that has been a bit of a disaster in the kitchen and needs a topping, or to finish a slow cooked recipe with fantastic flavour, by turning it into a pie.

The chicken is slow cooked, but the puff pastry has to really be popped into the oven with the pie filling to finish off the dish.  The filling is what makes the result spectacular in a pie.  Slow cooked food has a taste and aroma that I feel no other way of cooking can produce.

According to the kids, this was the best chicken pie ever, so how to make a chicken pie had to be turned into a blog post.  I get my meat, as always these days from Andrew Gordon Butchery and Fine Foods and the traceability, quality and texture never let me down.

Slow Cooked Chicken Pie Recipe

Lesley S Smith
Prep Time 30 minutes
Cook Time 8 hours
Total Time 8 hours 30 minutes
Course Mains

Ingredients
  

  • 1 Chicken Breast per person Cut into strips.
  • 2 Tablespoons Rapeseed Oil
  • 100 g Vegetables Per Person
  • Water Tailor to your recipe.
  • Salt Pinch
  • Pepper Pinch
  • Cornflour
  • Pack of Puff Pastry

Instructions
 

  • Switch on your slow cooker to high and add a couple of mm of water in the bottom. Look out a thick bottomed frying pan and your oil. This recipe is not cut and dried. There is very little that can go wrong, so choose how many people you will feed to decide how much you make ingredient wise. When you know your amounts, it is easy to judge how much of everything else that you need.

  • Lightly fry your chicken in a tablespoon of rapeseed oil, so that the edges all round have gone white. Once the meat has been sealed, it can be added to your slow cooker.

  • Choose which vegetables you use. I had 6 chicken breasts, and I added 2 chopped onions and 2 sliced carrots to my pan with the remaining rapeseed oil. I lightly fried those before adding them to the slow cooker.

  • I add another cup or two of water to half cover the ingredients, give it all a quick stir and pop on the lid. It can be left for 4 hours on high, or turn it down to low for approximately 7 - 8 hours.

  • When it's ready, you can thicken the gravy if you wish by using cornflour mixed in water, and adding it slowly until you reach the thickness of gravy that you prefer as a cook.

  • Spread the slow cooked chicken evenly along the bottom of a baking tray.

  • Roll the puff pastry out until it is the size you need to cover your baking tray. Lay it over the top, press the edges down and use a fork to make holes in the pastry at reglar intervals. You don't have to be perfect with the edges.


  • Some people will baste the top with egg or milk. For puff pastry, I never bother, and it always comes out fine. After being in the oven at approximately 220 degrees for 20 - 25 minutes, or until the pastry rises, take it out and score the top. The lovely flaky texture of the pastry makes a pie almost a whole meal in itself.


  • The lovely flaky texture of the pastry makes a pie almost a whole meal in itself.


Posted on 9 Comments

Traditional Scottish Stovies with Oatcakes and Beetroot – Slow Cooked & with the Kids Baked Beans to serve.

What better cold weather fare could there be.   Stovies used to be made in generations gone by in our ancestors family when it was washing day, or when the nets had to be hauled down to the boats and the women didn’t have time to make a big meal for the family.

They stayed close to home on stovie days as they had to carry their men onto the fishing boats to keep them dry.  We’re talking little women carrying huge strapping 6 + footers from the side of the piers right into their boats.  With their skirts and feet soaking and cold in the North Sea, it was a hard, miserable and tough life.

Often battling against misery and exhaustion, they would come back to their stovies simmering on the pot, and ready to fill empty bellies.

Unable to stray far from the home while they were cooking, this was a method of slow cooking that needed regular stirring couldn’t be made on market days when the women would have to carry the catch in a creel on their backs for miles to sell it at market.

Most people who make stovies today, are really only  making a type of hash with boiled potatoes and meat mixed in.  For real stovies, the potatoes need to be stoved.  They are dry and not waxy, and they break apart in the mouth when you eat them.

I’ve only ever made them in a thick bottomed pan before, so this method is a new (and easier) way of doing it for me.

The quantities mentioned in this recipe are for guidance only.  This would generally have been Monday’s meal, after the Sunday roast, and using up the leftovers of meat, potatoes and sometimes other vegetables would be added in a sort of bubble and squeak effect.

My stovies are wickedly tasty ones, made with the meat and gravy from nice large chunks of a fillet steak joint that I got from Andrew Gordon  Butchery in Aberdeen.  I am always spoiled for choice when I go in there and good meat really makes a difference to the taste of a finished dish.

Slow Cooked Traditional Scottish Stovies with Oatcakes and Beetroot (and the kids beans)

Lesley Smith
Prep Time 30 minutes
Cook Time 8 hours
Total Time 8 hours 30 minutes
Course Mains
Servings 6

Ingredients
  

  • 3 KG Potatoes Maris Pipers, King Edwards or Roosters - Peeled and Chopped
  • 1 - 2 Onions Chopped
  • 100 Grams Dripping Beef Dripping, Goose Fat or Vegetable Dripping
  • 1 KG Meat Usually Pork or Beef - Already Cooked
  • 200 Grams Gravy From the Pork or Beef
  • Salt & Pepper For cooking.

Instructions
 

  • In a saucepan, melt approximately 100g of your lard. This will be quicker than you expect.

  • Add the onions to the pan and lightly fry.

  • Make sure that the onions are still white and are not cooked long enough to begin turning brown.


  • Add the onions, lard and your potatoes to the slow cooker and stir until all the potatoes are coated in lard. If you have to add some more, add it a teaspoon at a time, as it is easy to use too much lard.

  • Add a few spoons of the gravy from your meat, a couple of tablespoons of water, and a couple of pinches of salt.


  • Cook for 8 hours on low, or 4 hours on high.

  • You will need to check the pot every hour and if you need to add a little extra water, do it a teaspoon at a time. You only want just enough to stop the potatoes from burning into the pot.

  • Don't mash the potatoes as when they are ready, they will break down with the stirring.

  • Add in your meat with a few more spoonfuls of gravy.

  • Cook until the meat is thoroughly heated.

  • Normally, you would shred your meat or cut it really small, but my boys like their meat in hunky chunks so my pictures are not the effect you would get if you shredded your meat before adding it.


  • Serve with oatcakes and beetroot with a glass of milk for the traditional fare, or add beans like the Scottish Mum Kids.


If you want to make your own oatcakes, try Traditional Scottish Oatcakes.


Posted on 1 Comment

How I Cooked the Aberdeen Gordonian Best Steak as a Roast

We took home a lovely piece of meat from Andrew Gordon Butchery and Fine Foods and had a lovely and luxurious meal fit for a King and Queen.

Questions that people often ask are around how to roast a joint of meat, or how to cook roast beef properly so I thought I’d write it down.

This piece of meat is a new steak that is sweeping the meat-eating population of Aberdeen off their feet.  Tempted to try it, I went a bit further and had a whole roast for our Sunday dinner last week.

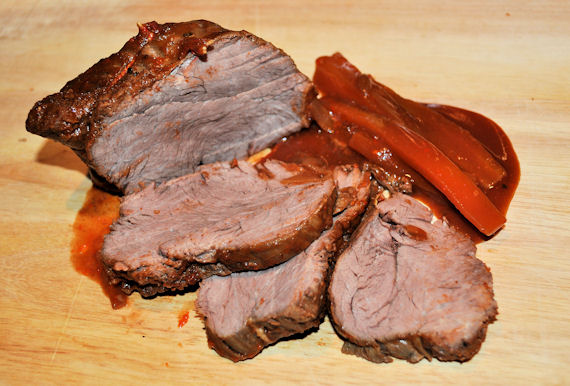
This picture shows the Gordonian Best Steak Roast in all it’s glory.  It is actually upside down as there’s a layer of fat on the other side that allows the roast to drip juices and keep it moist as it cooks.  My pictures are upside down to show the effect of the quality of the rich colour in the beef.

As a tender piece of meat, the roasting time can be slightly shorter and at a slightly higher temperature than a cheaper, or less tender roast of beef.

It’s a truly gorgeous piece of meat that anyone would be proud to have on their table for a cracking and filling meal.

The best way to roast a tender piece of meat is going to be in the oven, and after searing all sides in a pan first.

Tender cuts of meat always do well roasted.

The purpose of the roasting is only to use the fat to cook the roast, simply and with the occasional baste (spooning juices over the top) to help it along.

To seal the roast in, the easiest thing is to use a frying or sauté pan to help seal in the juices and help along the crusty and full of flavour outside of the roast.

While you are preparing and sealing your roast, make sure your oven is on to pre-heat. You want the oven nice and hot before it goes in to be finished.

Make sure your roasting pan is big enough to hold your roast, but not as large as the juices all escape and leave you nothing to baste your roast with as it cooks.  You really want enough juices left over to make awesome gravy as a trimming.

Cook a roast in the oven to finish off the process at around 180 – 200 C, or Gas Mark 6 for approximately the following times per pound of meat.

– Rare (15 – 20 minutes)
– Medium (20 – 25 minutes)
– Well Done (25 – 30 minutes)

I cooked my roast for the kids, which needed an extra 20 minutes on top of the cooking time to ensure there was absolutely no pink at all in the meat.  I know that isn’t the ideal way to cook, nor the way that butchers or chefs would recommend, but any redness at all and my kids won’t eat it.

For fabulous roasts, they really do need to rest after they’ve been cooked.   Once it’s cooked, just put it to the side for about 15 – 30 minutes and cover  it very loosely with some tin foil to help keep the heat in.   Resting lets the meat reach a more consistent texture and helps the meat to be consistently juicy.

Use the juices left over from roasting to make wickedly tasty gravy and serve with veg, and sides.  I have to apologise for the lack of plate pictures on this post, as I took a couple of hurried pictures as the family were so hungry, and neither of them came out.

The meat was fabulous.  The roast only had a teensy bit left over at the end of the meal, as the man and kids both had seconds.

I had hoped to have enough to make Gordonian Best Steak Roast luxurious stovies the next day, but alas, my boys cleared too much of it at the first sitting.


Posted on 2 Comments

Kids Make Chicken Fillets Decorative

I decided to let the kids get creative with their supper.   They were not liking how it looked on the plate when they got a plateful of Costco Chicken Fillets with some stir fried veg for supper.  This is how dads plate looked when it was dished up.

While not impressed, they decided to take presentation into their own hands so I could put it on the blog.  So here goes the version of chicken fillets, with stir fried veg, à la Scottish Mum kids.

Posted on 7 Comments

Slow Cooked Steak & Potato Hotpot

For the steak and potato hotpot recipe, I’ve used Diced Steak (Round Steak) from Aberdeen Angus cattle.  We really like the rich meaty taste of the Aberdeen Angus, so I knew this was going to be a great meal before I started out.

Steak Hotpot

I didn’t add any fancy herbs, spices or taste altering ingredients.  I decided just to go with the flavour of the meat itself, with only some salt and pepper to help the vegetables along.  The result was a fabulously rich and healthy warming hotpot that I know I am going to make several variations of in future.

Slow Cooked Steak & Potato Hotpot with Diced Steak from a great butcher.

Lesley S Smith
Prep Time 15 minutes
Cook Time 8 hours
Total Time 8 hours 15 minutes
Course Lunch
Servings 8

Ingredients
  

  • 1.8 kg Diced Steak Round Steak from Andrew Gordon Butchery and Fine Foods
  • 2 Onions Finely Chopped
  • 1 Leek Finely Chopped
  • 2 Carrots Chopped
  • 1 Stock Pot Use Fresh or Concentrated Stock
  • 3 Potatoes Sliced
  • Salt & Pepper To Taste

Instructions
 

  • Switch on the slow cooker. Add half a litre of boiled water, and leave it to heat while you prepare the ingredients.

  • In a frying pan, lightly brown the steak, which should only take a few minutes to do, then put the steak into the slow cooker.

  • Lightly fry the onions and leek in a frying pan. I add the carrots for about 30 seconds.

  • Add the vegetables to the slow cooker, along with the sliced potatoes, and another half litre of water.


  • Leave to simmer for 8 hours on slow.

  • Thicken gravy if necessary using bisto or cornflour.


Posted on 5 Comments

Greek Chicken Stir Fry with Chilli and Peppercorn Rice

A simple and quite easy main meal to make, but be warned, it does have a bit of a kick in the rice.

If you are slightly worried by spicy food, simply leave out the chilli and use some herbs or fruit instead.

Greek Chicken Stir Fry with Chilli and Peppercorn Rice

Lesley S Smith
Prep Time 10 minutes
Cook Time 25 minutes
Total Time 35 minutes
Course Mains
Servings 4

Ingredients
  

Rice

  • 500 g Basmati Rice Steamed or Boiled
  • 1 Red Chilli Finely Chopped
  • 1 teaspoon Black Peppers
  • 2 heaped tablespoons Coconut Oil

Stir Fry

  • 800 g Greek Chicken Stir Fry
  • For cooking chicken. For cooking chicken.

Instructions
 

Stir Fry

  • Using a thick bottomed saute pan, or a roomy wok, shallow fry the Greek Chicken Stir Fry for about 10 - 15 minutes in coconut oil, or until the chicken is thoroughly cooked.


Rice

  • Place freshly steamed or boiled Basmati Rice, Peppercorns and Chopped Chilli in a thick bottomed pan or wok. Lightly fry with 2 tablespoons of coconut oil on a low heat for 5 minutes, turning frequently.

  • Decorate the plate, and serve hot.


Notes

The ready marinaded Greek Chicken Stir Fry is from the counters of Andrew Gordon, Butchery and Fine Foods


Posted on 14 Comments

Slow Cooked Haggis in a Baked Potato & served with Coleslaw

We catch the wee beasties that are the haggis family, on the heathery hills in the highlands of Scotland, where we pluck them mercilessly from their lovely life of gay abandon.

Are you buying this?

Ok, haggis is a lovely, and slightly spicy delicacy that is often said to the national dish of Scotland.

I do frequently get asked the best way to cook haggis.  That could be because I often blog about food, and, being Scottish, there is probably an assumption that we all eat haggis quite often.  A bit like the rumour mill about the deep fried mars bar that only the tourists ever try.

We  normally experience haggis as part of Burns night celebrations, to celebrate the poet Rabbie Burns, so in our family it has usually been restricted to being supplied by other people.  On Burns night, people would traditionally have haggis neeps and tatties (turnips and potatoes).

Macsween sent us one of their haggises to slow cook as a few of us had been talking about it on Twitter.  I did go out and buy another one to go with it, as I thought the 3/4 person haggis was a tad too small for us all as there are 6 of us.   In the end, I think one haggis for about 4 – 5 people would be perfect for us.

On to slow cooking the haggis.

I probably would try cooking it in the slow cooker, but inside some tinfoil next time, but the slow cooked way did work nicely and made the haggis not as dry as skirlie, which is my past experiences of it.  I have to admit, I do struggle with the contents, and as I don’t eat lamb, it’s not for me, but the man, 2 kids and grannie wolfed it down.

Here’s a nice slow cooker haggis recipe for using with a store-bought haggis that has already been cooked.  I’ve added the coleslaw recipe under the haggis one.

Slow Cooked Haggis with Butternut Squash and Baked Potatoes

Lesley S Smith
4 from 2 votes
Prep Time 10 minutes
Cook Time 3 hours
Total Time 3 hours 10 minutes
Course Lunch
Servings 3 - 4

Ingredients
  

  • 1 Medium Macsween Haggis For 3 – 4 people
  • 1 Medium Butternut Squash or a turnip (Chopped)
  • 1 Medium Onion Finely chopped
  • 1 pint Boiled Water
  • 50 g Coleslaw To serve

Instructions
 

Haggis

  • Take off the outer skin of the haggis and the metal clip.


  • Cut the haggis into slices or chunks.


  • Put the haggis, squash, onion and water into a slow cooker and cook on high for 3 hours.


Baked Potatoes

  • Put baked potatoes in tinfoil and cook in oven at 180c

Haggis

  • Serve as filling for the baked potatoes.

  • Garnish with coleslaw on the top.

Notes

Your haggis will come already cooked, so the goal is to thoroughly reheat it, while cooking the vegetables.


Coleslaw Salad

Lesley S Smith
Perfect as a side dish with most main meals, or to use in a salad.
4 from 2 votes
Prep Time 10 minutes
Total Time 10 minutes
Course Side Dish
Servings 6

Ingredients
  

  • 200 g Carrot Grated
  • 150 g Cabbage Shredded into strips.
  • 150 g Onion Shredded into strips.
  • 2 - 3 tablespoons Mayonnaise or Thousand Island Dressing

Instructions
 

  • Simply shred the cabbage, onion and carrot.


  • Mix with mayonnaise or thousand island dressing.

  • Serve.