Posted on 4 Comments

Chicken Sauté with Leek on a Bed of Mashed Potato

There’s nothing new about sauté methods to cook our food with.  All it means is to cook on a high heat with little oil, but moving the food around so that it doesn’t burn while it cooks.  We could do it by tossing the pan or moving around the food with an implement.

Mashed potatoes are easy, and can make a lovely accompaniment to some dishes we’d usually eat with rice, cous cous or pasta.

Chicken-with-Leek-and-Mashed-Potato

Chicken Sauté with Leek on a Bed of Mashed Potato

Lesley S Smith
Prep Time 15 minutes
Cook Time 20 minutes
Total Time 35 minutes
Course Main Dish
Servings 6

Ingredients
  

  • 5 lb King Edward Maris Pipers or other potatoes that are suitable for mashing.
  • 3 medium slices Leeks
  • 1 Medium Onion
  • 200 g Sock or 1 stock pot.
  • 1 pinch Salt & pepper.

Instructions
 

  • Peel the potatoes and set them on to simmer with a couple of teaspoons of salt to cook with.

  • Cut the chicken breast into small strips, slice the leeks and chop the onion.

  • Use a thick bottomed saucepan or a wok, or cast iron sauté pan. Heat the pan up to very hot and use a little oil in the pan.

  • Add the chicken for the first 5 minutes and then add the onion, leek and stock, moving the food all the time. The chicken must be cooked all the way through.


  • Cooking for a further 10 minutes, ensure all the ingredients are fully cooked, add salt and pepper to taste and set aside with a lid on the pan. The heat will be retained for the few minutes it takes to prepare your potatoes.

  • When potatoes are fully cooked, drain and mash. Don’t be tempted to add butter or milk, or the potatoes will go too smooth and be the wrong consistency to make into a potato pie shape.

  • Place a patty sized heap of potatoes onto a plate and simply serve the sautéed chicken and leek on the top.

  • Decorate the sides of the mashed potatoes using a fork, and serve immediately.


Posted on 10 Comments

Puff Pastry, Ham, Hot Dog, Cheese and Sweetcorn Pizza

The puff pizza – does it exist?  I have no idea actually and perhaps I should really go and look it up.   I keep it in reserve for days when the fridge is coming to the end of its content and needs a help along with some tinned goodies (shhhhh) to fill some empty bellies.

I always have a block or two of puff pastry in the freezer.  I never make it as it’s such a faff, but maybe one day I will and then get myself converted to fresh puff from then on, but for now, it’s always on hand.

Today is an almost at the end of the fridge day and the kids have played footie, cricket, done chores, and have not sat still in the lovely sun that we rarely get to see.

Puff Pizza

With no passata on hand, it’s just a hodgepodge of what was available in my fridge and cupboard today.

Ingredients

  • 500g block of puff pastry
  • 300g wafer thin ham
  • 500g grated cheese
  • small tin sweetcorn
  • tin of hotdogs
  • salt
  • pepper

Method

  1. Flour an oven dish, I used a very rectangle tray that we use for making oven chips.
  2. Roll out pastry to cover the bottom of the tray.
  3. Sprinkle all your toppings of choice onto the puff pastry.
  4. Cover with tin foil, shiny side down.
  5. Bake in oven at 200 for 25 minutes.
  6. Remove tin foil and bake for further 5 minutes.
  7. Serve with whatever is left in the fridge salad wise.

Your oven may run hotter or colder to make sure you keep an eye on how your puff pastry is progressing.

Posted on 9 Comments

Apetina Cheese – Summer Suncatcher Salad, with a Chance to Win a Fabulous Hamper


Apetina is a new cheese to me.  

I was delighted to be asked to make a new salad that would help our family nutrition by keeping the kids happy.  Looking for the cheese to buy, I was quite surprised to find they also have gorgeous little snack pots.  

The lovely looking Apetina Sun Dried Tomato Snack Pack and the Garlic and Olive Snack Pack also made it into my shopping trolley, along with a classic block.  It really is worth a try, and also suitable for vegetarians.

The cheese crumbles with ease when it is being eaten and seems to absorb flavours well.   Arla also make a light variety which I would have loved to try, but my local shop didn't have any left.

To keep my kids happy, a sharing dish is usually the best option, especially if I can put together all the ingredients that I know my kids love.  They always pick from the big help yourselves dishes on the table.

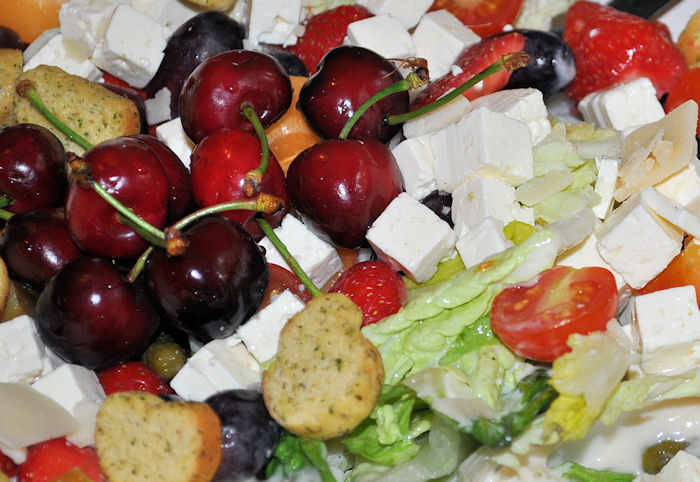
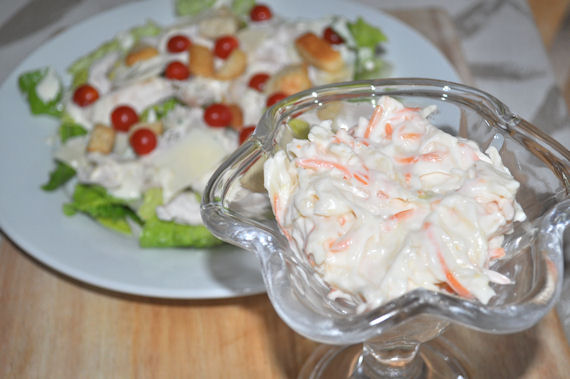
Apetina Cheese – Summer Suncatcher Salad Recipe

Ingredients

  • 1 x 200g tub of classic Apetina cheese
  • 1 chinese leaf lettuce
  • 150g grapes
  • 200g strawberries
  • 4 apricots
  • 10 cherry tomatoes
  • 15 cherries
  • croutons
  • olive oil
  • sour cream

Method

Salads are just so easy to make.  The first step is washing all salad ingredients and placing the lettuce in the bottom of the bowl, to make a bed for the rest of the salad to sit on.

  1. Drizzle a little olive oil onto the lettuce.
  2. Spread a little sour cream over the surface.
  3. Cut strawberries into quarters.
  4. Half the cherry tomatoes.
  5. De-stone the apricots and cut them into quarters.
  6. Sprinkle the fruit and tomatoes onto the bed of lettuce.
  7. Drain a tub of Apetina cheese and place on the salad.
  8. Top with cherries and croutons.
  9. Serve with sour cream as a side dish.

In our house, this was a success as I used the fruit that my kids love to mix with the cheese.  I like mixing fruit and veg where they work well together and salads are perfect for that.  We had a suncatcher that we made a few weeks ago on the window, so my boys named the salad the suncatcher as it had such lovely colours and looked spectacular on the table.

My Apetina recipe will be entered into the contest over on the Apetina Facebook page.  It will also be featured in the Recipe section of the website.

If you like the Facebook page, and vote for your favourite salad of the week, you'll be entered into a prize draw to win this fabulous picnic hamper.  Inside the basket, there will be a salad bowl with servers, and a dressing bottle.

The final week prize will be a BBQ, so head on over using the Apetina link to vote.


Sponsored Post

Viral video by ebuzzing

Posted on 6 Comments

Slow Cooked Beef Stew with New Potatoes

Beef and New Potato Stew

Beef and New Potato Stew

Being the fan of slow cookers that I am, mine has seen something of  a slacking off period this last few weeks.   Now back and determined to get back to using it more often, we’ve just sat down to a lush slow cooker beef recipe that includes new potatoes.  As always I am cooking for a large family (usually 6 + at any one time to feed).   Reduce the side of the portion to suit your own family size.

Slow Cooked Beef Stew with New Potatoes 

  • 6 – 8 servings.
  • Preparation, 15 – 20 minutes + cooking time.
  • Nutritional, rich source of vegetables and meat.

Ingredients

  •  1.2 kg stewing steak, diced.
  • 500g mixed vegetables.  I used celery, leek, carrot and turnip.
  • 1 large or 2 small onions.
  • 1kg baby new potatoes.
  • 2 x beef stockpots.
  • salt, pepper and / or spice to taste.

Method

  • Brown the stewing steak and add to slow cooker.
  • Brown onions and mixed vegetables and add to slow cooker.
  • Add stockpots.
  • Wash new potatoes and mix with meat and vegetables in the slow cooker.
  • Cover with enough boiling water to skim the top of your ingredients.
  • Add 1 teaspoon salt and 1 teaspoon pepper.
  • Put on lid and cook for 8 hours on low, or 4 hours on high for large wattage slow cookers.  Adjust heat and time depending on the size of your element.
  • Thicken, season to taste and simply serve.

Serving Suggestion

Serve with bread or rice cakes.

Posted on 4 Comments

Guest Recipe : Meatball and Okra Casserole

This guest recipe comes to you from Leila of @persianliving on Twitter.  Her blog is worth a visit as it grows with lovely Iranian style cooking.  You can find her recipes at: persianliving.co.uk

Meatball and Okra Casserole

My favourite vegetable of late is the flavourful and aromatic Okra, otherwise known in the West as Ladies Fingers or Gumbo.

In Iran, we call it Bamiyeh and in Pakistan/India it is known as Bhindi.

You can fry them up with garlic and tomato and eat with flat breads soaking up the juice, or cook in a casserole with chunks of lamb or beef ,flavour up with ginger and cinnamon and just for good measure add a few pieces of apple or simply stir fry. The easiest way and as I have found, the best way to get them eaten by my children, is to add them to a saucy meatball casserole because you can mash it up a little and they would never know the difference!

Okra, which is rich in calcium, can be found in most supermarkets usually somewhere obscure where all the fresh herbs and exotic vegetables are in little packets or already potted. I get mine from my favourite Asian store in Manchester where fruits, vegetables and herbs such as okra, baby aubergines, quince, coconuts, methi (fenugreek) and much more can be found in abundance. Here is my recipe for a deliciously spicy meal. Enjoy!

Ingredients

  • 400g lean minced beef or minced lamb shoulder
  • medium onion, grated
  • 175g okra
  • 1 tin chopped tomato
  • 2 heaped tbsp tomato puree
  • 2 heaped tbsp fine white breadcrumbs
  • 1 tsp turmeric
  • 1 tsp curry powder
  • salt and pepper to taste
  • 4 tbsp vegetable oil

Method

  • Add the grated onion, breadcrumbs,, turmeric, salt and pepper to the minced meat and mix thoroughly.
  • Roll the meat into little balls about the size of a gobstopper or smaller.
  • Heat oil in a medium sized lidded pan and fry the meatballs until they have firmed up and have turned a brown colour.
  • To avoid *sticking*, whilst the meatballs are still soft, instead of using a spoon, pick up the pan and shake occasionally to make sure all the meatballs have been allowed to fry.
  • Once the meatballs are thoroughly browned all over, add the chopped tomatoes, tomato puree, curry powder, salt and pepper to taste and cover with water.
  • Bring the casserole to the boil then simmer for 30 minutes, stirring occasionally.
  • After 30 minutes, add the okra. Mix into the casserole as gently as possible using your spoon to bring up sauce from the bottom and pouring it over the okra.
  • Leave to cook for a further 20 minutes repeating the same method with the sauce in order to soak the okra.
  • Serve with fluffy white rice and a crisp crunchy salad!

*Tip: Okra can be slightly *sticky* if split open. This is due to the seeds being gelatinous. To avoid this, don’t cut them or split open whilst stirring the casserole.

Posted on 20 Comments

Coco Mango Chicken Recipe


For my lovely meal, six of us ate from the recipe, and I have three strapping lads to feed, as well as a man who likes a good bit of animal protein.

Ingredients

  • 800 – 900g chicken breast / fillet.
  • 6 heaped tablespoons mango chutney (I buy Premium Mango Chutney in huge jars from Costco).
  • Rapeseed oil.
  • 1 clove of garlic crushed or chopped, or a teaspoon of garlic from a jar.
  • 1/2 tin of coconut milk (mix well in the tin before adding).
  • Salad, vegetables and fruit to serve.
  • Pitta bread or wraps.

Method

  1. Cut chicken into pieces.
  2. Shallow fry the chicken in the minimum of rapeseed oil.  Use a large frying pan, wok, or even a thick bottomed saucepan on low – medium heat.  Turn the chicken often to make sure it doesn’t burn.
  3. Add the 6 tablespoons of mango chutney and the garlic.
  4. Stir often to make sure the chicken and mango chutney don’t burn.  Turn down the heat, and let the mixture bubble away for a few minutes.
  5. Mix in the coconut milk a little bit at a time on a low heat at the end or it will separate.

To serve, simply warm pitta bread or wraps, choose vegetables, salad or fruit, and serve in large dishes for sharing.

Posted on 5 Comments

Guest Recipe: Sloppy Joes Burger by Claire T

This Guest Recipe from Claire, aka ninjakillercat.blogspot.com/ and @needaphone on Twitter sounds amazing.

Sadly Claire didn’t manage to take a photograph, so that means that I will just have to go and make it so that I can get one.  I’m sure my boys will love giving it a try.

———————————-
The trick to this recipe is to brown the meat well, on high heat. Don’t crowd the pan , work in batches and don’t stir the meat until it is well browned on one side. It helps to use a large cast iron pan, or an anodised pan, as these pans can handle the heat and are relatively stick-free.

Ingredients

  • 1Tbsp olive oil
  • 1/2 cup minced carrots or sweet pepper
  • 1 cup chopped onion ( about 1 medium onion)
  • 1/2 cup chopped celery
  • 2 gloves garlic,minced
  • Salt
  • 1 1/4lb ground beef
  • 1/2 cup tomato sauce ( or 1 15 once can whole tomatoes, pureed)
  • 1 Tbsp Worcestershire sauce
  • 1 tbsp red wine vinegar
  • 2 Tbsp brown sugar
  • Pinch ground cloves
  • 1/2 teaspoon dried thyme
  • Pinch cayenne pepper
  • 2 turns of freshly ground pepper
  • 4 hamburger buns

Method

  •  Heat love oil in a large saute pan on medium high heat. Add the carrots and saute for 5 minutes. ( If you are using peppers instead of carrots, add those at the same time as the onions).
  • Add the chopped onion and celery.
  • Cook. stirring occasionally until onions are translucent, about 5 more minutes.
  • Add the minced garlic and cook for 30 more seconds. remove from heat. remove vegetables from the pan to a medium-sized bowl, set aside.
  • Using the same pan ( or you can cook the meat at the same time as the vegetables in a separate pan to save time), generously salt the bottom of the pan ( about 1/4 to 1/2 teaspoon).
  • Heat the pan on high. Crumble the ground beef into the pan. You likely need to do this in two batches, otherwise you will crowd the pan and the beef won’t easily brown. Do not stir the ground beef, just let it cook until it is well browned on one side. Then flip the pieces over and brown the second side.
  • Use a slotted spoon to remove the ground beef from the pan ( can add to the set- aside vegetables), salt the pan again and repeat with the rest of the ground beef.
  • If you are using extra lean beef you will likely not have any excess fat in the pan, if you are using 16% or higher, you may have excess fat. Strain of all but 1 tablespoon of the fat.
  • Return the cooked ground beef and vegetables to the pan.
  • Add the ketchup, tomato sauce, Worcestershire sauce, vinegar and brown sugar to the pan. Stir to mix well.
  • Add ground cloves. thyme, and cayenne pepper. Lower the heat to medium low and let simmer for 10 minutes.
  • Adjust seasoning to taste.
Posted on Leave a comment

Guest Recipe: Vodka and Tonic Battered Fish & Wedges

Todays Guest Post is from theperfectbadmummy.wordpress.com, who is @mrsaimeehorton on Twitter.  Her recipe for vodka and tonic battered fish & wedges is not something I would have ever thought to try, but it sounds very tempting to give a go.

——————–

Food for 2

I get a little bit excited when I learn a new kitchen “skill”. Probably more then is normal. Then, I love to make it a bit different, especially if it involves alcohol.

For the Fish:

2 chunky white fish fillets

4oz/110g Self Raising Flour

175ml of Tonic

Double shot of Vodka

Salt & Pepper

Extra Flour for dusting

1 pint of Vegetable Oil

For the Wedges

4 or 5 large potatoes – peeled and cut into wedge shapes

Cajun Spice

Method:

1. Pre-heat the oven to 200C – pour the oil into a roasting dish and pop in the oven to heat

2. Sprinkle Cajun spice over the potatoes and put them into the hot oil and allow them to fry gently for about 10 minutes, until they are soft but still pale.

3. Lift out of the pan and leave to cool slightly on greaseproof paper.

4. Mix the Flour, Vodka, Tonic, Salt & Pepper in a bowl until it becomes a thick batter

5. Dip the cod in the batter until it is thickly coated

6. Place in the oil and cook for a few minutes until the batter is crispy and golden

7. Leave to drain on greaseproof paper

8. Add the potatoes back in the oil to finish off and crisp up

9. Serve with Mushy Peas or Salad and a vodka and tonic with a slice of lime.

YUM.

Posted on Leave a comment

Making Quiche / Flans on the Fly

Making quiche is easy.  It takes very little time, and you have a cracking meal very quickly.  

 I am one of these cooks who tends only to weigh what she has to.

  I weigh for doughs, bread and cakes, but I rarely weigh for things like pie fillings, pastas, rice, quiche, risottos, currys, stir frys etc etc. 

For those dishes, I reserve a remedy called

“chuck it in and hope for the best.”

Usually my chuck it in dishes turn out perfectly.  Not always, and one day I will post some of them.   Today is all about how I make quiche, or flan.

I have to thank @superamazingmum on twitter for the outline of how to make a flan, as I had no idea how easy it was until she posted it to me in three tweets.  I have made about a dozen of them since, and they ALL come out fabulous.

PASTRY

Making shortcrust pastry is easy, especially if you have a food mixer.  I really would recommend having one if you are planning to so any serious cooking for any length of time, as the pain it saves in your arms from all the mixing if you home cook a lot, is a true blessing.

250g  plain flour
110g  butter
Two pinches salt
Some water

This is easy.  Put flour and butter into a bowl and either rub the butter into the flour, or mix it in the food processor until it is a breadcrumb consistency.  Make sure that all the lumps of butter are rubbed in.

Add a couple of pinches of salt and mis in with your breadcrumb consistency.

Add a little water at a time and either mix by hand, or in the mixer / processor until the dough forms a ball.   Stop when the dough has bound together. 

Wrap the dough up with clingfilm and refridgerate for approximtely half an hour before using it. 

QUICHE

The dough mixed above, gives me enough dough for one large flan dish which is 8″ diameter, and two smaller ones approx 4″ diameter.

Taking the dough out of the fridge, flour a surface so that you can roll out the dough to the shape you need.  I use my rolling pin to roll the dough to a larger size than I need for my biggest flan dish.  I used to butter the dish before putting my pastry in, but now I have more professional baking tins, the ones I use for my flans (which came from tesco) don’t need greased before cooking.  I plop my rolled out piece of dough in the flan dish, press around the botton and the top, which takes the excess dough off the tin, and  repeat for the smaller flan trays.  Easy as 1, 2 3

All I need to do next is decide on a filling.  This week I have made cheese and tomato with chicken, and cheese and herb with garlic.  The world is your oyster.  Put in your flan whatever you want to.    Do not use raw meat in a quiche or flan as quiche is not cooked long enough or hot enough to cook the meat thoroughly. 

The egg and milk mix is the glue that holds the quiche / flan together.  To make one 8″ and 2 x 4″ flans, I need to crack open about 6 – 8 eggs and using a fork, whisk them for a minute.  I  then add 250 –  300ml of milk for each 4 eggs, or until I judge by eye that I have enough.

  •  To add a cheese and tomato with chicken, I would line the botton of the flan dish with a thick layer of grated cheese (usually mozarella in this  house).
  • Add chicken and sprinkle across the top of the cheese around the flan dish.
  • Place tomatoes, herbs and anything else you want to add on the top.
  • Fill up the empty space with the egg and milk mixture.
  • Bake for between 20 – 40 minutes at 160 – 170 degrees until all the egg is solidified.

The time to bake will depend on your flan size.  When you take it out of the oven, let it lie for five minutes for the egg to settle.