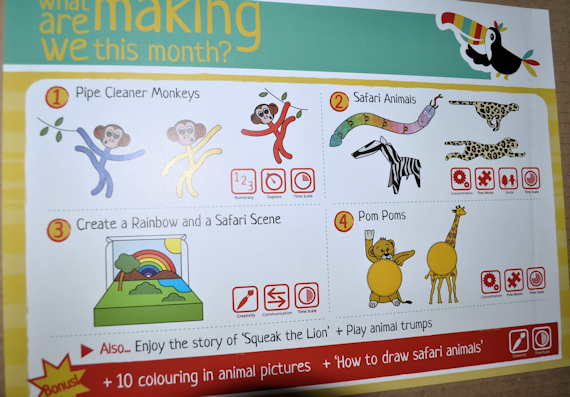
Posted on 3 Comments

My Gorgeous New Kettle from Palmers Department Store with an Unusual Result

A lovely email popped through last week, asking me to take a look at Palmers Department Store.  I hadn’t heard of it, so I had a pop over to see what they sell.

The lovely PR people sent me a gorgeous Morphy Richards Accents Kettle to test the service, which was very good all round.

The box came packed inside another sturdy box to give it plenty of protection on route to Scotland.    The kettle is slightly darker than it looks on the website pictures, but it’s still a lovely appliance and fits in well with my cream coloured kitchen.

I really do have to say a huge thanks to Palmers, and for more than the great delivery service.

The one thing that has really surprised me with the kettle is how much easier it is for me to lift than my old one.  My old kettle is a regular jug type kettle that means I have to turn my wrist side on to pick up.  With damage in my wrist that has caused some arthritic type pain, I find the movement quite painful at times, yet I never thought about changing my kettle.

With the Morphy Richards handle at the top, I can pick up and pour hot water by  moving my whole lower arm from the elbow, without twisting my wrist at all.   I was looking forward to a gorgeous new kettle, but I am really happy with the fact that my wrist can pour without any pain.   Why on earth I didn’t think about that before, I have no idea, but I won’t go back to a jug kettle now.

Thank you Palmers, you have no idea how much easier making a cuppa is now.

I’ve also got my eye on a fabulous Swan Stone Raclette in the future as the idea of asking the kids to sit and pick their food, and have them watch while it cooks appeals to me.   I better get my skates on and make some pennies to pay for one.

Palmers Department Store carries ranges for kitchens, bathrooms, living, dining and bedrooms.  There are also some unusual gifts, with some neat Jamie Oliver mugs.

Disclaimer:  I was provided a Morphy Richards Accents Kettle by Palmers Department Store.  I was not told what to write, and was given a choice as to whether to review.


Posted on 6 Comments

Scotty Brand Raspberries in a Raspberry Trifle with Double Cream

A delivery of Scotty Brand raspberries arrived and the raspberry making machine had to begin turning it’s wheel.  With some sponge cake left over from another day, I decided to make a lovely little glass of fast and delicious raspberry trifle.

The raspberry cheesecake from the Scotty Brand website looks amazing, and I think I will need to try that next.  Look at this…

Follow Scotty Brand on Facebook or Twitter to keep up with their newest recipes and news.

http://www.facebook.com/scottybrandltd

@scottybrand_ab

For now, my deceptively delicious raspberry trifle it is.

Lesley Smith

Scotty Brand Raspberries in a Raspberry Trifle with Double Cream

You don't have to be precise with this recipe, as it really is a simply cheats way to make a gorgeously tasty dessert in a few minutes.
Servings: 2

Ingredients
  

  • 200 g raspberries.
  • 200 g double cream. Half for whipping and half for use as pouring cream.
  • 200 g left over sponge cake.
  • 2 tablespoons jam

Method
 

  1. Add washed raspberries to the bottom of the glass.
  2. Slice sponge down the middle and spread with whipped cream and jam.
  3. Cut the sponge into chunks and place on top of the raspberries.
  4. Pour the remaining pouring cream over the top of the dessert, to allow it to soak into the sponge and the raspberries.
  5. Serve immediately.
Posted on 8 Comments

Scotty Brand Ayrshire New Potatoes with Sour Cream and Parsley

Sometimes, I think we overthink our cooking.  What’s wrong with some plain and simple boiled new potatoes, served with some sour cream and a topping of parsley like my grandmother would make.

This is just so simple to make and the sour cream tastes lovely over the newly cooked spuds.

Follow Scotty Brand on Facebook or Twitter to keep up with their newest recipes and news.

http://www.facebook.com/scottybrandltd

@scottybrand_ab

Lesley Smith

Ayreshire New Potatoes with Sour Cream and Parsley

New potatoes with sour cream and parsley.
Servings: 6

Ingredients
  

  • 1 bag of Ayrshire new potatoes from Scotty Brand
  • 4 tablespoons of sour cream
  • Sprinkling of parsley

Method
 

  1. Wash and scrub the new potatoes.
  2. Simmer in boiled water for 10 - 15 minutes.
  3. Serve hot in a separate dish from the main course.
  4. Add one tablespoon of sour cream for each portion of potatoes.
  5. Sprinkle the top of the potatoes with parsley for a pretty finish.


Posted on 4 Comments

Princes Wild Alaskan Pink Salmon Toasted Sandwiches

Princes sent the Scottish Mum household a box of Alaskan salmon with the request to create our own recipe and report back.

They also kindly sent us a lovely salmon recipes book, and a couple of our tins of Wild Pink Salmon are going to be made into salmon fish cakes as the recipe in the book looks so absolutely and deliciously tasty.   Having salmon in a can is handy for those meals where the kitchen cupboard is looking a little bare and we struggle for something good, nutritious and filling to feed our families.

Inspired by the Wild Alaskan Salmon French Toast Sandwiches in the recipe book, I went to work.


Lesley Smith

Princes Wild Alaskan Pink Salmon Toasted Sandwiches

Serve as a snack, or a main meal. I use a panini press, but you could use a regular sandwich maker, or make them under the grill.
Servings: 6

Ingredients
  

  • 2 x 213g can pink wild Alaska salmon
  • 4 heaped tablespoons of mayonnaise
  • 12 slices bread
  • butter
  • salt and pepper
  • lettuce
  • cherry tomatoes
  • coleslaw

Method
 

  1. Drain the can of wild Alaskan salmon.
  2. I removed skin and bones from the can as I know my kids won't eat these, but you can choose to keep them in.
  3. Mash the salmon and add the mayonnaise. Use a fork to mix the mayonnaise thoroughly with the salmon.
  4. Add a pinch of salt and pepper and mix that in gently.
  5. Lay out bread for making the sandwiches. I butter on one side only.
  6. Spread the salmon and mayonnaise mix on the buttered side of the bread, and top with lettuce and sliced cherry tomatoes.
  7. Place the top piece of bread on and put in the panini press to cook.
  8. After approximately 4 - 5 minutes, or when the bread is a lovely golden colour, remove from panini press, slice, and serve with cherry tomatoes and coleslaw on the side.


Posted on 4 Comments

Kellogg’s Rice Krispies Challenge from Britmums

Kelloggs sent us a big pack of Rice Krispies, with a fab case of colouring pens, colour changers, glitter glues and more.  The colouring pack alone has kept my kids entertained for a few days now, and they’ve rediscovered an enjoyment of colouring in again.

Middler has learning difficulties, but he likes to colour in.  His older brother helped him to do the figures and they made a pretty tidy job of it as a team.

The next picture is my entry for the Britmums #ColourMeInRK competition, sponsored by Kelloggs.  The prize is £500, or a year’s supply of Rice Krispies.  When I mentioned a prize, the kids took colouring in very seriously indeed…..

There is also the opportunity for 10 entries to be put on a T-shirt for the child to wear.

Lots of bloggy fingers crossed.
The Scottish Mum Kids

If you want to enter, visit the Britmums Linky and link up a blog post entry of your own.

Posted on 6 Comments

Bloggers Saving Lives – Share Niger – Child 6 – Welcome Hapsatou

A warm welcome to Hapsatou from the Child 6 team, organised by @merrilyme to sponsor children for #shareniger on Twitter.

I’ve previously blogged about the campaign and the journey by Sian To to Niger earlier this year.  Read more here.

The campaign has so far managed to raise enough money to sponsor 11 children and help with the food crisis for the next year.  Most of us couldn’t afford to sponsor a whole child by ourselves, so we’ve done child shares, which World Vision UK has allowed, and the lives of 11 families and their villages will improve thanks to blogger power.

The Child 6 Team as it was, but who are now the Hapsatou team are @geekmummy @frugalfamily, @danielleGparker and I.

Didn’t we all do well….


Posted on 15 Comments

My scabby lounge makeover – before and after. What this blog paid for.

Who says blogging doesn’t pay for anything…  My lounge was badly in need of a makeover.  Actually, it’s badly been needing a makeover for a few years now, but with the kids, and middlers propensity for temper tantrums and trashing things when his medication wears off, I really didn’t see the point of doing it.

The front lounge was last done roughly about 12 years ago and the carpet never, ever, showed any dirt.  I had no real excuse to replace it.

The lounge had deteriorated to such an extent, that the single chair in this picture had to be thrown out about six weeks ago.  Middler in a nervous mood one day, picked at it until the leather broke and then pulled it apart.  It was beyond saving.   There was a three seater which is out of view, but sadly this is the only image I can find of my lounge as it was (that tells you how I felt about it).  Boring, old fashioned and unbelievably tired.

I began to get embarrassed about it when people came to the house and that’s never good.  I didn’t want to spend blogging money on necessities as it would have disappeared into the general pot of daily living, so a new makeover was planned and executed in less than 10 days from start to finish.

Here are the pix of the end results.  Ok, the suites are not what I would choose ideally, but they fitted within my budget and were immediately available.   The TV is NOT going back into this room and it’s going to be my chill out and reading room, or a visitors only place.  It’s too light a carpet for anything else and it smells all nice and new.  I wonder how long we will be able to keep it up though.

The man was determined to lay it himself and bought a kicker to do the job.  It took him a couple of hours and saved me £120 from the original bill.


I just need to add a photo wall next.

Posted on 1 Comment

Simple Lemon Chicken Recipe for a Toasted Sandwich / Panini

A simple lemon chicken recipe for using in a toasted sandwich or panini is a lovely, light and zingy taste.   The mix also qualifies under quick chicken recipes, and can be sued with rice, potatoes, nan bread or polento to mix up the meal a little.

Lesley Smith

Lemon Chicken Toasted Panini Style Sandwich

Quick and easy, we use toasted chicken panini recipes for sandwiches when I'm in a hurry and don't have enough time to make a full meal.
Servings: 4 - 8 depending on how much filling is used

Ingredients
  

  • 500 g chicken fillets / breasts
  • 1 lemon
  • 2 tablespoons caramelised onions
  • 2 tablespoons mango chutney
  • 1 teaspoon black peppercorns
  • 100 g lettuce
  • salt to taste
  • rapeseed oil to cook chicken

Method
 

  1. I use a heavy and very large cast iron saute pan for cooking frying pan style. If you only have a small frying pan, it might be easier to cook the caramelised onions and chicken separately. Add rapeseed oil to your pan. I add the full sized pieces of chicken and cook both sides for a few minutes before taking them out of the pan and cutting them into smaller pieces.
  2. When the chicken is cooked through, add the mango chutney, black peppercorns and caramelised onions. Allow the mix to cook slowly for five minutes, turning frequently to stop it burning.
  3. While the mix is cooking, squeeze the lemon and add the juice to the pan.
  4. Prepare the bread for the filling by buttering one side if you spreads (I have a Kenwood panini maker which gets used for lots of different things, but doesn’t need butter on the outside of the bread in the way that some sandwich makers do).
  5. Top the bread with sandwich filling and simply add the second slice of bread.
  6. Toast in the panini maker for a few minutes until ready. (you might use a sandwich maker or simply put it under the grill, but grilling will mean you need to turn it over half way through).
  7. Garnish and serve.


Posted on 14 Comments

How to make yoghurt at home with a yoghurt maker. Natural Yoghurt with Granola

I thought it was about time to do this since I’ve talked but not really gone into depth about how to do it on Twitter, or how it works.  Making yoghurt at home is easy and really quite simple.  I wish I had done it years ago as it would have saved me a small fortune in lunch boxes.

I’ve certainly cheated by using a yoghurt machine, but how easy it is to have home-made yoghurt is ridiculous.

I bought my yoghurt machine from Lakeland, and it isn’t a bad price considering there isn’t any more outlay once you’ve bought it.  I did consider the Easiyo one.  Looking looking at the stats, it might have been cheaper initially, but it would have needed endless topping up of their sachet systems to make yoghurt with, and I thought those were very expensive.

Ok, ok, I know you just want to get into finding out how to make yoghurt, and miss out my long-winded explanations.

I was slightly apprehensive about getting my machine as I thought it would be more hit and miss, but it really was very very easy.  For this recipe, I sprinkled Granola on the top.

Lesley Smith

Home Made Natural Yoghurt Recipe

5 from 3 votes

Ingredients
  

  • 1 litre milk. It can be cows goats, soy or sheep.
  • 2 teaspoons live culture.
  • 2 teaspoons of skimmed milk powder if you like your yoghurt very thick.

Method
 

  1. Switch on yoghurt maker to warm up before you start.
  2. Put 1 litre of milk into a jug or the dish for the yoghurt maker. I have used UHT versions of milk as to use non UHT means that it would need to be heated up. Keep UHT milk at room temperature and not in the fridge, unless it has already been opened..
  3. Optional: Heat the milk gently in the microwave for a minute to take the edge off how cold the milk is.
  4. Stir the milk, and add the live culture and skimmed milk powder.
  5. Stir thoroughly and place the lid of the yoghurt maker on.
  6. Leave for 8 hours and come back to lovely thick yoghurt.
  7. Put straight in the fridge to chill for later.
  8. When chilled, add any sugar, fruit or spice to taste, it can also be used for cooking.

Notes

You can use skimmed, semi-skimmed or full fat milk, and the only difference will be the thickness of the yoghurt. Adding some milk powder takes care of that and gives you a lovely thick and creamy yoghurt.
Soy yoghurt doesn't seem to take as long as the cows milk and I've found that at 6 hours, it seems to be ready.
For your starter culture, buy a plain yoghurt with live culture. Some health food stores and online will sell a powdered yoghurt starter, but I find these expensive.
Save a couple of teaspoons of your freshly made yoghurt to make your next batch 🙂
If you are using unpasturised milk, ensure that you heat it up to boiling point and let it cool before you use it for yoghurt making. This ensures that any bad bacteria are killed off before you add the lovely good live culture to your milk.


Posted on 8 Comments

Introducing cats to cats. You Tube Video Find (Cute)

I found this on Youtube, and I really couldn’t resist sharing it.  I once had to introduce a teensy kitten to two adult cats and the process was pretty similar.  We had our cats eye each other up through glass doors for a few days, but the steps seem to be pretty common and I still get asked how to introduce cats.

The cats protection league has a section titled : How can I introduce my new cat to my existing cat? which gives us good pointers on how to make the introductions slowly and with care to make sure that they accept each other.

The general steps for introducing cats to each other seems to be.

1.  Allow the animals to smell and see each other through a door for a few days, each cat with plenty food, water and comfort.

2. Slowly introduce them to each other by scent on your clothes, and on hands until they get used to the scent of each other.

3. Allow them to be in the same room in your presence where you can supervise and ensure that a vulnerable cat is safe.

4. Take your time as some cats will take longer to get used to new cats than others.

I challenge you not to say awwwww at the end of this video introducing a kitten to a cat …

—————————————————————————————————————–

Posted on 30 Comments

Funky Foodies July (Month 2) & WINNER for June 2012

STAR RECIPE WINNER – for June 2012 is Mama Cook with her recipe for :  Spanakopita (spinach and feta pies) for the whole family.  Congratulations.

JULY FUNKY FOODIE LINKY IS OPEN

Apologies for being a couple of days late with the start of the linky.

  • Funky Foodies is a monthly linkie, which will be opened on the first day of the month and will close on the last day.
  • A medal will be awarded for the Star Recipe every month, and the fabulous trophy in the blog badge will be awarded at the end of a whole year of the Funky Foodies.   If you want to find out more about it, read here.
  • All you have to do is share as many recipes from your own blog a month as you’d like.  If you struggle to add your recipe, send me your link and I’ll add it for you.
  • Try to pop around and share the comment love with other funky foodies.  We all like a little love and might come across some fabulous recipes.
Simply add the link to your recipe on your own blog, and share your latest recipe with everyone taking part.  If you don’t want to miss the linkie being opened, subscribe to RSS or by email in the blog header.

I’ll add recipes of mine to share, although I don’t count in the recipe challenge.

Funky Foodies

Feel free to copy the badge or use the html in the widget at the bottom of the page to add the small blog badge to your own blog / post.  It makes finding you easier for other funky foodies.

If you want to add the July blog hop to your own recipe, get the InLinkz code and add to the html.


Posted on 4 Comments

FREE Telecare Systems for Special Needs, Eldercare or Disability

This post isn’t one for bleating or winging about what some of us can’t get, or miss out on for our disabled or elder care families.  This one I am actually very pleased with and at the same time, massively surprised about as it seems to be UK wide, but at what levels I am not quite sure.

It started at parents night at middlers special school.  The alarm system man was there to show off the systems that can be used to help families who need to know what is happening through the night.

Imagine waking up by hearing a crying child who’d been kicked out of their bed.  Imagine hearing a noise downstairs and then investigating to find a child with front and back doors open and four burners of the gas turned on !!!!!  The potential is enormous for many parents of special needs children.  Our solution was to have one adult sleep downstairs permanently.

I had asked doctors, consultants, social workers and more for solutions to it, and the only answers I could get were to lock the doors so he couldn’t get downstairs, or put new doors on so that they could be locked.  I had visions of horror in the event of fire, or if something happened and the kids couldn’t get downstairs or out of the front door as the key is under my pillow.

Cutting a long story short, coming across these alarms is kind of bitter-sweet.  We’ve struggled for years, when there was a solution on our doorsteps, and one that the council also provides for free here.  The only charge is for things like elder care fall alerts at  £1.80 a week to link up to a call centre.

The equipment is free for us in Aberdeen, and it looks free from a lot of the local authorities I’ve had a look at.  I think Aberdeenshire is £4 month, but I think most people could stretch to that for peace of mind.

After persuading my mother that she needed an alert too after falling downstairs and making this mess of herself, she finally gave in to the fact that there needs to be some way of raising an alarm when I’m here as well as when I’m away.  I was two rooms away and had no idea she had fallen face first from the top to the bottom of the stairs.

The picture was 2 days after falling.  By 5 days, the bruising had joined up under her eyes and cheekbones.  The kids said that her bruises were “growing”.   Although she looks nowhere near her 77 years, she has arthritis which makes falling actually quite easy.  There were no broken bones which amazed me.

She has two pendants and a wrist watch style fall alert.  If she falls with the watch on, it automatically sends an alert to my wrist watch and to the care centre, just in case I don’t hear it.   She can use the pendants to either just get my attention, or to go to a call centre for help if I am not here.

We have a door alarm on middlers door which is actually quite small (wandering alert).  It goes to a unit which I keep beside my bed and wakes me up if his door is opened.  He doesn’t know how I know that he has left his room and I can usher him back to his bedroom and safety.

Alert Handset

In Aberdeen, they are raising awareness of the systems as too few people seem to know about them.  My first question was “how much will it cost”.  Sceptical as usual….    The equipment was installed within 2 weeks of my initial self referral.  An assessor came out to do an assessment of what would be needed, and two fitters came a mere few days later to install all the equipment.

The service was absolutely amazing, and I don’t say that lightly.

If you know someone who could benefit from peace of mind, let them know to look for it in their area.  They really are worth having and I have to say it again, I have been enormously impressed by the Aberdeen Telecare Information Service.

We’re sleeping easier and the wrecked lounge come bedroom is getting a makeover to celebrate it’s return to being solely a lounge.