Posted on 3 Comments

Raw Food Cheesecake – Suitable for Vegans

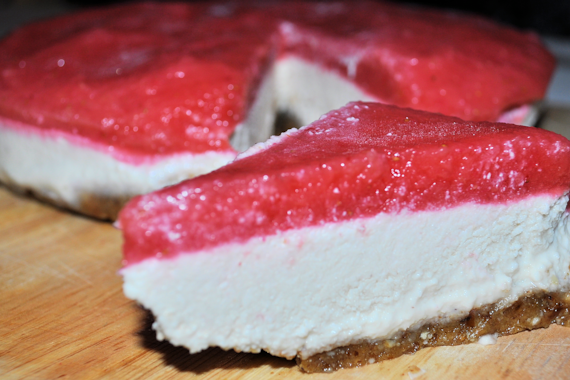
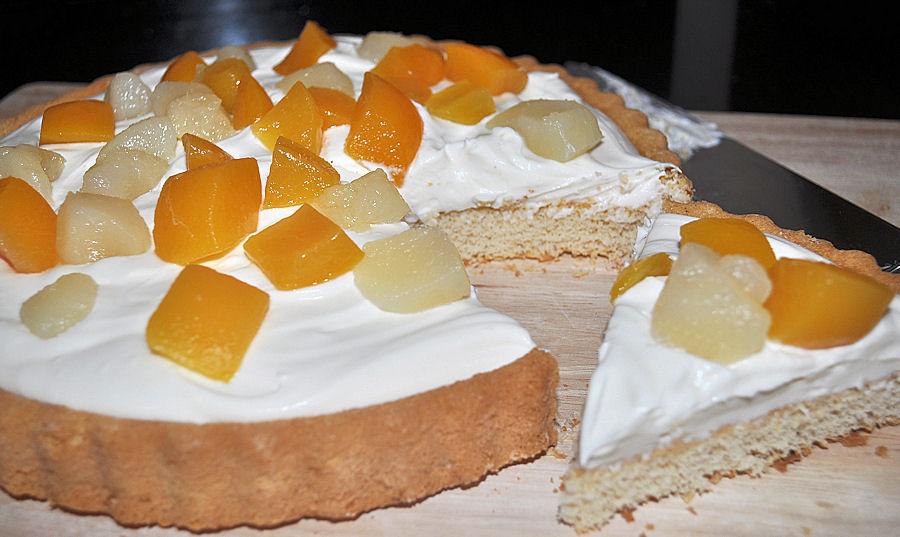
Was raw food cheesecake a sensible idea?  I’m not really sure to be honest.  I’m glad I made it, but a very small slice is enough to eat.  I loved the base and the topping, but I can’t say the same for the filling.  None of the kids liked it, but they are more used to dairy.

I do think that if I’d used a dairy filling, they’d really have liked it.  With this size of cheesecake, you could easily get about 15 – 20 small portions.

Looks pretty easyish to make, but a bit disappointing for us.  I’d say that you would have to be a die-hard vegan / vegetarian to go for this a lot, and the calories must be immense, but it does make a dessert for people who might not otherwise be able to have one.

Adding some more tartness to the filling might have made it a bigger hit here, but I’m not sure I would ever try it again.

Raw Food Cheesecake Recipe

Lesley Smith
Prep Time 1 hour
Total Time 1 hour
Servings 15 - 20

Ingredients
  

Base

  • 1.5 cups Walnuts
  • 1 cup Dates
  • 2 tablespoons Agave / Syrup or Honey If needed.
  • 0.5 cup Dessicated Coconut

Filling

  • 3 cups Cashews Soaked for at least 8 hours.
  • 3/4 cups Lemon Juice
  • 3/4 cups Coconut Oil The solid at room temp kind.
  • 3/4 cups Agave / Syrup or Honey
  • 1 tablespoon Vanilla Essence
  • 1 cup Water

Topping

  • 2 cups Strawberries

Instructions
 

Cheesecake Base

  • Put walnuts and dates into a food processor. I have to use my steel blade to get this to work and it can take several minutes to get the base to a place where it looks and feels like a cheesecake base. You can keep it with big chunks or wait a little longer to have a more finely processed base. I added a little agave syrup to help blend the nuts, but it really wasn't needed.


  • Sprinkle the coconut onto the pan you'll use for your cheesecake to set in. It makes the first layer to stop your cheesecake from sticking.

  • Press the walnut mix down on top of the coconut and your base is ready for the filling.


Filling

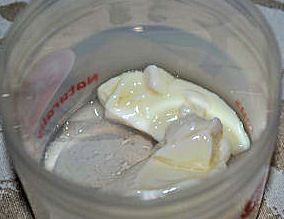
  • Put all the filling ingredients, apart from the water into a mixer / processer at the same time. You can add water bit by bit, and keep processing until you have a smooth creamy mix. It may take a few minutes to happen.

  • Put filling on top of the base and freeze it for about an hour to let it harden. At this point, it really is looking like a regular dairy cheesecake.


Topping

  • Blend the strawberries until they are smooth. Put them on top of the base and filling.


  • Put it all back in the freezer until the topping slightly hardens. Then all you have to do, is remove from freezer and serve immediately.

Notes

The coconut oil is to help the filling stay in shape. Coconut oil that is solid at room temperature works well. If you leave out the coconut oil, you may have to add in some gelatine to keep it in shape, or serve straight from the freezer instead. You can also use gelatine for the topping of strawberries to allow it to set without using the freezer.


Posted on 6 Comments

Scotty Brand Raspberries in a Raspberry Trifle with Double Cream

A delivery of Scotty Brand raspberries arrived and the raspberry making machine had to begin turning it’s wheel.  With some sponge cake left over from another day, I decided to make a lovely little glass of fast and delicious raspberry trifle.

Scotty Brand blogger badge

The raspberry cheesecake from the Scotty Brand website looks amazing, and I think I will need to try that next.  Look at this…

Follow Scotty Brand on Facebook or Twitter to keep up with their newest recipes and news.

http://www.facebook.com/scottybrandltd

@scottybrand_ab

For now, my deceptively delicious raspberry trifle it is.

Scotty Brand Raspberries in a Raspberry Trifle with Double Cream

Lesley Smith
You don't have to be precise with this recipe, as it really is a simply cheats way to make a gorgeously tasty dessert in a few minutes.
Servings 2

Ingredients
  

  • 200 g raspberries.
  • 200 g double cream. Half for whipping and half for use as pouring cream.
  • 200 g left over sponge cake.
  • 2 tablespoons jam

Instructions
 

  • Add washed raspberries to the bottom of the glass.
  • Slice sponge down the middle and spread with whipped cream and jam.
  • Cut the sponge into chunks and place on top of the raspberries.
  • Pour the remaining pouring cream over the top of the dessert, to allow it to soak into the sponge and the raspberries.
  • Serve immediately.
Posted on 14 Comments

How to make yoghurt at home with a yoghurt maker. Natural Yoghurt with Granola

I thought it was about time to do this since I’ve talked but not really gone into depth about how to do it on Twitter, or how it works.  Making yoghurt at home is easy and really quite simple.  I wish I had done it years ago as it would have saved me a small fortune in lunch boxes.

I’ve certainly cheated by using a yoghurt machine, but how easy it is to have home-made yoghurt is ridiculous.

I bought my yoghurt machine from Lakeland, and it isn’t a bad price considering there isn’t any more outlay once you’ve bought it.  I did consider the Easiyo one.  Looking looking at the stats, it might have been cheaper initially, but it would have needed endless topping up of their sachet systems to make yoghurt with, and I thought those were very expensive.

Ok, ok, I know you just want to get into finding out how to make yoghurt, and miss out my long-winded explanations.

I was slightly apprehensive about getting my machine as I thought it would be more hit and miss, but it really was very very easy.  For this recipe, I sprinkled Granola on the top.

Home Made Natural Yoghurt Recipe

Lesley Smith
5 from 3 votes

Ingredients
  

  • 1 litre milk. It can be cows goats, soy or sheep.
  • 2 teaspoons live culture.
  • 2 teaspoons of skimmed milk powder if you like your yoghurt very thick.

Instructions
 

  • Switch on yoghurt maker to warm up before you start.
  • Put 1 litre of milk into a jug or the dish for the yoghurt maker. I have used UHT versions of milk as to use non UHT means that it would need to be heated up. Keep UHT milk at room temperature and not in the fridge, unless it has already been opened..
  • Optional: Heat the milk gently in the microwave for a minute to take the edge off how cold the milk is.
  • Stir the milk, and add the live culture and skimmed milk powder.
  • Stir thoroughly and place the lid of the yoghurt maker on.
  • Leave for 8 hours and come back to lovely thick yoghurt.
  • Put straight in the fridge to chill for later.
  • When chilled, add any sugar, fruit or spice to taste, it can also be used for cooking.

Notes

You can use skimmed, semi-skimmed or full fat milk, and the only difference will be the thickness of the yoghurt. Adding some milk powder takes care of that and gives you a lovely thick and creamy yoghurt.
Soy yoghurt doesn't seem to take as long as the cows milk and I've found that at 6 hours, it seems to be ready.
For your starter culture, buy a plain yoghurt with live culture. Some health food stores and online will sell a powdered yoghurt starter, but I find these expensive.
Save a couple of teaspoons of your freshly made yoghurt to make your next batch 🙂
If you are using unpasturised milk, ensure that you heat it up to boiling point and let it cool before you use it for yoghurt making. This ensures that any bad bacteria are killed off before you add the lovely good live culture to your milk.


Posted on 14 Comments

Strawberry Cheesecake with Fresh Scotty Brand Strawberries

Our delivery of strawberries arrived, and two boxes were eaten almost immediately by children who ate them like sweeties.  They were so sweet and juicy that I was reminded of the strawberries we used to get as kids.

Scotty Brand blogger badge

Our challenge came via this adorable recipe from Scotty Brand for cheesecake pots.  You can download the Scotty Brand recipe from the link, and my version is below.  I didn’t have all the ingredients to hand, so I have changed the recipe to suit my kitchen cupboard.

The kids wolfed down some glasses of cheesecake as soon as they were made and they didn’t have the chance to set.   We only have 3 glasses left for after their evening meal tonight.  I suspect they will disappear sharply.

Strawberry Cheesecake  Makes up to 8 glasses.

Ingredients

Filling

  •  600 g Scotty Brand strawberries, blended
  •  500 g cream cheese
  • 200 ml whipping cream, whipped
  • 30 g gelatine
  • 6 tbsp hot water
  • 3 tbsp icing sugar

Base

  • 400 g digestive biscuits, crushed
  • 100 g butter, melted

Method

1. Melt butter and mix with crushed biscuit crumb.  Press into individual glasses.

2. Beat soft cheese (mascapone here) and mix with 3 tablespoons of icing sugar.  Fold in whipped cream.

3. Blend the strawberries until it’s a pulpy mush.

4. Dissolve 30 g gelatine using hot water.  Add half to the cheese mix and half to the blended strawberries.

5. Pour a layer of the blended strawberries into the glasses.  I put mine in the freezer for 10 minutes to set the strawberries a little.

6. Smooth the cheesecake mix as the next layer.

7. Pour the last of the blended strawberries on the top and leave overnight to set.

8.  Add strawberries, cream or topping before serving.

Posted on 16 Comments

Cheesecake Flan (Cheats Cheesecake)

This is a complete and utter cop out for cheesecake but is fabulously easy, quick to make and the kids and visitors are always impressed.

Ingredients

    •  1 x Large sponge flan case.
    • 500g Tub of mascapone cheese.
    • 4 Tablespoons icing sugar.
    • 1 Teaspoon vanilla essence (optional).
    • Peaches and pears.

Method

      • Take cover off pre-bought flan case (hard work I know).
      • Mix mascapone cheese with the icing sugar.
      • Add vanilla essence if you want a slightly creamier taste.
      • Spread mix onto flan case.
      • Slice (or drain) peaches and pears.  I dry mine with kitchen roll, then just plop on the top.
      • Pop into fridge for half an hour if you’ve time.

Hey presto.


Posted on Leave a comment

The Cheats Strawberry & Raspberry Pavlova (made in Aberdeen by kids)

Made in Aberdeen by the Scottish Mum kids.

Want a speedy dessert that will make kids fall over themselves with delight at having made?  One they can share with family and friends, or just to eat themselves?

There is nothing difficult about creating such a spectacular tower of indulgency for a sweet dessert to die for, nor does it take any time at all to put together.  Using bits and bobs left lying around the house, it uses up all the fruit and sweetie leftovers.

Ingredients my boys used:

  • mini marshmallows
  • sugar strands
  • a pre-made meringue pavlova case
  • carton of custard (or you could make it yourself)
  • spray Tip Top cream (thoroughly ashamed, but hey, it was speedy)
  • strawberries and raspberries

Pinching a marshmallow is good fun too.

With some custard added to the bottom of the pavlova, spraying on the Tip Top was the next step.

Adding the fruit and veg is the most difficult bit for fingers.

Then simply finish the decoration and eat immediately.  This is not a dessert that can languish in the fridge. If you use fresh cream, you would get away with putting it in the fridge for later.