Posted on 1 Comment

Madeira Wine Cake Recipe

I used to think that Madeira Cake was made with Madeira wine, the same way that liqueurs are often substituted in recipes.  It took a long time for me to realise that the Madeira Wine came in as the perfect accompaniment to a crumbly sponge cake.  I’d be tempted to use almost any sponge cake recipe for use as a Madeira cake, with the addition of some lemon for that citrusy taste to give the cake a tangy flavour.

Here, I’ve used a basic sponge cake recipe.

The accompaniment for sponge cake, to counteract crumbly dry texture, is always a sweet white wine.

Madeira wine from the Madeira Islands is particularly good for this, but choose a sweet variety to accompany cake for afternoon tea.

Unusually, Madeira wine is fortified (made by adding the Madeira spirit) and the flavour is created by heating the wine up to high temperatures and keeping those constant for a good period of time, which also helps to keep the wine for a long time when it’s opened.

Here is my Madeira Cake Recipe Using a Basic Sponge 

Madeira Sponge Cake Slices

Ingredients

  • 250g Caster Sugar
  • 250g Butter
  • 250g Self-Raising Flour
  • 4 Eggs
  • Grated Rind of 1 Lemon

Method

  1. Set the oven to a moderate temperature.  Around 160-170 C.
  2. Mix (cream) the sugar and butter together in a mixer or bowl until smooth.
  3. Add in the eggs and mix until smooth.
  4. Fold in the sifted flour until you have a cake mix texture without lumps and bumps, then fold in the grated lemon rind.
  5. Put the mixture into a loaf tin or two depending on the size.
  6. Bake for up to 35 minutes.  To find out if your cake is fully cooked, use a barbeque skewer to pierce the cake, and if it comes out clean, it’s fully cooked.  Adding a spray or two of cake release to the tins helps with removing your cake once it’s cooked.
  7. When your cake is cool, and I mean cool, slice it in the same way you would a loaf of bread.  If you slice it hot, the cake may crumble into tiny pieces.
  8. Serve and enjoy with a glass of Madeira Wine.  Tesco have a great selection of sweet white wines.

Written for Tesco.

Posted on 3 Comments

Do Onions Bring Tears To Your Eyes?

One of the most versatile ingredients for many dishes has to be onions.  The majority of mine have onions in some shape or form, whether they’re red, white or just small shallots.

Without going into too much depth, there is a lot of goodness in our onions and we’d all do well to eat more of them than we actually do, depending on our current intake.

Why are onions good for us?

In a word, phytonutrients, or plant nutrients as I know them better.  The substances that help prevent some diseases and are good for our health.  If you don’t know what those are, you’re in good company.  Neither did I, until I skimmed through the notes from my University course from years ago.   I must have known at some point, but it had been very well forgotten.  All I could remember was that they beat tomatoes and carrots hands down.

Onions 255

Where are the nutrients?

What I did remember, was to peel onions very lightly, taking off only the outer skin where possible, to keep the best flavour of the onion.   I grew up having the benefits of a thin peel for potatoes from my grandmother, but the benefit of onions hadn’t been drummed into me so well.

When onions are cooked for soup making, they don’t lose their health benefits.  Some will leech into the water or stock, but they’re still there, doing us a lot of good when they’re cooked into our food.

There is also some discussion around whether onions help reduce our stress levels.  Just for that reason alone, it’s worth adding them into our diet.  I find that when they’re cooked into food, a strong oniony taste disappears, which is always good if we’re cooking for children and making smooth soups, where the individual taste of vegetables can be easily hidden from children.

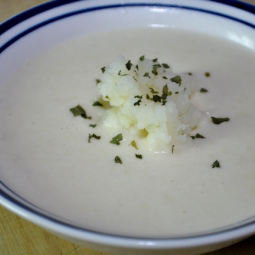
Cooking onions for soup.

Using the sauté method, where we slowly cook our onions until they’re soft, brings out the natural flavour that many of us love.

Happy hearts.

Like garlic, onions have a beneficial effect on our hearts.  There has been talk about onions helping to stop clots forming in blood, but how true that is, I haven’t had time to research fully.   As a mum, I’m happy to go with the old wives tale of onions being a natural reducer of cholesterol.

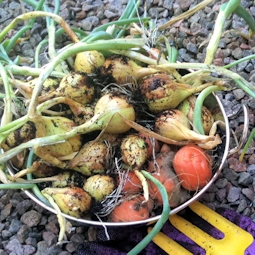
A kitchen garden vegetable.

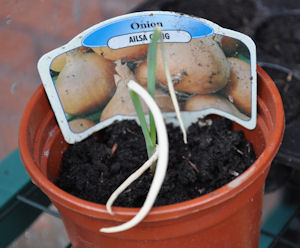
As a plot renting household, we tend to always have plenty onions on the go.  They’re easily grown and fresh onions always seem to taste sweeter than their shop bought companions.  We successfully grow traditional onions as well as the small sweet spring onions and their leeky companions.

Our onions tend to differ in size and colour, often with different varieties mixed together, but we find the small yellow ones easiest to grow in our cool climate.

onions1

Where did onions come from?

On the internet, I found that people tend to say they came from Egypt, thousands of years ago.   They were held in high regard and even buried in tombs with important people.

Choosing and Storing Onions.

Make sure your choices have a good round shape with an unbroken stem and a crispy top layer.  Soft spots and dark spots can mean the onion is past its best and are best avoided.   In the past, I’ve made the mistake of putting onions in my fridge, but that should really be avoided as often as possible.  Keep them in the dark, in a dry but well ventilated room.  I’ve kept onions for up to a month, but sweeter varieties can degrade more quickly.

Helping the Stinging Eye Syndrome.

I suffer from this badly, yet my youngest child can chop the meanest of onions and shed never a tear.  When we cut into onions, we release a natural gas that can bring a tear to the eyes.  Apart from being incredibly useful for actors, there seems to be little other benefit for the rest of us.

I’m told the following can work, but for me, these seem to do  nothing.  And I’ve tried them all.

  • Using a very sharp knife.
  • Cut low and stand tall, maximising the distance between your eyes and the onion.
  • Wear glasses.  I have to say that I wear glasses most days and they don’t help me with this problem at all.
  • Stick the onions in the freezer for a few minutes before chopping.
  • Chop them up outside.
  • All of the above.


Posted on 5 Comments

Creme Egg Brownies – With A Surprise Middle

Cadbury is my favourite chocolate, but making a cadburys cake hadn’t come into my kitchen until now.  For an Easter recipe, it seems a good idea to use one of the things that we only get for a few months each year, the renowned Cadburys Creme Egg.

The kids wanted a tray bake to take to a friend’s house, but I had so little that would actually fit into any one recipe and sponge didn’t seem to be the answer.  I had too few eggs, so it had to be brownies.

My eldest pottered round to the local co-0p and came back with a variety of cream eggs, with different fillings.  It wasn’t quite what I’d asked for, but hey ho, they were all Cadburys chocolate of some sort.

We ended up with some full sized Cadbury Creme Eggs, and some Cadbury Caramel Mini Eggs.  I was at a bit of a loss, so brownies seemed to be the answer for this conundrum.  I’m just glad these are going out of the house, as they are delicious and far too calorie laden to be more than an odd treat.

Serves16
Prep time15 minutes
Cook time40 minutes
Total time55 minutes
By authorLesley S Smith

INGREDIENTS

  • 250g Unsalted Butter (Softened)
  • 375g Caster Sugar
  • 200 Grams Plain Flour
  • 3 Eggs
  • 50g Cocoa Powder
  • 5 – 6 Cadbury Creme Eggs
  • 16 Cadbury Mini Eggs
  • 1 teaspoon Coffee Powder (Optional)

METHOD

Step 1
Preheat your oven before you start and set it to 180ºC, or reduce it to 160ºC for a fan oven.

Step 2
Grease a medium to large baking try or roasting tin.

Step 3
fAdd all the ingredients to the mixer, or bowl, and mix/fold until smooth. Many people will beat the sugar and eggs together first, but I don’t bother for brownies. I just throw it all in.

Step 4
Pour into your choice of baking tray and smooth it all into the edges.

Step 5
fPut into the oven for 20 minutes, lightly score the top of the mixture in the cake tin into portions and push half or a whole mini egg into each portion.

Step 6
fPut the brownies back into the oven for a further 20 – 25 minutes, or until the mixture stops wobbling when you shake the pan.

Step 7
fLet your Cadburys Brownies cool down before putting smushed pieces of Cadbury’s Creme Egg on the top and serving. The kids wanted a bit of colour, so we added a little icing writing to the plate, which pleased them very much.

Posted on 7 Comments

Crustless Tattie, Cheese, Tomato & Onion Quiche

Not everyone likes pastry, or wants the calories and fat that come from making it.  It doesn’t mean we have to do without quiche style dishes.  This version is made using a regular oven dish, with all the ingredients just placed in.

PASTRY FREE POTATO, CHEESE, ONION AND TOMATO QUICHE (CRUSTLESS QUICHE)

Pastry Free Potato, Cheese, Onion and Tomato Quiche (Crustless Quiche)
Serves10-12
Prep time20 minutes
Cook time30 minutes
Total time50 minutes
AllergyEggMilk
Meal typeLunchMain Dish
MiscPre-preparableServe ColdServe Hot
By authorLesley Smith

INGREDIENTS

  • 700g Baby Potatoes
  • 25g Garlic Butter
  • 500g Cheddar Cheese (Grated)
  • 250ml Semi Skimmed Milk
  • 12 Medium Eggs
  • 1 Large Onion (Finely Chopped)
  • Salt & Pepper to taste
  • 1 Vegetable Stock Pot
  • 250g Cherry Tomatoes (Cut into thirds.)

METHOD

Step 1
Set your oven to approximately 160 – 170 c.

Step 2
Wash and smother the baby potatoes in garlic butter. Place them on a microwave safe plate and cook them for 10 minutes. Remember to pierce each one, or you could end up with exploding tatties. If you don’t have a microwave, simply boil them for ten to fifteen minutes, then drain and let the garlic butter melt on the skins.

Step 3
Beat your eggs and mix in the milk. Have your chopped onion ready to go into the dish. Feel free to saute your onions in a little olive oil if you like them done that way too. I would have added mushrooms, but my mother wouldn’t eat the meal and she’s eating with us tonight, so it’s a mushroomless variety.

Step 4
Slice the baby potatoes into evenly thick slices. I usually get about three or four slices from a baby potato.

Step 5
Pour around 1-2mm of the egg/milk mix into the bottom of your dish. Mine is approximately 10 inches by 8 inches in size. You could use a couple of smaller oven dishes just as easily.

Step 6
Place a layer of sliced potatoes onto the bottom of your dish, then layer some cheese on top and add some tomatoes. repeat with some more potato and then the cheese, until you run out of ingredients.

Step 7
Top up the dish with the remainder of the egg/milk mix, making sure to pour slowly, with the intention of not disturbing the filler too much.

Step 8
Pop in the oven and bake until the egg is set. Usually around 20 – 30 minutes.

Posted on 2 Comments

Soup Maker Recipe: Soya Bean and Onion Soup

Soya beans tend to have a very pungent taste to me, so making soup from soya is all about changing the flavour.

SOUP MAKER RECIPE: SOYA BEAN & ONION SOUP WITH CARDAMOM

Soup Maker Recipe: Soya Bean and Onion Soup

Lesley Smith
Prep Time 10 minutes
Cook Time 21 minutes
Total Time 31 minutes
Servings 4 -6

Ingredients
  

  • 300 g Soya Beans The Green Endamame Beans
  • 300 g Onions Finely Sliced
  • 200 g Potatoes Peeled & Chopped
  • 800 ml Hot Vegetable Stockpinch Salt & Pepper To Taste
  • 1 teaspoon Cardamom Powder
  • 1 teaspoon Olive Oil

Instructions
 

  • Lightly saute the onions and cardamom with a pinch of salt and pepper, in the olive oil.

  • Add all the ingredients to the soup maker and stir very well.Choose the smooth setting for a thick soup.

  • Season with other herbs or spices if you'd like a stronger taste.


Posted on 2 Comments

News from the SoupMaker.Club 22nd February 2015

For those of you subscribing here, these are newest recipes on the soup maker club website.

Soup Maker Fruit Cocktail and Pear Smoothie (Tinned Version)

Tinned-Fruit-Smoothie-2-258x300

Soup Maker Version of Cauliflower and Cheese Soup

Soup Maker Chicken & Sweetcorn Soup

Soup Maker Chicken & Mushroom Soup

Soup Maker Version Coconut and Lime Soup


Posted on 3 Comments

Review: Tassimo Coffee Maker

We’ve recently been using a Tassimo Coffee Machine.  It’s not the top of range one, as we had to go with one that had a large tank on it.  Ours is the Fidelia T40 Tassimo by Bosch machine.   I was half the price on Argos website in their sale, so I’m surprised to see how expensive they just a week or two on, but also grateful for getting ours so cheaply.  It pays to watch out for bargains it seems.

With six people in the house, of whom, 2 are die-hard coffee addicts and 1 child is a right tea johnny, a machine that only spits out a couple of cups at a time would have been harder to live with, but saying that, I have nothing to compare it with as yet, so can’t express my approval at our machine highly enough.

Tassimo

The driving force in buying one, was simply due to my mother and her shaking hands.

She can no longer manage the kettle well, and I didn’t want to take away the pleasure of making her own coffee, so a pod machine it was.

In the end, I went for the one on offer in Argos at the time and bought the cheapest they had with the largest tank.

I did spend a fair while trying to decide on a Nespresso machine v a Tassimo.

The Tassimo won due to the availability of tea and hot chocolate pods.  The advert for £20 off t discs on the box  helped to cement that decision a little too.

Tassimo Bosch

We’ve had our first pods, and we’ve got our first delivery of coffee pods.  I did manage to be a tad disappointed that there don’t seem to be any compatible pods, or t-discs as they’re called for the Tassimo, but I’ve learned to live with that for the moment as these machines do so much more than just make coffee from the discs.

Tassimo T Discs

I’ve been offered pods/discs in the past to review, but never had a machine to use them with, so perhaps you’ll now see reviews of those going online.

I suspect Tassimo Recipes will be going up here soon too.  Tiramisu and Chocolate Mousse seem like a good place to start for me in the next couple of months.

Tassimo Costa Americano

My biggest relief was finding out that it dispensed hot water as well as making coffee.  When we first got our machine, we ran out of discs quickly.

That was no problem, as it just needed the cleaning disc inserted, a spoon of coffee in the bottom of the mug, and off it went making instant coffee too, all while only boiling enough for each mug of coffee.

It’s also been used to fill one of the pot noodles that the middle one is partial to for a snack, meaning that he does not have to manipulate the kettle either.

Each t-disc has a barcode on it.  The machine reads that barcode and it tells the machine how much water to dispense with the beverage of choice.  Some drinks are enough for Expresso type small cups and others need larger cups for the latte style drinks.  If we want a weaker coffee, we can simply choose to press the button at the right time to dispense extra hot water into the cup.

Tassimo T Discs2

Most of us love it, that is, apart from the one person who it was bought for in the first place.  Sadly, it seems that dementia and learning how to use a new machine, don’t go hand in hand, so the machine is now fully the preserve of the rest of the family, but with one difference.

The kids are all comfortable with making her a cup of coffee with it, where they were more wary of pouring boiling water from the kettle, so I have helpers to give the elder her caffeine fix.  And for days she’s on coffee overdose, we switch to decaff after she’s had a couple of steaming mugs.  She can never tell the difference.


Posted on 11 Comments

Frozen Veg Versus Fresh Veg – Would you use frozen fruit and vegetables?

If you believe the Daily Mail, the consensus is that frozen food is better than fresh food – and that includes frozen vegetables and fruit.

Using frozen ingredients in recipes isn’t always popular though, and I do often wonder how many of us actually use them.

Von Chef Frozen Strawberries

Coming from a family who always ate from fresh, I found the transition to using frozen food a bit difficult.  It had always been drummed into my head that fresh was the way to go, no matter what.  We grow a lot of our own in summer, so it’s always the winter months where we are lacking in much of the fresh stuff.

Apparently a couple of studies have found that frozen fruit and veg could actually be healthier with the higher levels of vitamins preserved in them, especially the antioxidant leafy veg

The antioxidants fared best, which included Vitamin C, polyphenols, anthocyanins, lutein and beta-carotene.

Frozen Vegetables

Personally, I’m not 100% convinced they’re better for us, but I can understand how they would be just as good for us if they were picked and frozen quickly.  I’ve seen the evidence, but I can’t get my head around how they could possibly be an improvement.

There’s always the benefit of not being in transit for days before they get to us, which can’t be bad though, and the frozen version will keep the freshness they seem to have.

I don’t like frozen fruit and veg when it’s thawed from the packet.  That’s just me, so I rarely use them for just serving up the veg on its own, but I do use them for cooking in other food.  The slightly limp results I seem to get on defrosting tends to put them off my list for just adding veg to the plate as a side dish to a main course.

Von Chef Frozen Bananas

I did find great ways to use fruit I froze myself, with the frozen dessert maker that Von Shef sent to me, but that’s not what I’m talking about.  Strangely, the fruit I froze in my freezer did not have the wetter consistency that the shop bought kind seems to have.

I do buy a lot of frozen veg though.  I love it for last-minute soups, for onions and for garlic and ginger.  I’ve been using more and more frozen carrots too, as they just last so long.  As much as I love fresh carrots, there are times when they’re wasted in the veg drawer and end up in the bin, which I find very wasteful.  Unless I’m buying those for specific meal planning, I keep reserves in the freezer for days we fancy carrots or I’m putting a casserole on and fancy throwing some in without having to visit the local shop.

At the end of the day, unlike a lot of home cooks, I’m very pro the use of frozen veg in recipes.  I’ll use fresh where I can, but frozen is not off my radar.

What about you?


Posted on 4 Comments

How to make stock in a Soup Maker

We’re all put off making stock on occasion, by the sheer need to be around as the pot simmers those old bones and bits left over from any roast we’ve had for dinner, but there is another way.

Chicken Stock 2

Determined to use my Soup Maker to its full extent, I tried making stock as a test, to see if it was really possible to do.  Any soups always taste fabulous with fresh stock, so it’s a no brainer for me.  I put the carcass or bones into a pot as soon as it’s cooked, so that I can freeze any leftovers for another day.  I don’t let it cool, as I’ve always lived by the rule of only one reheat after meat is cooked.

It’s fairly simple.  I add nothing as I prefer to add my extra ingredients at the cooking stage, but you could add different options.

Ingredients:  Carcass, Bones or Leftover Meat

Optional:  

– Salt & Pepper

– Stock Pot

– Garlic

– Onions etc

Add any bones, or chopped up pieces of leftover meat to your soup maker.  You do need to ensure there is enough room to put on your lid if you use a kettle version.

Method:

Step 1

Add your ingredients to the soup maker, choose the chunky option and run through the cycle.

Step 2

Chicken Stock 1

If you like your stock to be stronger, run it through a second cycle.

Step 3

Sieve your liquid, to separate the bones & meat from the liquid stock, and now it’s ready for use.  You can freeze the stock if it’s freshly made, but if you’ve let the meat or the carcass cool, I’d use it straight away.

IMG_8817


Posted on 21 Comments

Soup Maker Recipe: Vegetable and Lentil Soup

Soup Maker Vegetable and Lentil Soup

Lesley Smith
4 from 1 vote
Prep Time 10 minutes
Cook Time 21 minutes
Total Time 31 minutes
Course Soup
Servings 4 -6

Ingredients
  

  • 500 g Mixed Vegetables I used Potatoes, Carrot and Turnip
  • 50 g Lentils
  • 1 clove Garlic
  • 1 teaspoon Cinnamon Spice
  • 1 Stock Pot
  • 1 pinch Salt
  • 1 pinch Pepper
  • 800 ml Vegetable Stock

Instructions
 

  • As simple as can be. Just throw all your ingredients into the pot.

  • Set your soup maker to the smooth setting. As this soup cools, it will thicken a fair bit. It depends if you'd rather make it and eat it fresh, or wait until it has thickened and then re-heat it.

  • Season with other herbs or spices if you'd like a stronger taste.


Posted on 1 Comment

Soup Maker Club

Soups have begun to take over the blog.  I know a fair few of you visit, just for the soups.  I see many of you subscribing after reading soup posts, but if you’re just after soup recipes, you might not want to read lots of my other posts, articles and sometimes, even my rants over nothing much in particular, but things that bother me at that specific moment.  I’m very happy for you to stay subscribing to all posts here, but if you just want soups, smoothies and shakes, I’ve created a place for those to go.

I plan to keep soups I’ve made and photographed on the Scottish Mum blog, but for those of you who don’t want to read everything else, I’ve started a soup maker recipe specific blog.   All the recipes from here will be added, and there will be lots more recipes, particularly ones I’ve made, but have not got round to photographing.  For those, I might use a stock picture or just no picture at all, but rest assured, every one that makes on on this blog and on the Soup Maker Club and posted by me, will have been cooked up by my trusty Morphy Richards.

The new website won’t just be limited to a soup maker.  The plan is to enjoy soups of all kinds, from a pot, to bubbling in a tin over a camp fire, or even thrown into the microwave.  If you’ve got an unusual way of cooking soup, then I’d love to hear it from you and feature your own recipes over there.

Soupmaker club

All you have to do, is head over to soupmaker.club to find me over there.   Sign up to join the club, and instead of being sent each new recipe as it arrives, I’ll send you a digest of weekly or monthly news, including new recipes on the blog and posts, giving you the choice whether to check them out or not.

If you want to add your own recipes for the soupmaker club, just send them to me, or use the form on the website.  I can’t see my soupmaker being used any less than it is now, well not for the rest of my own life, so I’m hoping to build an impressive backlog of soups for us all to enjoy.

Thanks for listening and for the ongoing support of my readers, as without you, there would be no blog.

Lesley

x