Posted on 5 Comments

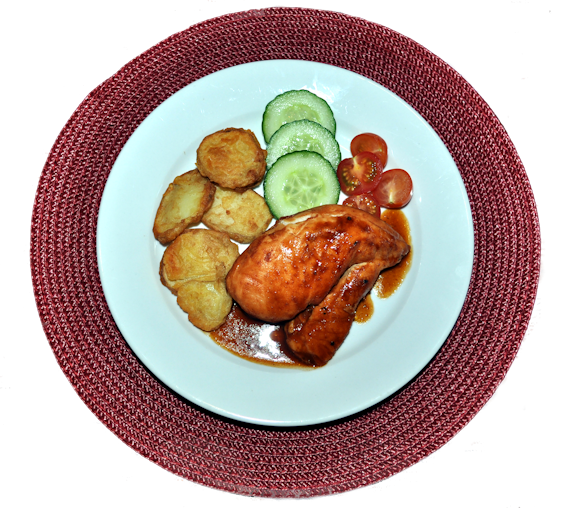
Sticky BBQ Chicken, Cherry Tomatoes & Cucumber

Sticky BBQ Chicken 570

Much easier than it looked, I think I’m now hooked on cooking in the bag. This time round, I bought Maggi So Juicy to try it, but after seeing it is a Nestle product and knowing the boycott around them for the advertising campaigns at mothers in third world countries to get them to buy baby formula, I doubt I’ll buy it again. My next attempt will just be a roasting bag with herbs and spices in it.

I didn’t see anything to worry me on the ingredients list, although I’d have preferred to do without the Maltodextrin if it was at all possible.

All there is to it, is to open the top, take out the bag and pop your chicken into it. Then shake the seasoning into the bag, tie the end with the clip provided and turn the bag over and over until all the seasoning coats the chicken.

I used chicken breasts from my favourite online butcher. I forgot to pierce the 4 small holes in the top of the bag, but it didn’t seem to do any damage. I added 5 whole chicken breasts to the pack and there was plenty of room for them to cook despite being huge.

The bag expands a fair bit so make sure you put it in the lower to middle of your oven, otherwise, you could end up like me with the top of the bag sticking to the upper rack and having to peel it off.

Thankfully the bag stood up to a fair bit of punishment all in all, and I did spend longer cooking it than was recommended on the pack. I cooked for an hour, whereas the recipe said 30 – 40 minutes for drumsticks. I reasoned that the big chicken breasts would take longer to cook and they came out just perfectly.

I served with Potato fritters, cherry tomatoes and cucumber.

My next job is to try it without the ready made herbs and spices.

Sticky BBQ Chicken 2

Posted on 4 Comments

My Vege Bags

My little pots are growing their leaves and flowers, and I hope, that eventually we will manage to have some lovely little flowers from the pots and containers that are full of gorgeous leaves.  Whether they actually have some fruit or not remains to be seen, but hopefully they do.     I have spent hours (ok minutes) tending these lovely pots and bags to try to turn my non gardening fingers into some semblance of a growers beginnings.

Here for your enjoyment, in all the Scottish dreary weather are some shots of my growing pot collection.

I did try to hold off until the sun showed its’ smiley face again, but I suspect that might not be anytime soon.

Ok, ok, I know these are not vegetables, but some pansies and geraniums make lovely pictures.

The strawberries are nearly ripe for picking (all three of them).  There are two more, honestly, there are.

Leeks and Onions and Lettuce are really doing well.

My potatoes are growing up a storm.

And apart from the carrots on either end, I have no idea what is growing in the  middle of my trough.

My neighbour gave me the seedlings and I planted them.  She cannot remember what they were.  If you recognise the leaves, do let me know.

Thats it for now.  I’ll post more when I start to harvest my little crop.

Posted on 4 Comments

Another Big Idea – Fruit and Veg – Grow Yer Ain

I really have no idea what came over me, but I have decided to have a go at growing a few bits and bobs.   It all started out in Sainsburys with their little tubs for childen to grow strawberries and tomatoes.  They’re cute, they’re sweet, and after a little humming and heying, I went for it.   The kids were actually quite excited about it all and with serious faces, they all took their turn, and we now have some little seeds in pots waiting to grow before I put them outside.

 My boys really did enjoy doing these.  Putting in the little pellets, and seeing them grow to fill the pots as they added the water was surprising.  I really didn’t think that they would enjoy it at their age.    The sticks were duly written on with the date and the type of seed on it.  I am just hoping that they are as keen to keep looking after the plants once they begin to come through.

The only problem for me is, that once I start getting into things, I tend to take them to completely over the top levels, so I have been out shopping for more.  First in line was a few seeds to add to a new propagator.  Sweetcorn, melon, and peas have made their way to teensy little pots that we are watering and checking by the hour for signs of growth.

Whats next for my boys and I?  More plantlings, that’s for sure.  We had lots of fun sorting, picking and watering the seeds.  They are interested in them because they feel responsible for starting them off.

Wish us luck…….

That some of the seeds grow ……………

Posted on Leave a comment

Making Quiche / Flans on the Fly

Making quiche is easy.  It takes very little time, and you have a cracking meal very quickly.  

 I am one of these cooks who tends only to weigh what she has to.

  I weigh for doughs, bread and cakes, but I rarely weigh for things like pie fillings, pastas, rice, quiche, risottos, currys, stir frys etc etc. 

For those dishes, I reserve a remedy called

“chuck it in and hope for the best.”

Usually my chuck it in dishes turn out perfectly.  Not always, and one day I will post some of them.   Today is all about how I make quiche, or flan.

I have to thank @superamazingmum on twitter for the outline of how to make a flan, as I had no idea how easy it was until she posted it to me in three tweets.  I have made about a dozen of them since, and they ALL come out fabulous.

PASTRY

Making shortcrust pastry is easy, especially if you have a food mixer.  I really would recommend having one if you are planning to so any serious cooking for any length of time, as the pain it saves in your arms from all the mixing if you home cook a lot, is a true blessing.

250g  plain flour
110g  butter
Two pinches salt
Some water

This is easy.  Put flour and butter into a bowl and either rub the butter into the flour, or mix it in the food processor until it is a breadcrumb consistency.  Make sure that all the lumps of butter are rubbed in.

Add a couple of pinches of salt and mis in with your breadcrumb consistency.

Add a little water at a time and either mix by hand, or in the mixer / processor until the dough forms a ball.   Stop when the dough has bound together. 

Wrap the dough up with clingfilm and refridgerate for approximtely half an hour before using it. 

QUICHE

The dough mixed above, gives me enough dough for one large flan dish which is 8″ diameter, and two smaller ones approx 4″ diameter.

Taking the dough out of the fridge, flour a surface so that you can roll out the dough to the shape you need.  I use my rolling pin to roll the dough to a larger size than I need for my biggest flan dish.  I used to butter the dish before putting my pastry in, but now I have more professional baking tins, the ones I use for my flans (which came from tesco) don’t need greased before cooking.  I plop my rolled out piece of dough in the flan dish, press around the botton and the top, which takes the excess dough off the tin, and  repeat for the smaller flan trays.  Easy as 1, 2 3

All I need to do next is decide on a filling.  This week I have made cheese and tomato with chicken, and cheese and herb with garlic.  The world is your oyster.  Put in your flan whatever you want to.    Do not use raw meat in a quiche or flan as quiche is not cooked long enough or hot enough to cook the meat thoroughly. 

The egg and milk mix is the glue that holds the quiche / flan together.  To make one 8″ and 2 x 4″ flans, I need to crack open about 6 – 8 eggs and using a fork, whisk them for a minute.  I  then add 250 –  300ml of milk for each 4 eggs, or until I judge by eye that I have enough.

  •  To add a cheese and tomato with chicken, I would line the botton of the flan dish with a thick layer of grated cheese (usually mozarella in this  house).
  • Add chicken and sprinkle across the top of the cheese around the flan dish.
  • Place tomatoes, herbs and anything else you want to add on the top.
  • Fill up the empty space with the egg and milk mixture.
  • Bake for between 20 – 40 minutes at 160 – 170 degrees until all the egg is solidified.

The time to bake will depend on your flan size.  When you take it out of the oven, let it lie for five minutes for the egg to settle.