Posted on 4 Comments

Soupmaker Recipe: Cream of Pumpkin Soup

creamy-pumpkin-soup-750

Better Quality Video is the second one, but it is longer.

[fbvideo link=”https://www.facebook.com/ScottishMumBlog/videos/1215979371801342/” width=”500″ height=”400″ onlyvideo=”1″]

[fbvideo link=”https://www.facebook.com/ScottishMumBlog/videos/1218050738260872/” width=”500″ height=”400″ onlyvideo=”1″]

Cream of Pumpkin Soup

Lesley Smith
Pumpkin Soup isn't just for Halloween. Enjoy it any time of the year.
Prep Time 10 minutes
Cook Time 21 minutes
Total Time 31 minutes
Servings 4 -6 Bowls

Ingredients
  

  • 400 g Pumpkin chopped.
  • 100 g Carrot chopped.
  • 200 g Onion chopped.
  • 2 Vegetable Stock Cubes.
  • 200 ml Milk.
  • 1 Garlic clove or Garlic frozen cube.
  • Salt and Pepper to taste.
  • Water.
  • 2 Tablespoons Rapeseed Oil.

Instructions
 

  • Put your chopped onion and rapeseed oil into your machine if you have a saute version, or do the sauteeing on the stove. Lightly fry your onions until soft.

  • Add the garlic and stock cubes, and finish the saute, by adding carrots and pumpkin. Stir and switch off the saute button.

  • Add in milk, water and salt/pepper to taste. Ensure the level of ingredients and liquid is below the maximum and above the minimum fill marks.

    .
  • Stir well, and ensure the lid is on tight.

  • Select the smooth setting.

  • I served with a little parsley.


Posted on 2 Comments

Soup Maker Recipe: Cream of Peppercorn Pumpkin Soup

Did you know raw pumpkin seeds are actually good for you?  I only found out when I was looking for more ways to add protein into my life.  I’ve tended to mostly roast my seeds before eating, but it’s not necessary at all. Straight from the pumpkin, these little pale seeds also have iron, potassium, phosphorous, zinc and magnesium.  Don’t throw away those seeds when you’re carving up your pumpkins this year – get them in your bellies somehow. You can use them in soups, salads, sandwiches, porridge, cereal, pasta and even curries and stews.

I like to add seeds at the end for extra crunch.  I haven’t tried adding them at the cooking stage, but I’ll be trying that over the next week before Halloween.  We’ve ended up with far too much pumpkin to use…

peppercorn-pumpkin-soup-2

Cream of Peppercorn Pumpkin Soup

Lesley Smith
Prep Time 10 minutes
Cook Time 21 minutes
Total Time 31 minutes
Course Soup Maker
Cuisine Soup
Servings 4 -6 Bowls

Ingredients
  

  • 460 g Pumpkin peeled, chopped.
  • 100 g Onion diced.
  • 130 g Leek chopped.
  • 2 Vegetable Stock Cubes.
  • 2 Teaspoons Ground Peppercorns. I used rainbow peppercorns.
  • 1 Teaspoon Ground Nutmeg.
  • Salt & Pepper to Taste.
  • Water.

Instructions
 

  • Saute your onions in a little oil if you wish. I didn't this time round, as I was in a bit of a hurry.

  • Add all your ingredients, apart from the stock cubes to the soupmaker.

  • Top up with water, to above the minimum and below the maximum levels.

  • Crumble the stock cubes over the top, and mix well with a wooden spoon.

  • Make sure your lid in on properly.

  • Choose the smooth setting.

  • At the end of the cycle, I used my blend setting for another 10 seconds to purée the soup even more. Pumpkin can need a little longer to break down than other vegetables.


Posted on Leave a comment

Pressure Cooker Soup: Broccoli, Sweetcorn & Asparagus Spears

It had to happen, didn’t it?  Soup in a Pressure Cooker from me….

This is an Instant Pot Recipe, or the 7 in 1 Pressure Cookers that do it all for us.

I imagine most pressure cookers work the same, and this is the first soup recipe in my brand spanking new machine, bought this week from Costco.  There are times when I’ve got need of a larger pot of soup than my soup maker, but I still don’t want to spend the time standing over the stove.  It helped that my pressure cooker has a soup setting, and I was keen to make the most of it.

broccoli-and-asparagus-spears-3


Pressure Cooker Soup: Broccoli, Sweetcorn & Asparagus Spears

Lesley Smith
Overall, broccoli and asparagus are the strongest flavours to come out in the soup. The taste of onion, leek and potato seem to blend into the green vegetables, giving a lovely texture that I didn't expect. I'd make this recipe x 1.5 or double it in future. This was just an orientation recipe that came out rather well. I'd also be tempted to stir in 50g of grated cheddar cheese at my next attempt with this.
Prep Time 10 minutes
Cook Time 35 minutes
Total Time 45 minutes
Course Pressure Cooker Soup Recipe
Cuisine Soup
Servings 6 - 8 Bowls

Ingredients
  

  • 100 g Asparagus Spears chopped.
  • 100 g Tenderstem Broccoli chopped. I remove leaves.
  • 200 g Onion diced.
  • 200 g Leek washed and chopped.
  • 100 g Sweetcorn. I used Niblets.
  • 50 ml Rapeseed oil.
  • 100 g Potatoes peeled and cubed.
  • 2 Vegetable Stock Cubes. I used Knorr.
  • 100 ml Milk.
  • 8 Instant Pot Cups Water.
  • Salt and Pepper.
  • 1 Clove Garlic.

Instructions
 

  • Add the rapeseed oil, onion, garlic, stock cubes and leek to the bottom of the Instant Pot pan, along with 1 cup of water. Set the machine to saute, and stir until the strong flavours are well combined. This took a few minutes for me.

  • Add the remaining ingredients, along with salt and pepper to your taste. IMPORTANT: Ensure you don't go over your pressure cooker maximum levels for high liquid content.

  • Stir the mixture and select the soup setting, which runs for 30 minutes.

  • Allow the pressure to release naturally.

  • Using an immersion blender, whizz away until you get the texture you are looking for.

  • Serve, or use the keep warm setting if you need to wait for a while.

This post contains an affiliate link.

Posted on 1 Comment

Soup Maker Recipe: Cream of Butternut Squash Soup

cream-of-butternut-squash-soup-2

Soup Maker Recipe: Cream of Butternut Squash Soup

Lesley Smith
Prep Time 10 minutes
Cook Time 21 minutes
Total Time 31 minutes
Course Soup Maker Recipe
Cuisine Soup
Servings 4 -6

Ingredients
  

  • 400 g Butternut Squash.
  • 150 g Leek chopped.
  • 150 g Onion chopped.
  • 200 ml Milk.
  • 2 Vegetable Stock Cubes.
  • Salt & Pepper.
  • 1 Teaspoon of Ginger spice.
  • Water.

Instructions
 

  • When you chop your butternut squash, leave the skin on. It makes the soup extra creamy in texture, but chop your pieces quite small, as butternut takes too long to cook if it's left in big chunks. The skin breaks down nicely for the smooth setting, but I'd probably remove it for a chunky soup.

  • Add all your ingredients to the soupmaker.

  • Top up with water, to above the minimum and below the maximum levels.

  • Crumble the stock cubes over the top, and mix well with a wooden spoon.

  • Add a dash of salt and pepper to taste.

  • Make sure your lid in on properly.

  • Choose the smooth setting.


cream-of-butternut-squash-soup

Posted on Leave a comment

Budget Meals: Peas Pudding Recipe

A lot of us are watching the pennies right now, so making meals that are both healthy and filling can be challenging on a budget.  With few ingredients, and whatever is in your cupboard, adding things to split green peas is fairly simple.

This makes a fairly large batch, so unless your diners don’t eat large portions, halving the quantities might be a good idea.

peas-pudding-2-1250

Peas Pudding Recipe

Lesley Smith
Prep Time 15 minutes
Cook Time 1 hour 25 minutes
Total Time 1 hour 40 minutes
Course Mains
Servings 10

Ingredients
  

  • 250 g Green Split Peas Dried
  • 150 g Onion chopped.
  • 150 g Leek chopped.
  • 50 g Butter.
  • Water.
  • 3 Vegetable Stock Cubes.
  • Salt and Pepper.
  • Herbs of Your Choice.
  • 1 Crushed Clove of Garlic or 1 Cube of Frozen Garlic.
  • 200 g Bacon Turkey or Chicken Strips.

Instructions
 

  • Put the green split peas into a fairly large pan, with around 1.5 litres of water. Bring to the boil and let simmer for around 40 minutes. You need to keep a close eye, as the water can boil off pretty quickly. You may need to top up the water levels.

  • Drain the green split peas, then pop them back into the pan, add all the other ingredients and adding 1.5 litres of water again. Mix well, and bring to the boil, letting this simmer until the water reduces by about two thirds. Be careful you don't leave this alone as it will burn quickly if you do. I added a good measure of salt and pepper at this stage. Some people add basil and thyme, and even rosemary, but I know my boys wouldn't eat that, so I leave it out.

  • Add your slushy peas mix to a baking tray, and let it set in the oven for around 25 minutes, at 180 degrees C. Your oven might take slightly less time, or more. It won't set firmly at all, but will be easy to cut when it's ready.

  • I cook my meat separately, and add it to the top of the peas pudding in the last five minutes, before removing from the oven. Some people add it when it first goes into the oven, and cook it as part of the dish.

peas-pudding-1-2000

Posted on 1 Comment

Review: Abakus Dried Jujube Fruit (Red Dates)

I don’t choose to try things, unless I know my kidlets or I will actually use them, so two items came top of my list recently, one of them being the jujube fruit

I’m a date snob, in that the only ones I like are Medjool dates, and I eat loads of them in a month.  They stop me craving sweets, and as they taste so caramel like, I never feel the need to eat any sweets.  That’s why I said yes to trying the Jujube dried fruit.

Abakus Jujube

Image Courtesy of Abakus Foods

The Jujube fruit, from Abakus Foods, is known as a red date, and has been eaten in Asia for thousands of years.  Jujube tells me that it’s used in Chinese Medicine for vitality and wellbeing.  As a natural sweetener, it was worth a try, and I wondered if the dried Jujube fruit might be an alternative for my Medjool date obsession.  It’d be nice to have something slightly different.

Dried Jujube Fruit jujube-fruit-3

You know when you open a pack of sweets, and five minutes later the pack is empty, depsite resolving only to try a couple?  Yup, that was me.  Couldn’t stop popping these into my mouth.

They tasted sweet, quite dry and spongy, with a slightly nutty taste to me.  It’s very pleasant indeed.  I could quite easily eat these instead of sweets though, which is always a good thing when it comes to fruit.  At 289 calories per 100g, a whole pack from Abakus only weighs 40g, which is the perfect snack size.   At 115 calories for about 14 of these red dates, it’s a great snack for me.  They’re a source of antioxidants and have no added sugar.

I’m hoping I can find these easily in shops to be honest.  They lasted me longer than a packet of crisps.

Suggestions from Abakus are to enjoy as a snack, add to porridge, salad and soups, use in baked goods and add to smoothies.  The actual dates, I’d just eat as they are.  I did eat them as they were.  I wouldn’t need suggestions for how to use these, they’re among my new favourites.

Jujube Crisps jujube-crisps-2

Jujube Foods says these are crunchy, light and sweet.  I found them slightly chewy crunchy, but that was fine, as they’re really really good, and would be much better for me than a packet of crisps when I’ve got a craving.  They are slightly higher in calories at 350g per 100g or 72 calories per 20g pack.

They make a decent snack, and would look awesome as part of a party susan, if that’s even what they’re called nowadays, with the lovely bright red colour on the outside and the pale middle.

Jujube Powderjujube-powder

This would be fab for adding to smoothies, desserts and sweet baking.  I actually quite liked just eating the powder, as it’s more of a crumbled biscuity texture.

I’d quite like to see how it performed as the base for a cheesecake, but that could work out rather expensive, so perhaps I’d try it to reduce how much of a biscuit base I use.

What do I think?

I had a look to see where I could get some of these, but my local supermarket doesn’t stock them, so I’ll have to head to Abacus itself.  Keep an eye out for these on the shelves though, especially if you like dates, and would like to try one with a nutty flavour.   I ate both packets of dried fruit and the crisps at once sitting, since both packets were open.  I couldn’t help myself…….  I’d all good intentions of adding these to cooking, but they didn’t last long enough, although that’s fine at 187 calories for the two packs.  That’s a good sign in my world, especially when it’s a healthy food.

Disclaimer: Thanks to Abakus Foods for the review samples.

Posted on Leave a comment

Operation Clear Out the Cupboards Soup Recipe

One thing about taking an unplanned for holiday, is that it impacts on the budget, so this week, I’ve been carrying out operation clear out the cupboards, and the fridge and freezer.  It’s a great excuse to use up all those things lurking in the back and might never see the light of day, until they’re out of date by a year or two.  I can’t be the only one who finds things like that……

My first port of call was the freezer, for all those half or nearly empty bags of frozen stuff that I keep in reserve to add to other dishes.   Out came the frozen bags of butternut squash, sweet potato, carrots, onion and peas.  I have a fridge drawer full of cucumbers the man grew, and loads of tatties from the plot, so it was easy to make a lovely big pot of soup.

It’s not the prettiest soup in the world, but it filled a fair few bellies a couple of times over.  What can you make from the depths of your cupboard or freezer?

operation-clear-out-cupboard-soup

Clear Out the Freezer Soup Recipe

Lesley Smith
Prep Time 15 minutes
Cook Time 45 minutes
Total Time 1 hour
Course Soup
Servings 10 + Bowls

Ingredients
  

  • 500 g Butternut Squash cubed.
  • 500 g Potatoes peeled and cubed.
  • 180 g Onions finely chopped.
  • 200 g Cucumber peeled and cubed.
  • 250 g Leek washed and chopped.
  • 100 g Carrot sliced.
  • 200 g Petit Pois.
  • 2.4 Litres Water. 1,75 kettles full for me
  • 4 Vegetable Stock Cubes.
  • 1 Tablespoon Marmite.
  • Salt and Pepper to taste.

Instructions
 

  • Add all the ingredients to the pot. Many were frozen, and if I'd had more time, I'd have given the onions and leek a quick fry first, but on this occasion, I just lumped them all into a big pot.

  • Top up with your water, to above the level of your vegetables. You can add more water later if you need to, and some salt and pepper.

  • Stir well, and bring to the boil, then simmer gently until the vegetables are cooked.

  • Use a potato masher to mash down some of the vegetables, to thicken the soup slightly, but still leave enough to give the soup some body.

  • Add the frozen peas, and when they're completely defrosted and heated, your soup is cooked.

operation-clear-out-cupboard-soup-2


Posted on 6 Comments

Quick and Easy Millionaire Shortbread Recipe

This came about due to a child who opened a tin of caramel, just to put a couple of spoons on his ice-cream.  He then added some to a piece of cake, heated it in the microwave, and proceeded to sip it with a spoon.  In order to ensure he didn’t finish the entire tin and end up on a sugar high, I quickly grabbed what was left of the tin, around half, and scooped it into a little bowl while I smushed up some Digestives.

Would I use this kind of caramel again – you betcha – although the finished result is far more runny in the caramel stakes than caramel you actually cook up on the stove.  This was much faster and with the caramel cold, the chocolate can go almost immediately on the top.

millionaire-shortbread-2

Quick and Easy Millionaire Shortbread Recipe

Lesley Smith
5 from 1 vote
Prep Time 10 minutes
Cook Time 10 minutes
Total Time 20 minutes
Course Baking
Servings 8

Ingredients
  

  • Half Tin Caramel.
  • 8 Digestive Biscuits. I used Tesco.
  • 60 g Butter.
  • 200 g Chocolate. I used Tesco value milk chocolate as that's what I had. I could have got away with less chocolate.

Instructions
 

  • All I did here was smush the digestives in a small pan, with a steak tenderiser. It was fast, and much preferable to putting the biscuits into a bag and smushing them that way. Less mess and no chance of the bag bursting.

  • Add the butter to the biscuits. I did think about microwaving, but as the digestives were in a pan, I just put in the butter, and heated it up. I used soft butter, otherwise, having the biscuit in at the same time as the butter could have ended up with toasted digestives.

  • Once the butter is melted and mixed in with the biscuits, take off the hob and put it into a small cake tin. I had some paper cases, so used one of those. It was about 6 inches in diameter. Spread the biscuit base and pat it down with the back of a spoon.

  • The caramel is cold, so I didn't wait for the base to cool. I simply spread the caramel over the top, and gently made sure the whole base was covered.

  • No need to wait for your other ingredients to cool, as with the cold caramel, it was straight onto the chocolate. I melted it in the microwave, 30 seconds at a time, then stirring madly, until all the chocolate was nice and gooey. Spread over the top, pop into the fridge, and take it out before completely cool, to score the top of the chocolate. Pop it back into the fridge for a while, and the base will be easy to cut and break up.

millionaire-shortbread-7


Posted on Leave a comment

Quick and Easy Apple Turnovers

Ever wondered what to do with that spare apple or two that nobody wants, or the odd ones that fall from the tree?  My youngest came home from school, all fired up to show us what he’d made so quickly with an apple at school.

Apple Turnovers 3

Who am I to say no to that…..

No measurements, no being picky, this is just a pinch here and there and off you go.

I’d a block of 425g Puff Pastry, and we used about a third to a half for this.

Yield: 4-4.5 Apple Turnovers.

Ingredients

  • Puff Pastry – around 200g.
  • Sugar.
  • Milk.
  • 2 Small Apples or 1 Large.

Method

  1. Roll out the pastry, to an approximate large square.

    Apple Turnovers Prep 4

  2. Cut the pastry into smaller squares, so that you have four. Tidy the edges if you feel you need to. Littlest had made a couple of his more of a rectangle, so we had to fiddle around with it a bit at the stuffing stage.

    Apple Turnovers Prep 3

  3. Peel, core and chop the apple, then divide it up into your pastry pieces, in the centre.

    Apple Turnovers Prep 2

  4. Fold the squares over, point to point, then press down on the edges with a fork.

    Apple Turnovers Prep 1

  5. Brush the tops with milk, then sprinkle on sugar before piercing the turnovers.  Then, simply bake in pre-heated over at 220 Degrees, or following your own pastry pack advice, for around 15 minutes.

Apple Turnovers 2

Posted on 2 Comments

Snack Recipe: Stuffed Mushroom with Protein Cheese and Sun Dried Tomatoes

We were sent a pack of Protein Cheese to try, and I first used it to make a lovely wee snack, which isn’t high in calories, nor in fat or carbs, which is always good for us diabetics, or for those watching our weight, as well as just wanting something a little different.

Protein Cheese, by eatlean, seems to be new on the market, although we had our sample for a while before I opened it.  At first, I found it a little strange-looking, as it seemed slightly translucent, but how it looks, doesn’t affect how it tastes.    With 37g protein and only 3% fat in every 100g, it’s a good option.  It’s also suitable for vegetarians, and made in the UK, using milk from the UK.  I’ve even spotted it in my local supermarket recently, so it’s becoming more well-known.

These mushrooms with cheese and sun-dried tomatoes, would even make a great tasting raw food addition as a starter or party nibble.

Mushrooms Protein Cheese 2

Each Single Mushroom Snack.

  • 32 Calories
  • 4.6g Carb
  • 0.4g Fat
  • 1.8g Protein

Stuffed Mushroom with Protein Cheese and Sun Dried Tomatoes

Lesley Smith
Prep Time 5 minutes
Cook Time 15 minutes
Total Time 20 minutes
Servings 5 Mushrooms
Calories 160 kcal

Ingredients
  

  • 100 g Mushrooms centre stalk removed and slightly hollowed out.
  • 3 Sun Dried Tomatoes sliced, or 25g.
  • 30 g Protein Cheese grated.

Instructions
 

  • For this, I used regular sized mushrooms, and not large ones, although the big ones would do fine too. I got 5 mushrooms for my 100g and slightly hollowed them out.

  • I used sundried tomatoes from a jar, and washed mine thoroughly before using them. I wanted all the oil off them.

  • Place some cheese in the mushrooms, then popped some sun dried tomatoes on top, before adding a few more strands of cheese on top.

  • Pop your snack into the oven around 180 degrees for 15 minutes.


Posted on Leave a comment

Konjac Flour: Pasta and Rice with only 8 calories per 100g… Surely not!

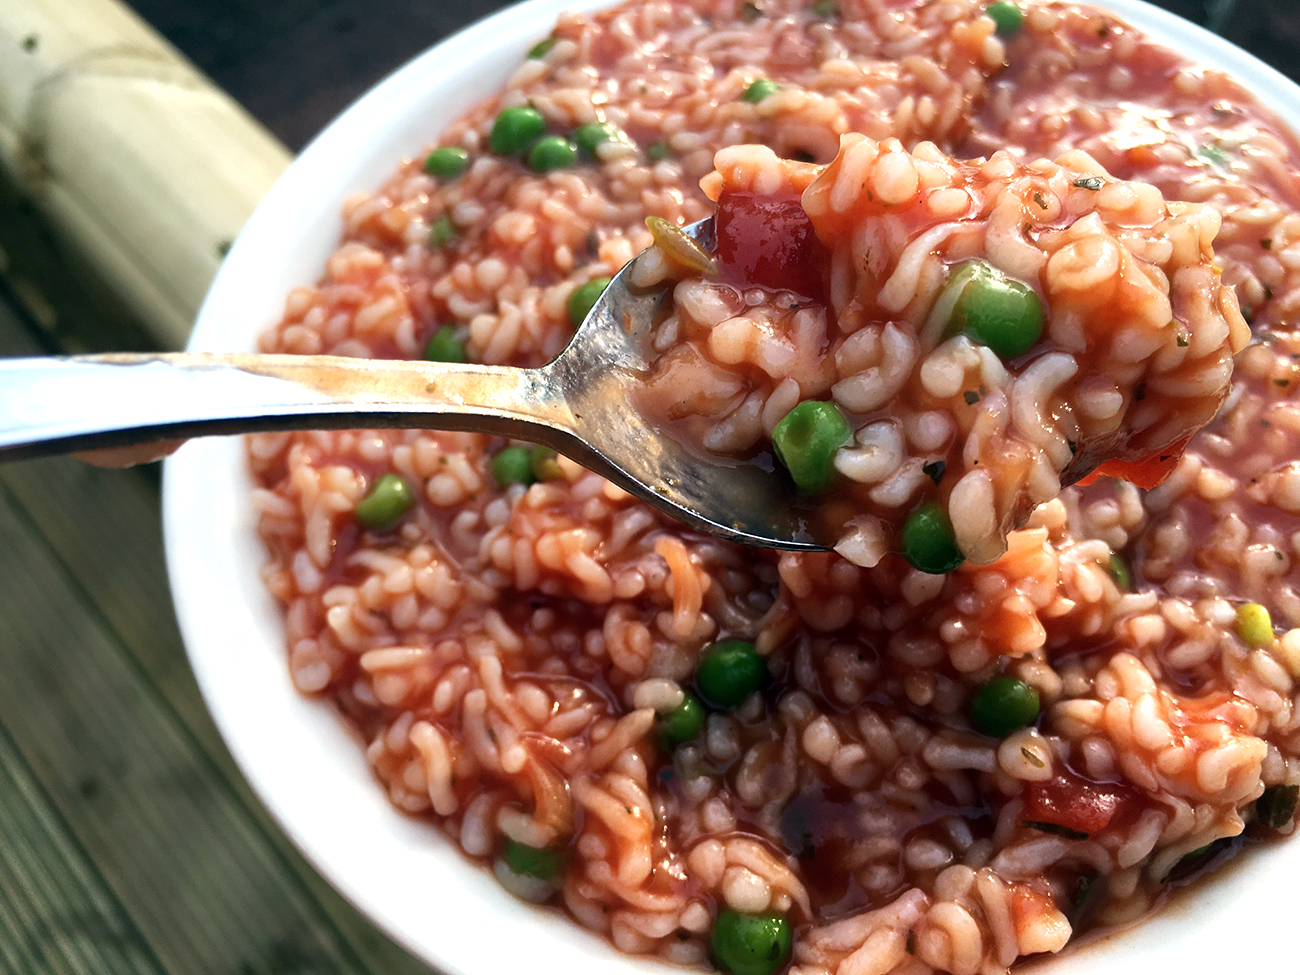
This is seriously my first try with those pasta and rice replacements, the Konjac Flour ones, that are mainly water.  With 8kcals per 100g of drained rice in the version I just tried, its a serious way to reduce calories for those who watch their carbs like me.   How bad could it be?    It only has 0.1g Carbohydrate per 100g.  That’s almost zero calories for a lot of food.

This is rice shaped konjac noodles, not actual rice itself.  I think I expected a more ricey texture and shape, and that’s where I failed at the outset.  The product doesn’t try to pretend it’s something that it’s not, but I did misread the label and half expected a rice like texture.  I’ve left my image until the end, in case it hits you the same way as it does me.

What are Konjac Noodles?

Well, they’ve been hailed as a dieter’s dream.   There are several brands, mostly around noodles.  barenaked rice, Zero Noodles, Slim Rice / Slim Noodles / Shirataki Noodles.   They’re all made of the same thing.  The Konjac plant is a red flower with one leaf, and a long spike, that’s grown in Asia.  Most noodles will come from and be imported from China.

It’s generally known as a starchy tuber, that is processed into glucomannan flour, which is then used to make the noodles.  The rice I have, actually looks like pasta, but far too much like squiggly little worms for my eyes to come to terms with.

Although they’ve been around in Japan for years, they’ve only recently been gaining popularity over here, and I can’t believe I’ve gone all this time without even ever hearing about them.  It all started when I spotted a pack in Sainsburys and picked them up to read the pack.  My first thought was that it was a con, and complete rubbish.   Some people know these as water noodles as they’re so high in water content, which probably explains why they actually taste of nothing until they’re mixed with other ingredients.

The generic Google bumf says these noodles are to fill us up, or to bulk out our food.   I do love pasta, and I miss it now that I rarely eat it, so finding something to replace that would be perfect, but Sainsbury didn’t have the pasta version, so the rice it had to be.

The rice/noodles contain 96 per cent water and less than 4 per cent glucomannan fibre.  I checked reviews, and there were so many positive ones, I thought I’d give it a go.  I already had my “barenaked rice,” to try them out, but wished I’d gone for the proper pasta versions and ordered online. The rice is just tiny rice sized pieces of the larger pasta versions.

There were also as much negative reviews as there were positive, so I was a little cautious from the outset.  Complaints included a fishy smell when the packet is opened, to the rubbery texture when it’s eaten.  So here goes.  I added it to a mix I make frequently for myself, with Dolmio Light Sauce and peas.

Konjac dolmio light

My Ingredients

  • 1 Pack konjac noodle rice replacement – 250g drained. (20 calories)
  • 50g Peas.
  • 200g Dolmio Light Sauce. (78 calories)
  • Salt.

My Cooking Method

Step 1

On opening the pack, the fishy smell was there.  I put my rice into a sieve and ran it under cold water for a couple of minutes, and the smell was gone.  In truth, the smell was no worse than buying fresh cod or haddock and getting it home, so it didn’t smell half as bad as the reviews said – to me – anyway.

konjac barenaked rice 2

Step 2

Cook the rice on the hob for around 8-10 minutes, with a little salt.  I didn’t want to take the chance of the fishy smell still being there.

Step 3

Sieve off the water and rinse through again.

Step 4

Return the hob, add the peas and Dolmio sauce, heat thoroughly.

Result

To be honest, it didn’t soak up the Dolmio like rice does, and it looked pretty awful in the bowl.   Eating it wasn’t as bad as I thought it would be, but as rice, it slides down and the texture is more rubbery than rice.

It didn’t replace my rice craving, but it did fill my belly with a couple of spoonfuls.

I think the fact my dish looked more like little worms in my Dolmio put me off, and I might prefer this rice in a stir fry.  The taste wasn’t as bad as I thought it would be, so I’m prepared to try it out with some different dishes, and one that doesn’t look like squiggly worms when I’m eating it.  

I couldn’t finish more than two small spoons of this, but it’s given me ideas, and I think I could tolerate it better as a proper pasta dish, where it doesn’t look off-putting in the dish.  Actually, I might not even notice it isn’t real pasta at all, as it has a similar mouth feel to pasta for me, but slightly more rubbery.

How it looked was what stopped me eating it, rather than how it tasted.  It didn’t taste terrible at all.  It took on the flavour of the Dolmio very well, so although it isn’t a true replacement for rice, it does reduce calories going into the belly.  I couldn’t cope with it as a rice replacement, but as a pasta one, I think Konjac and I will get on very well.

See what I mean below…  Little worms.  I just couldn’t…  It’d be much better in a stir fry for me I think, but if the appearance doesn’t put you off, it could be a very good bulking agent for other foods indeed.

Konjac barenaked rice featured

Posted on Leave a comment

Recipe: Oaty Sticky Toffee Pudding using Hamlyn’s Scottish Oatmeal

Oaty Sticky Toffee Pudding 1300

Halmyns LeafletAlong with a few fellow bloggers, I had the opportunity to appear in a leaflet for the Scottish Royal Highland Show this year.

Hamlyns of Scotland, who commissioned the leaflet, kindly gave me permission to post my recipe on my blog too.  Here it is, the front cover of the leaflet, which apparently went down very well, and the recipe and images from making sticky toffee pudding with some oaty goodness in it.

I think I might even try replacing all the flour with oatmeal at my next attempt with this.  The consistency might be different, but as I love the nutty taste of oatmeal, I suspect it would go down very well here.

Oaty Sticky Toffee Pudding Recipe

Oaty Sticky Toffee Pudding 8 650

Ingredients

For the pudding.

  • 200g Medjool Dates, stones removed.
  • 100g Self Raising Flour.
  • 100g Hamlyns Scottish Oatmeal.Oaty Sticky Toffee Pudding - Hamlyns Oatmeal 650
  • 150ml Boiling Water.
  • 2 Teaspoons Bicarbonate of Soda.
  • 2 Eggs.
  • 100g Butter.
  • 2 Tablespoons Black Treacle.
  • 150g Demerara Sugar.
  • 100ml Double Cream.

For the toffee sauce.

  • 350g Golden Caster Sugar.
  • 100g Butter, cubed.
  • 500ml Double Cream.
  • 1 Tablespoon Black Treacle.

Method

For the pudding.

  1. Chop the dates into small pieces. Put them into a bowl and pour over the boiling water and set them aside.  Leave them to soak in until everything else is done.Oaty Sticky Toffee Pudding - Add Dates Mashed Into Water 650
  2. Put your oven on, to around 170C/160C (Fan).
  3. In a mixing bowl, add your flour, oatmeal, bicarbonate of soda and sugar, and stir it around. Melt your butter so that it’s easy to mix in, and add it, along with your eggs and black treacle.  Mix by hand, or use a low setting on a mixer, to ensure the mix isn’t handled too roughly.  When the pudding mix looks slightly curdled, add in the double cream and fold it in by hand.  Don’t worry about the texture.  At this point, it might resemble batter more than pudding mix.  Just remember, that it isn’t a cake mix and doesn’t need lots of air added.  Using a spatula to scrape the sides and bottom of your bowl is a good idea.Oaty Sticky Toffee Pudding - Mix Ingredients 650
  4. Mash the dates into the water, then pour it all into the bowl with the rest of your ingredients. Again, fold in by hand.  The mix may look curdled, but it’s fine.
  5. Grease your baking tins and pour the mixture in. I used two moulds.  One traditional round pudding mould and a flat one for the family to tuck into as soon as our toffee pudding was ready.
  6. Bake for 25-30 minutes, until the pudding is cooked.

For the toffee sauce.

  1. In a thick bottomed pan, add the sugar and butter with around three quarters of the cream, then slowly bring to the boil, stirring all the time.
  2. When the sugar is dissolved, add the black treacle and bring the mix to the boil, letting it bubble for a minute or two at the most.
  3. Take the sauce off the heat and beat in the remaining cream. Your mix will be a gorgeous toffee colour, and look lovely and glossy.Oaty Sticky Toffee Pudding - Toffee Sauce 650

Combining the pudding and sauce.

Oaty Sticky Toffee Pudding - Pour Toffee Sauce over and Leave to Soak 2 650

  1. Slide a knife or spatula around the edges of your cakes, and slide them out of the tins if possible. If a little of the cake sticks to the bottom, its fine.  Just use your spatula to scrape it out and pop it on top, then use a knife to smooth it out.  The pudding is gooey and it will repair easily and can even be slightly moulded if needed.  Toffee sauce is going on the top, and it will hide any slight imperfection.  If in doubt, wait until your pudding is cooler before attempting to remove it from the mould.
  2. Pour a little toffee sauce into the bottom of your moulds. Replace your pudding, letting it sit in the toffee sauce, then pour some more on top.  Keep aside around one third of the toffee sauce for serving.
  3. If you’ve left the pudding overnight to soak up the toffee sauce, it will be more sticky and gooey than if eaten immediately. If you want to heat the pudding up before serving, that’s fine too.
  4. Enjoy on its own, or with a little yoghurt and strawberries.

Oaty Sticky Toffee Pudding 1 650